|
How did you celebrate Computer Science Education Week? In the third consecutive month with a tech week to celebrate (October - Digital Citizenship Week, November - Media Literacy Week, and December - Computer Science Education Week) my fellow integrator, Anita Moose (@amooseIT), and I were pretty fried after organizing the first two and not sure how to get back up and excited for this huge event. Anita proved to be key to getting us motivated and excited by rallying the troops and reaching out to our middle school coding classes. She then matched them with elementary classes K-4th grade to share their knowledge of basic coding with some fun unplugged and digital activities. In addition to having students teach students, we held lunch sessions in the middle and high school with Ozobots, Osmo, and hour of code activities on the Chromebooks.
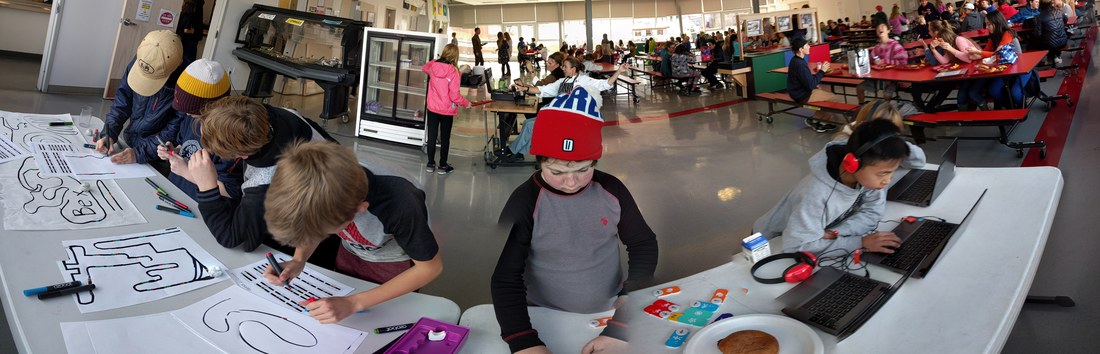
Panorama shot of AMS students playing with Ozobots, Osmo, and Hour of Code Chromebook activities during lunch.
Our most concentrated effort was having coding and CS centers on rotation in the elementary school library with the help of our amazing librarian, Lisa May Howard (@aeslib) and AES G/T teacher, Julie WIlle (@jpwille). Using Bee-Bots, Pro-Bots, Ozobots, and code.org activities, every single student in the elementary got exposure to a variety of coding and CS concepts throughout the week with time to play, explore, and problem-solve.
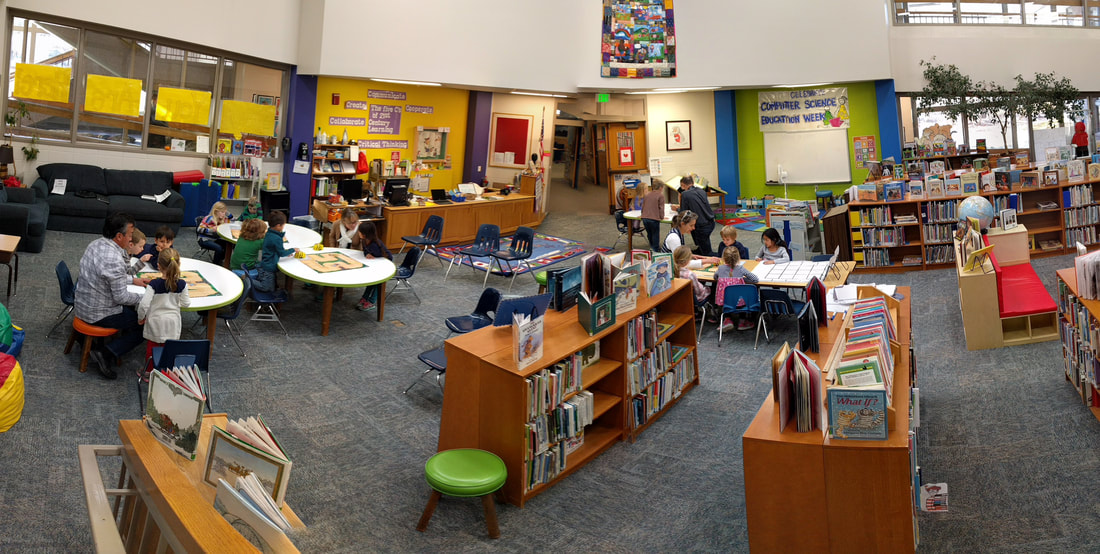
Panorama shot of students working at various coding/CS centers in the AES Library.
The three buttons below will give you access to each of the resource documents Anita and I put together for teachers to use during and after CS Education week. We included videos, unplugged resources, and online activities.
Though we are getting more traction at including coding and CS (Computer Science) in students' everyday curriculum, it was still important to provide a specific focus on these topics to create excitement for pursuing these topics from the students and teachers. The underlying goal of each of the weeks was to encourage teachers to keep using the concepts throughout the year for a more comprehensive understanding and use. That's why we created resource documents for each topic (Digital Citizenship, Media Literacy, and Computer Science), to provide consistent access for teachers and allow them to go back at their convenience and use when applicable. The hope is that these weeks will soon be showcases of the great work already being done throughout the year. Please share any great resources you've used for this week or successes you've had.
0 Comments

Image retrieved from EdtechTeam
You've often heard my ranting and raving about the great things done for edtech and education from the amazing people at the EdTechTeam. I was accepted to present at their Colorado Summit in Louisville, CO this November and joined 600+ educators for a weekend of fun and learning. It was truly an awesome event and a bit overwhelming with all the participants and presenters to hone in on the best tips, tricks, and practices to take-away and back to my teachers. Here is a list of the amazing things I gained from this incredible two day event:
1. Chromebooks are the answer! - I'm sure this could spark a lengthy debate on which device is the most effective for student learning and there can be a case made for a variety of devices depending on environment, but the more I speak with other educators in a variety of situations the Chromebook continually seems to rise to the top. In my district we have been steadily moving mostly to Chromebooks for students, but still have a mix of devices including iPads, iTouches, Android tablets, Macs and PCs. The Chromebooks are a breeze to manage using the Admin console and the simplified interface of the Chrome OS lets students get just about everything and anything done within the GSuite workflow.
Once you do take the plunge into the world of Chromebooks there are plenty of great tips you and your students can use to maximize your experience. I sat in on a session with Sean Williams (@seani) who walked us through some of the useful shortcuts, apps/add-ons, and extensions. Review his slideshow HERE, but some of my favorite are: Shortcuts - save yourself some time and sanity with these keyboard shortcuts. Ctrl+Shift+T - Open your last closed tab(s) Ctrl+Windows Switcher - screenshot Ctrl+Shift+Windows Switcher - selected area screenshot Ctrl+Shift+? - Pull up a map of all the available keyboard shortcuts and what they do. Extensions - get the most out of your Chrome experience with great extensions to improve you and your students workflow. Extensity - as you continue to add more and more extensions you may notice some issues with performance. Too Long; Didn't Read (TLDR) - this extension has been out for a while, but seemed to take a hiatus and wasn't working for the past year or more for most users. Well it's back, and I urge you to use it with your students to get great short summaries of any website and assist with their reading and summary skills. Add-ons and Apps - when working in a Chrome environment it's always key to find useful apps or add-ons to allow you and your students to do more. Apps are currently being phased out in the Chrome environment so they are essentially websites again. Equatio - allows you to insert complex equations into most GSuite tools. Use voice, handwriting (touchscreen required), or keyboard input. NOW FREE FOR TEACHERS!! Draftback - add-on for Google docs that enhances the existing 'version history' that can be used to see past revisions and revert back to those versions. Great way for you and your students to watch the evolution of the writing process and reflect on practice. Desmos - a powerful graphing, web-based, calculator that can be used individually or as a class with teacher-led activities and instruction. Google Keep - turn your sticky notes digital! Create to do lists, notes, and reminders that can be shared with others, organized, and inserted into Google docs.
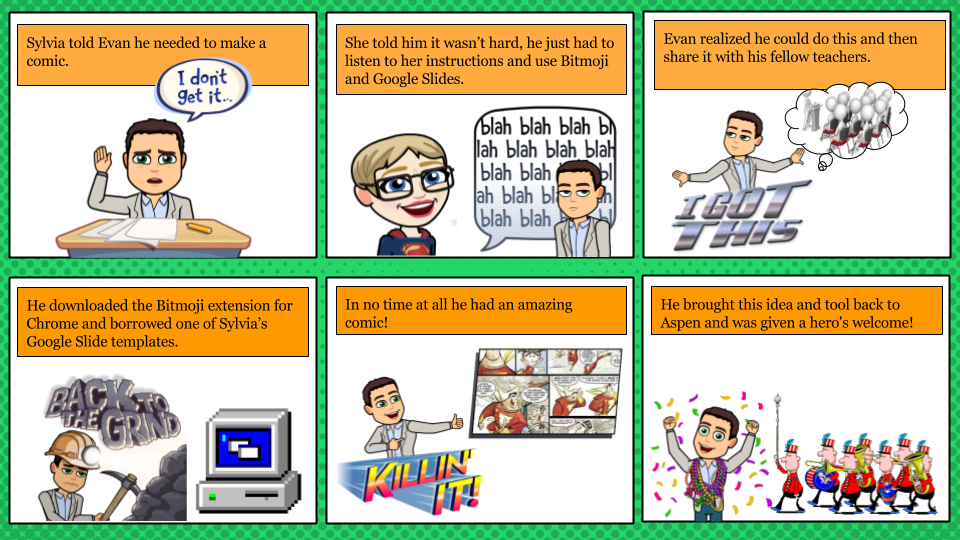
2. Bitmojis and Google Slides - There are a ton of great uses for Google Slides in the classroom and I was blown away by Sylvia Duckworth's (@sylviaduckworth) presentation on tying together the Chrome extension Bitmoji and Google Slides to create fun comics for teachers or students to use. Many of us have already dipped in the Bitmoji world via Snapchat, but utilizing the Chrome extension is a great way to use these fun comics to create meaningful digital literature for both students and teachers to express themselves. Check out Sylvia's presentation HERE and her website (sylviaduckworth.com) for more awesome ideas and how to get started.
3. Sketchnoting - Another great topic championed by Sylvia Duckworth. She gave several presentations during the summit to help people get started and advance their skills in how sketchnoting can work in the educational environment. As we do move to an more digital environment for students it's important to still provide students with tactile ways to record and remember information. There often seems to be a disconnect if students simply type down their notes and we are getting closer with the tools available to live comfortably in both worlds. I cannot do the topic justice in comparison to Sylvia so please check out her presentation HERE, blogpost HERE, and her website for more information on how to find the best tools and strategies for you.
We were also introduced to Rocketbook which combines the best of both worlds when it comes to taking notes and keeping digital records. Sketchnote, doodle, draw, scribble, etc... and use an app on your phone to send your documents to a variety of locations all at once. Very cool tool I recommend checking out. 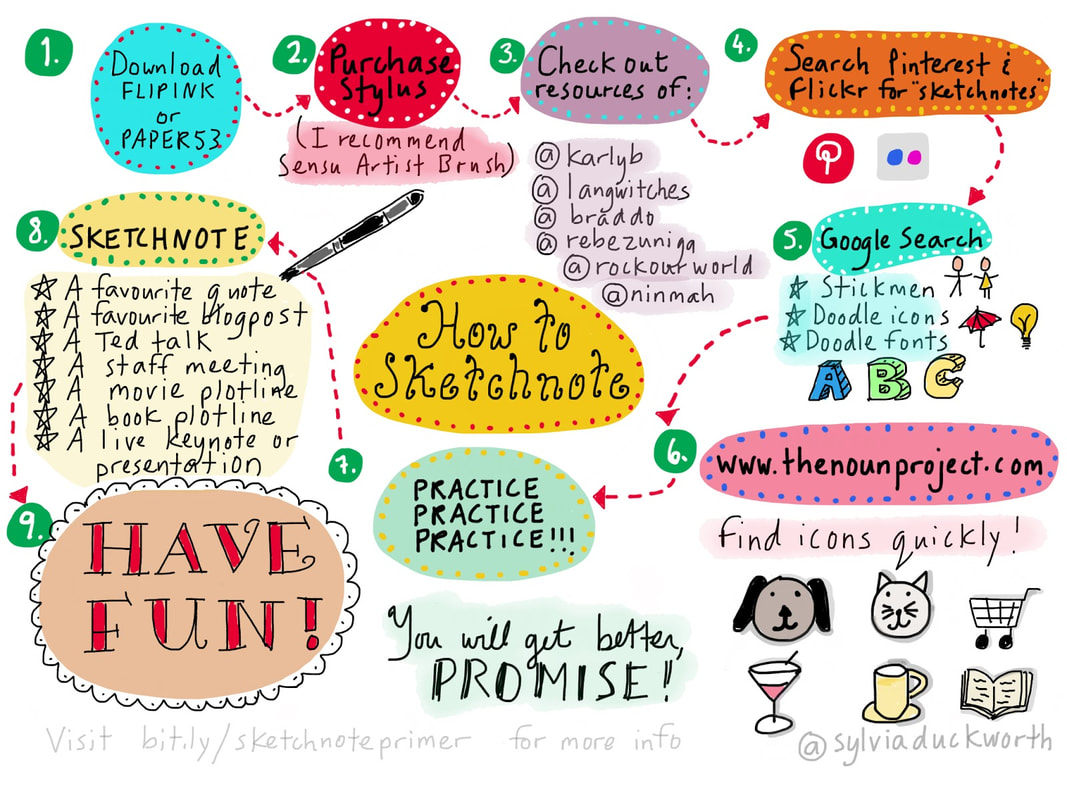
Duckworth, Sylvia. “How to Sketchnote.” ETools for Language Teachers, 26 Dec. 2014, mmeduckworth.blogspot.ca/2014/12/sketchnoting-or-visual-note-taking.html.
4. The Power of Sheets - We need to start thinking of Google Sheets as much more than a data collection repository. Ben Johnson, Media Specialist at Rocky Mountain HS, showcased some simple but extremely effective add-ons and resources that make Sheets a powerful tool. Taking things to the next level will find you using the script editor to create your own javascript to enhance the function of a Google Sheet. If you're not ready to write your own code then take advantage of those who already have it done such as Flippity.net, Teacher Tech w/ Alice Keeler (@alicekeeler), or Knight Lab for amazing tools ready to go and boost your effectiveness.
My favorite take-away was the WolframAlpha add-on which essentially puts the power of Siri into your Google Sheets. Insert questions into your sheet and use the add-on to quickly grab the answers. This is obviously the most simplistic use of this amazingly powerful add-on so add this to your Sheets and start playing.
So there you have some of my biggest takeaways from the incredible Colorado Summit put on by the EdtechTeam. Alas, I am only one man so there was no doubt a plethora of other great things happening that I couldn't get to throughout the Summit. I've said it in previous posts, but if you are able be sure to make the time to go check out a summit near you. The information, connections, recharging, and excitment gained from this two day event is incredible. Feel free to comment on any of the topics above or any great ideas you've taken away from this or another EdtechTeam Summit.
Dowd, Heather, and Patrick Green. Classroom Management in the Digital Age. Digital image. Classroom Management in the Digital Age. N.p., n.d. Web. 1 Sept. 2017.
My awesome fellow Integrator and #ETCoach, Anita Moose, recently organized a book study for the book Classroom Management in the Digital Age. If you haven't yet checked out this amazing resource I recommend you go grab yourself a copy right away and get reading as this school year begins to hit full stride.
One aspect of the book I really liked was its lack of focus on a specific technology or device. With so many options out there for schools and classrooms it's great to see a focus on the strategies and skills needed to be successful in any classroom that is technology-rich regardless of type of device or tool. Here are some of my take-aways from the book:
Those are a just a few of the great topics in this guide, but having your own copy on hand gives you access to a library of strategies with far more depth. My partner, Anita, arranged a hour long twitter chat with the authors and members of her book study, below you will find some highlights of the conversation, but the entirety of the chat can be found using the hashtag #CMDigitalAge. Not only is it important to reflect on these ideas and strategies, but collaborating with fellow educators can help move the design process along for shaping your policy and expectations.
There's nothing quite like the real thing, so consider picking up yourself a copy of Classroom Management in the Digital Age and join the conversation on twitter at #CMDigitalAge. Please comment below on any of your highlights from this resource.

I've been a big fan of the EdTechTeam and their awesome summits providing meaningful and exciting edtech PD for teachers. They have also branched into online learning and offer a multitude of great courses through EdTechTeam Online. These course focus on GSuite tools for education, Apple Teachers, Paperless classrooms, assistive technology, teacher leaders, and other critical teaching tools and strategies. Courses are anywhere, anytime learning that can be taken for graduate credit. This summer I took their Creating Global Learners with Geo Tools course and was pleasantly surprised at the power of GSuite tools like Google Maps to enhance a teacher's lesson in far more areas than just Geography.
Being an extensive GSuite for EDU user I was amazed at all the new tools and ideas I gained from taking this course. The possibilities of utilizing Google Maps to teach a multitude of subjects and help students gain a global perspective is seemingly endless! One of the things that really stuck out to me was the http://www.geteach.com/ map comparison engine. I see a lot of use of this tool for students to get amazing visuals on data that can be used for a lot of teaching purposes. Another tool that I really saw the benefit of was using My Maps as an alternative presentation tool for teachers and students that helps look outside of their world. The Google Lit Trips is a great place to get started and I plan on sharing that right away. I really hope to promote the use of this with the teachers in my school and get the students engaged in different and broader way than they are used to.
Here are some of the resources I explored in the course that really stuck out:
Google Art Project - Great resource to expose students to digital media resources for history and art. Specifically, the historical figures section provides access to great pictures and primary sources that can be used for students to create their own narratives about a figure and then do some research to compare stories and facts. Google Crisis Map - Interactive Map allows students to layer various types of data about various crisis situations nationally and worldwide. The weather, hazards, emergency preparedness map would be a great basis to teach students how to collect data and analyze patterns from different regions with other corresponding data to make their own hypothesis on why the weather and hazards may be occurring. GeoGuessr - Game that uses Google Street view to give clues about a mystery location in the world. Great way to teach students to use context clues to be able to narrow down a location based on what they can see and what makes sense in a particular region. Into the Wild map - My Map creation of the locations visited by Christopher McCandless from the story Into the Wild. This could be used as an example of how students could use My Maps to create their own maps based on a book they’ve read. Including links and other resources at various locations mapped from their story. Google Street Art - Access to audio tours, online exhibitions, world collection, and artist stories to provide students access to a genre of art that isn’t always easily accessible and can be just as moving as traditional art. Good way to get students interested in art who may not be interested in traditional art.
My final project was to create a lesson using My Maps to help students become better global citizens and understand a larger impact they and others have on our world. I chose to focus on population growth and what it could mean for various places and cultures around the world. Use the button below to access the lesson plan and feel free to use it or modify it for yourself.
My post may have given you some insight to how tools like My Maps can greatly enhance your teaching and students' path to becoming global learners, but there's nothing like the real thing. Go check out the EdTechTeam Online learning place and take advantage of some great courses they have to offer. Feel free to comment below on any ways you've helped your students become global learners or utilized tools like My Maps in your teaching.
I was very excited to have an opportunity to attend and present at the EdTechTeam Summit April 29th-30th in Breckenridge, CO. I always jump at the chance to take advantage of an event so close to Aspen that never disappoints and always provides me with great resources and ideas to take back to my staff. Below you will find some of the strategies and tools that stuck out to me during my two days at this awesome event:
Make Learning Visible! Creating Student Digital Portfolios with the new Google Sites - Everyone seems interested in utilizing digital portfolios as the most effective way to display student work, and most importantly, understanding. The biggest question has become how do we do it? There are plenty of avenues out there and if you are a Google school then I think the new Google Sites has to top your list. The site revamp has really made sites a useful tool and with many of the same sharing and privacy functionality as a Google Doc it becomes very easy for students to use and limit visibility until the time is right. Some updates to the functionality of the teacher-student workflow would be nice (Hey Site Maestro!) but I think the pros far out weigh the cons. Check out the amazing resources and presentation by Pamela Lewis for more great info on getting started.
Map What? Map That! - Google Maps and My Maps are two amazingly powerful tools that can be taken advantage of in many ways in the classroom. Mapping data from a Google Forms survey can give incredible visual context to what is being collected. By coming several of the GSuite tools a fun and interactive scavenger hunt can be created that has students traveling to various locations around the globe watching informational videos on YouTube, answering questions in Google Forms, and retrieving information from Google Slides and Google searches. Check out Leslie Davison's presentation for more details on what activities like this can look like. Zero to Ninja: Sheets and Forms- EdTechTeam's Michael Wacker walked us through the process of becoming Google Sheets and Forms Ninjas by completing a self-paced activity that earned you digital badges along the way based on your completion. So while learning a bit more about Google Sheets and Forms was nice, the real take-away I had was the process of becoming a "Ninja" and earning the digital badges that came with each level of accomplishment. The process was set up through Google Slides which provided the instructions for each activity and then a final submission of which levels you completed via Google Forms gave you the necessary codes to get your badges and keep them in a Google Sheets trophy case. The badging process was facilitated through a great add-on created by Daniel Sharpe that can easily be used for multiple applications. I see so many applications of this process both with students and teachers. Check out Wacker's site with the ability to become a Ninja in all the GSuite apps. There you have three of my big take-aways from yet another amazing two days of PD, learning, connection and excitement at the EdTechTeam Breckenridge summit. Below you will find another summary of my reflection on two things learned and how I hope to apply them in my own practice. Feel free to comment below on any experience you have had with any of these tools/ideas and what works for you and your students/staff.
When making a push to integrate technology into our classrooms the ASD tech team wanted to find a way to reach our educators in a deeper way then simply showing them "cool" tools that can make their teaching easier and their students more engaged (though those are good things too!). We found ourselves looking at our own philosophy on how we view technology in education and had hoped that the teachers would find our department's foundational pieces as enlightening and helpful as we did.
It came down to two models for viewing technology and its integration in to the classroom. SAMR (Substitution, Augmentation, Modification, and Redefinition) and TPACK (Technology, Pedagogy, and Content Knowledge) are fairly well known and are used by many teachers and schools to evaluate or reflection on how they are using technology, but I feel they are often set aside when a teacher keeps coming back to using various technology to support their teaching and a student's learning. Our tech team felt that if we could provide a interactive refresher for staff to look at these two models and define them in their own terms, then maybe we could spark the idea of how to effectively integrate technology in their classrooms and use us as a resource to do it. SAMR - There are lots of resources out there to look at what exactly SAMR means and how it applies to educational technology. I really like the video explanation by Common Sense Media found here. Created by Dr. Ruben Puentedura, this model frames how technology can be used in education and what the evolution looks like as more tools and increased skill levels are applied. I like the analogy that this model is like a pool: depending on what you are trying to accomplish a simple substitution or augmentation might be as far as you need to take it, but getting into the deep end of modification and redefinition is where the most authentic learning will take place and really transform what you are doing. 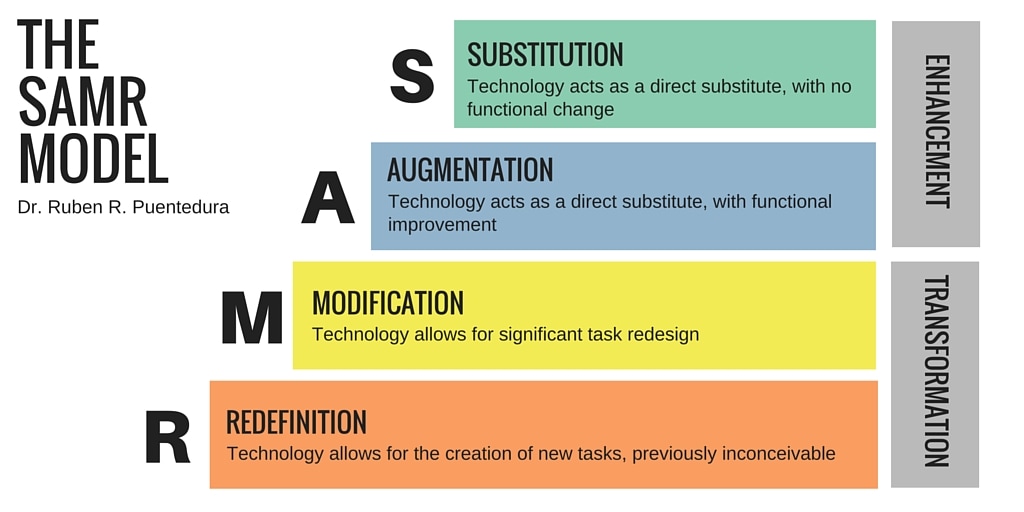
TPACK - I have a special place in my heart for the TPACK model as I am a graduate of the MAET program at Michigan State (Go Green!). Again, I really like the video introduction and explanation done by Common Sense Media found here. Created by Punya Mishra and Matthew J. Koehler at Michigan State University the TPACK model looks at three major areas in education and teaching: It looks at Content Knowledge, Pedagogical Knowledge, and Technological Knowledge and frames it in a Venn diagram to help visualize the intersection of these important areas and how they work together and can build on one another to create excellent teaching practice and in turn, student learning
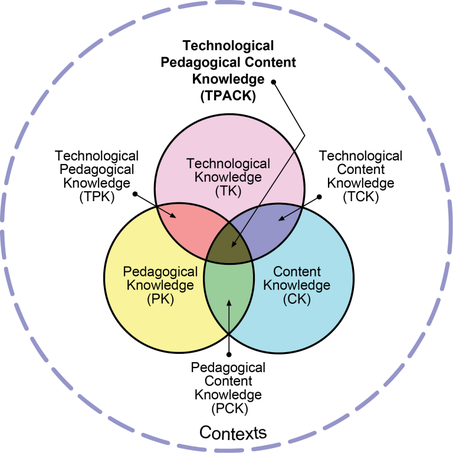
http://tpack.org
So in order to expose our staff to these two models and how they applied to technology integration we created the slideshow below and had teachers spend time in small groups learning and jigsawing ideas of what these concepts mean to them and how they can apply it to their own teaching. We did the presentation three separate times in each of our buildings and were amazed at how engaged and thoughtful the staff was at working through this process. Shortly after each presentation my fellow integrator (Anita Moose) and I were constantly approached to help teachers with ideas or next steps for using these concepts to better integrate technology into their lessons. Feel free to make copies, modify, and use with your own staff to teach these crucial concepts of technology integration. Comment below on any experiences you have had with these two models and any success or struggles with implementing them.
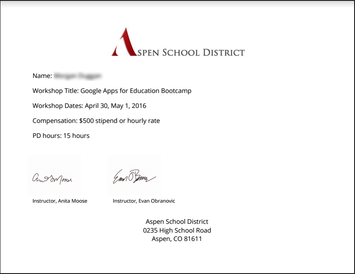
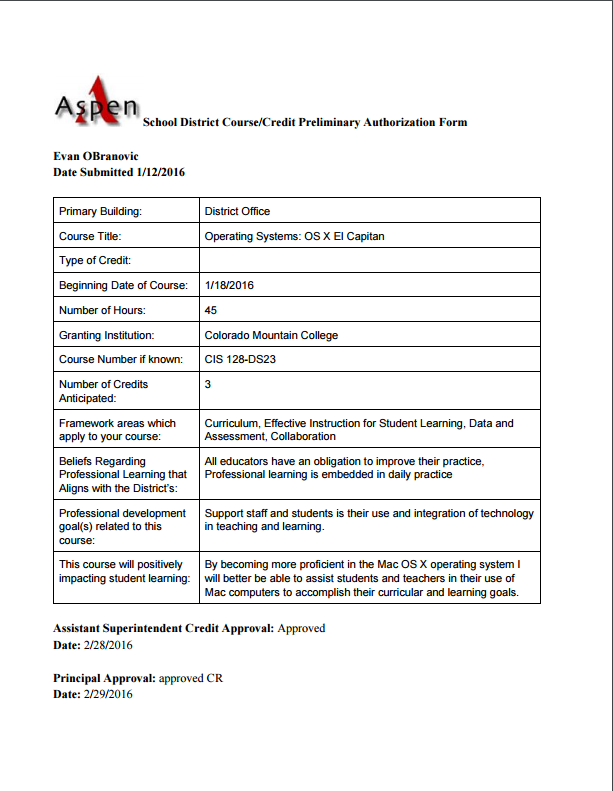
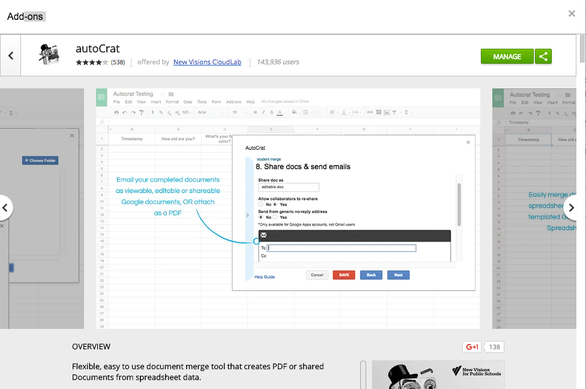 Find the autoCrat add-on in the Chrome web store or the add-on market directly in a Google Sheet. I have written about the autoCrat add-on before in my "What Google Sheets and add-ons can do for you..." post, but I really wanted to spend some time diving into the great ways myself and my district are using this versatile add-on to help automate, streamline, and uniform how we format and share information from our Google Apps for Education (GAFE) with our staff. The process of autoCrat is really just a version of a mail-merge tool, but with the added power of GAFE, (specifically Forms, Sheets, and Classroom) you are really able to create and maintain a workflow that better helps the transfer of information between everyone. I have used it many times with my co-integrator, Anita Moose (@amooseIT), in order to create and share certificates of completion for our technology-based professional development with our staff. This process has allowed us to use an existing roster of participants collected from a Google Form registration and create custom certificates that serve as record of participation, completion, and in-district credit. We also then have a spreadsheet containing all the relevant data and links to the certificates to share with HR in order to qualify staff for salary advancement and keep their records digital and searchable.  Collecting information via a Google Form is a great way to get all the important details in a spreadsheet that you can run autoCrat on to send form letters or certificates. 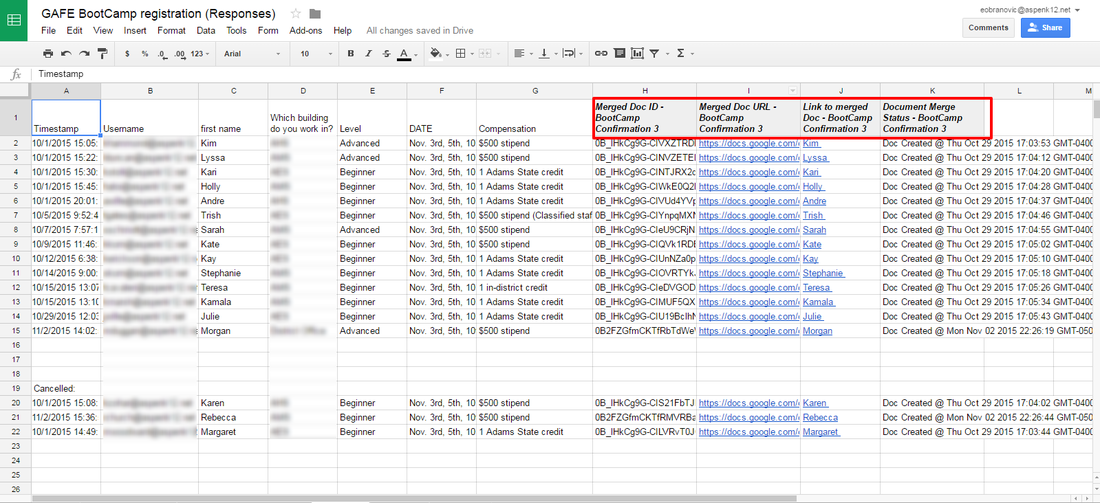 Using the response sheet from a Google Form, you can run autoCrat to pull the specific information you want and insert it on a Google doc template.
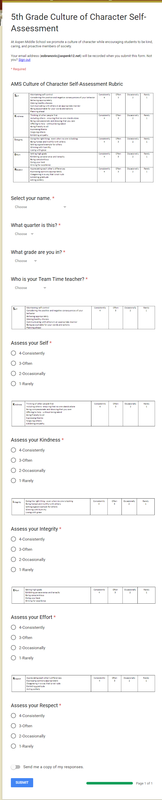
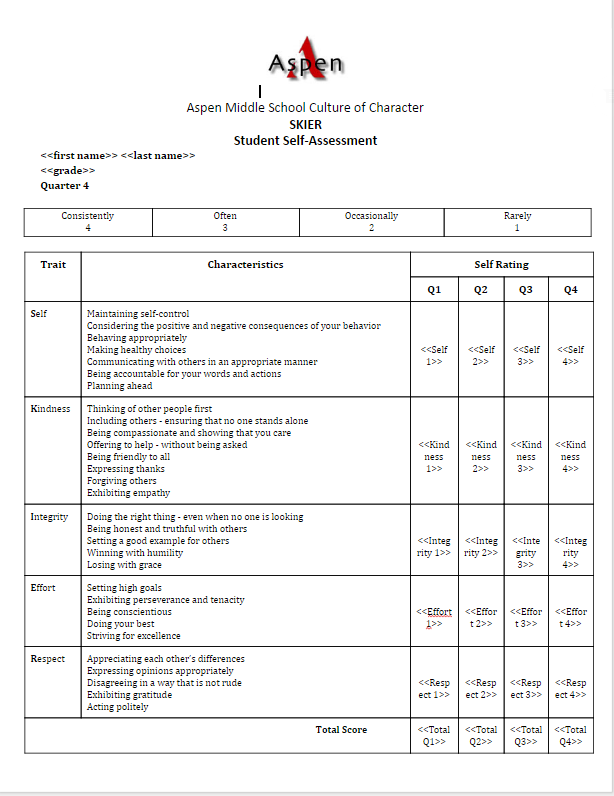
Anita has used autoCrat to create progress reports for middle school students as they self-evaluate on a rubric designed to evaluate character using Google forms. Grades 5th-8th are enrolled in a Google Classroom per grade-level and expected to complete the self-evaluation each quarter The results are then pushed to a running progress report that is printed and included in report card envelopes sent home at the end of each quarter to help students see their progression throughout the year.
Our district has started to move several of their processes to a digital/GAFE format and we again found great use for autoCrat. With the large amount of professional development opportunities our staff take advantage of during the school year and summer, we wanted to streamline the process of approving relevant PD and keeping track of completion. All approvals are now done through Google forms as well as completion certificate submissions. This makes record keeping for our District office much easier and a quicker turn-around for teachers and staff to have the information they need.
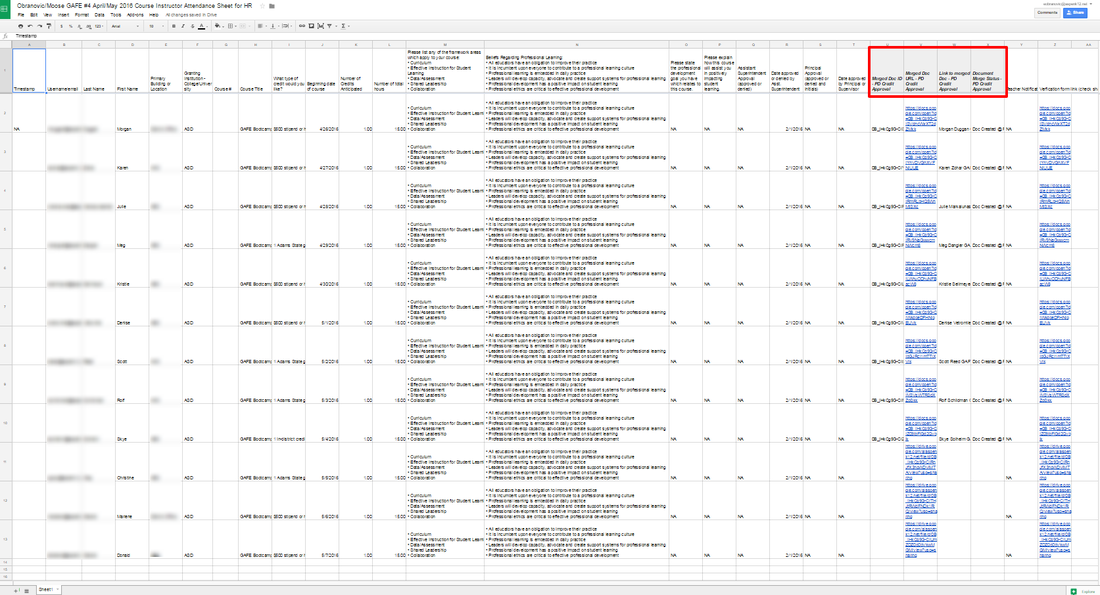 When a staff member runs an in-district PD, they are given a copy of this sheet to customize for their own attendance and record keeping. They can then run autoCrat to personalize completion certificates and turn in a copy of the Sheet to HR for district records. So now you can see how much autoCrat can improve your workflow. If you are a Google school you need to start taking advantage of this FREE add-on and become far more efficient with how you can collect, format, and share information. There are lots of great tutorials out there, but below you will find one that walks through the latest version of autoCrat by Brent Coley that is well done. Please don't hesitate to contact me for help getting started with autoCrat and feel free to comment below on great ways you have found to use this amazing tool!
12 educators from all three of our buildings at Aspen School District (ASD) travelled to Denver at the end of June to attend the annual ISTE conference (International Society for Technology in Education). What is the ISTE conference? It's a massive gathering of educators, administrators, and edtech companies coming together for the purpose of learning from one another how educational technology can be used to help teachers, students, administrators and schools be successful in accomplishing meaningful student learning. Held at the Colorado Convention Center, it is truly a sight to behold. This year’s conference had over 14,000 attendees! Walking through the convention center halls with so many inspired and motivated professionals was truly amazing!
So what does does an ISTE conference look like? It fills the halls of the CCC with teachers, specialists, administrators, etc… buzzing from room to room and booth to booth, trying to find the right presentation for their needs and interests in educational technology. Presentations are held in many different formats: traditional lectures, interactive playgrounds, quick poster presentations, research paper presentations, interactive discussions, panel discussions, workshops, and a massive expo hall space in which companies from around the country and world showcase their latest and best in education. The vast variety of content makes finding what’s interesting and right for you and your school only a few steps away. Topics this year included coding, robotics, blended and distance learning, virtual reality, effective assessment, BYOD (Bring your Own Device), Personalized Professional Development, ISTE standards for teachers, admins, and students, and much much more! Being my second time attending an ISTE conference I could really appreciate everything that was going on and how beneficial bringing educators to a conference like this can be. You are instantly put in a place to network with like-minded educators and grow your PLN (Professional Learning Network) so that long after the conference you are still developing great ideas and new concepts. Being in a new role as a Technology Integration Specialist I was amazed to see how prevalent my new position has become across the country and excited to connect and learn from other’s in my field doing so many great things for their staff and students. Having the ASD teachers who attended come up and express their excitement and motivation during and after the conference was also inspiring. They were able to see how many in their same position could leverage all the tools available to create successful and exciting learning environments. We all left the conference with a renewed, positive outlook on our involvement in education and how we can take our profession and students to the next level. Events like this are so important for teachers, administrators, specialists, and all educators to attend to recharge their outlook on the profession and continue to develop their skills to match an evolving field. It feels good to be part of a school district that values educational technology and encourages teachers to learn and grow in this incredible field. 
Click on the image above to check out my full list of resources from ISTE 2016 in my Digital Tote.
My biggest take-aways:
1. Student devices are here to stay! - With so many newly evolving technology practices within education, students having an easily accessible device is crucial to taking advantage of the new methods capable in a digital world. So many teachers are utilizing the various cloud-based platforms and LMS (Google Classroom, Microsoft Classroom, ClassFlow, Canvas, Blackboard, etc...) systems to make classrooms paperless and more accessible. Many factors play into what device is ideal for your student population and though my district has moved forward with Chromebooks, I can see the advantages of tablet devices and feel like a mix of the two helps address all the needs. BYOD (Bring your own device) policies and programs still haven't found the sweet spot. But just like different learning styles, cause us to change our teaching methods, if a student can succeed with one device over another and has the ability to bring it and take ownership of it, why not let them choose? It seems the most important item is access to some type of device to enable the teacher and student to work together in this new medium of education.
2. Edtech Coaches/Tech Coaches/Tech Integrators/etc... are a growing part of most schools and districts. - It was so refreshing to see such a large group of educators in my same field, working towards the same goals. We have many different names, but it became clear to me that the position of Edtech Coach/Integrator is here to stay. Now that we are here to stay, we can start to connect and share our hurdles and successes. Having the ISTE standards for Coaches is a great reference that can help put us all on the same page working to help our teachers, students, and administrators achieve the same goals. I can't wait to continue to grow in this field and work with other amazing educators passionate about how technology can change education for the better!
4. Technology does not replace great teachers and good teaching! - With everything that continues to help make teaching better, one very simple fact seems to stand the test of time: great teachers are what make students successful! The various tools and strategies can only amplify what is already there. The potential for great teachers to become even better and reach more students with the developments in edtech is staggering. The technology available is finally starting to reach a point that allows educators to think well beyond what was once possible and prepare students for a world and job market that is always on the cutting edge. So all the bells and whistles are great, but it's still the teacher behind the technology that makes it go!
Comment below any of your highlights or insights from ISTE 2016!
I'm a big fan of the EdtechTeam and the great ed-tech PD they put on for educators across the country and even world-wide. In last month's post I showcased a local summit my colleagues and I put together, modeled after the EdtechTeam summits I have attended in the past and gained so much knowledge about effectively using technology to enhance student learning and teacher delivery of content using all the great edtech out there.
This year I decided to take the plunge and put in a proposal to present at the 2016 Breckenridge summit. I submitted two proposals because I hoped they could find one of them worth accepting and then I was surprised with an email letting me know that both had been accepted! It was exciting and nerve-wracking to be selected to speak to fellow educators about what great things you've learned and worked with that could help them. Just like teaching a group of students you want your presentation to be engaging, informative, differentiated, and useful, which we know are not always easy to put together in one neat package. My topics were customizing Google Chrome and Google Forms, two tools I had a lot of experience with and had already discussed with my own staff many times. I put together two presentations that I tried to overload with information to enable advanced folks to work ahead and beginners to continue to digest well after the summit.
The summit was fantastic and as always I walked away inspired by the people I met and learned from, and with a head full of new great ideas to bring back to my own district. When it came to presenting, I think the biggest take-away is to not be afraid to put yourself out there and engage with your peers. Fellow educators are always so appreciative and excited to learn from one another and there is a recognition that we are all in the same boat and just want great things to make our students more successful and our teaching more dynamic. That sense of community and desire to continue life-long learning is what makes summits like these so successful.
Below you will find my two presentations which you can feel free to copy for your own learning regarding Forms and Chrome. Take a look and don't hesitate to contact me with any questions.
Diving Deep into Google Forms looks at the customization that can be done in the old Google forms and what your options are in the new Google Forms. Take advantage of all the great advanced question features and add-ons to really make Forms an amazing tool!
Making Chrome Work for You is a quick guide to how you can customize the Chrome web browser to work for you and use the multitude of apps and extensions to work smarter, not harder.
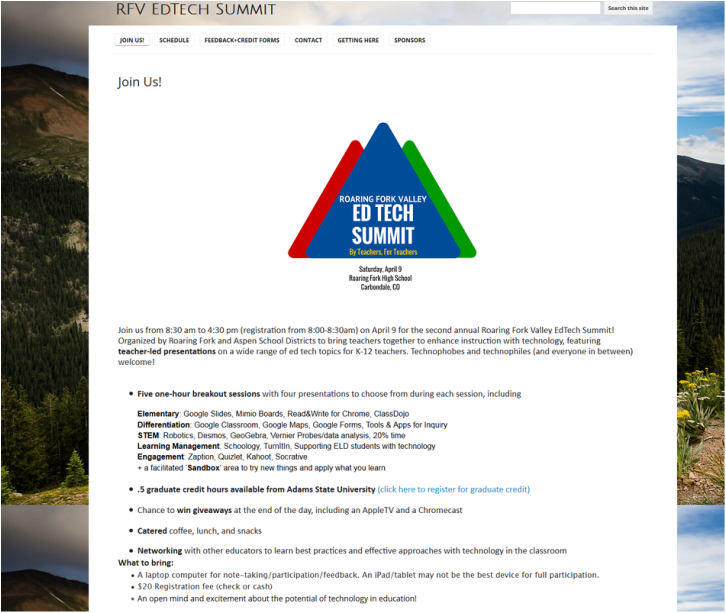 The 2nd annual RFV Edtech Summit was held on Saturday, April 9th and it was so encouraging to see local teachers from around the Roaring Fork Valley come together in order to share and learn about various ed-tech tools and strategies. The summits were a concept borrowed from the wonderful work done by the EdTechTeam and their various summits run throughout the country and world to bring educators together to network and share how edtech and GAFE can work for them. If you haven't attending one, I highly recommend checking one out near you and getting geeky and inspired with all the great resources available to you! After attending several of their summits in the Colorado area, my cohort, Anita Moose, and I got together with a fellow integrator from the neighboring district (Roaring Fork School District), Ben Bohmfalk, to think how we could bring that same excitement and opportunity to our small valley. We wanted to enable teachers who might not be able to give up a whole weekend and travel away from home an inexpensive opportunity to learn and work with their colleagues right down the road, creating a network of support that they can easily access. Engaging, useful, and exciting Professional Development is always a want and need in any school district and a summit environment is a great way to deliver it. Thus the Roaring Fork Valley Edtech Summit was born as a one day event that would be put on by teachers for teachers. We worked with administration to offer teachers in-district credit for attending and presenting and approached local businesses to provide give-aways and discounted catering options. Our first Summit was held in February, 2015 at Aspen High School with 70 teachers in attendance and over 15 presenters. We learned a lot about successfully putting that many educators together and what needs to happen in order to make them feel comfortable learning something new and working with each other. Fast forward to 2016 we were ready to launch RFV Edtech Summit #2 at Roaring Fork High School in Carbondale, CO. Taking feedback from last year, in addition to our presenter sessions we added a 'Sandbox' area for participants who needed time to wrap their heads around concepts/tools they just learned. The 2nd annual RFV Edtech Summit was held in April, 2016 and had over 80 participants and 20 presenters. Other improvements made were offering graduate level credit or in-district for participants and presenters. With two summits in the books we are showing no signs of slowing down. We plan on continued growth in participants and presenters and will look to branch out for sponsorship's and ed-tech partners. Here's a list of things I learned along the way: Organizing participants/presenters- Getting your participants and presenters organized is the key to having a successful summit. If you can't get quality presentations and enough participants to attend you are done before you start. We used Google Forms to gauge interest, gather presenters and their materials and have participants register. It was great to get all the information into Google Sheets and then be able to run the add-on Autocrat to provide confirmations and completion certificates. Keynote/Intro- Having some type of introduction to get people motivated is crucial to a good summit. Having a big name is great, but for our local summits we kept it simple by having a few tech staff and teachers speak the the group about what excites them about edtech and what their hopes for the group are. Then a quick rundown of logistics and directions and you get people off and running. Passing time- Though this doesn't seem like an important element, it is! Giving your participants and presenters time to process what the last session delivered, time to use the bathroom, grab a snack or cup of coffee, and most importantly, network and inquire with other participants and presenters is so valuable. In my opinion 15 minutes is the absolute bare minimum and any more than 30 minutes you risk losing people. Sandbox time- This concept was born out of feedback from our first summit. It was mentioned that there was so much great information floating around that near the end of the day it was hard to try and stay focused on a new topic when there wasn't much time to explore an earlier idea. For the 2nd summit we added a space for the third, fourth, and fifth sessions where participants could sit in a tech facilitated room to dig into something cool they learned and truly process how it could work for them. Food/snacks- Teachers LOVE food and snacks! If you are going to have an overworked teacher give up their weekend in order to better their craft, in addition to great content you better have some delicious food, drinks, and snacks to keep them going throughout the day. We made sure to provide great local coffee, continental breakfast, granola bars, and a fully catered lunch to keep everyone's stomach full and mind open! Sponsorship's/donations- Extra funds aren't typically laying around in an educational setting (let's not get started on this...) so finding support from the community is key to putting your best foot forward. Not being familiar with knocking on doors and asking for things I was surprised at how kind and generous so many businesses can be, especially when it comes to teachers! Great give-aways, food, and drinks were donated to our cause. Don't be shy, get out there and be amazed at the support your community can give you! Wrap-up/give-aways/feedback- At the end of any training it's so important to bring the group back together to allow time for reflection and decompression. It also helps to have some great prizes to reward the participants and presenters for all their hard work! Having a short wrap-up is a must and giving away fun prizes ensures most of your group will come back together. This is where all the great support we had from the community came into play and once we had everyone's attention we reminded them of what needed to be completed in order to receive credit and help us make the next summit better. We combined a form to provide feedback to the organizers and presenters and turn . This proved to be such a useful set of data for planning our next summit. There are so many good PD opportunities out there, but sometimes you need to stay local and take advantage of all the great resources around you. Find a topic that gets teachers excited and you're off and running with a homegrown PD that is really helpful. Don't be overwhelmed at the thought of organizing your own PD event, use the tools at your disposal and make something happen that benefits your teachers and students! 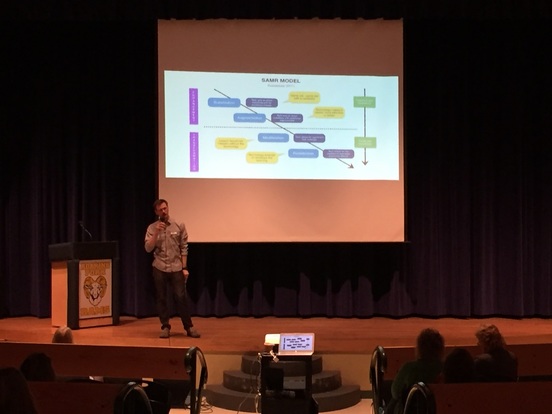 RFSD Tech Integrator, Ben Bohmfalk, speaks to using and understanding the SAMR model.  ASD Tech Integrator, Anita Moose, gets educators inspired before jumping into the first session.  AHS Science teacher, Kim Hammond, runs a session on how Google Classroom helps facilitate management and differentiation.  AHS teacher, Karen Zohar, shows participants how assessment tools like Socrative and Kahoot can help student engagement and feedback.  AMS SPED teacher, Lori Anderson, walks teachers through using Google Read&Write. 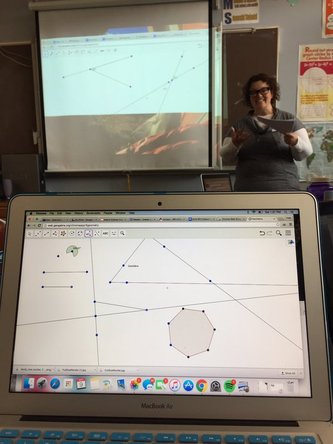 AMS Math teacher, Sarah Beesley, goes over using GeoGebra to teach students geometry concepts. 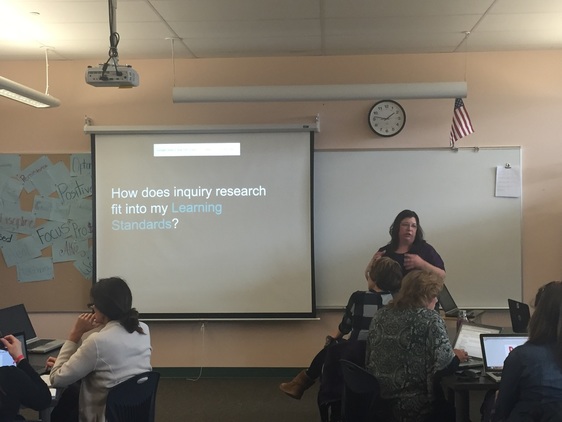 AHS Librarian, Jenn Cook, talks to participants about tools to help facilitate student inquiry. 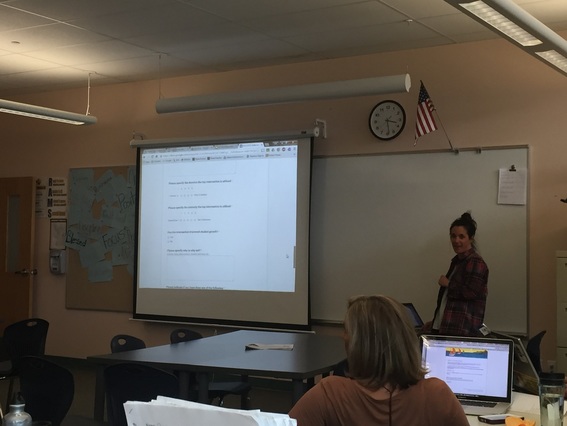 AHS MTSS coordinator, Tara Valentino, discusses how Google+ and Google Forms can be used with fellow staff and students. |
About EvanDirector of Technology for Traverse City Area Public Schools. Level 2 Google Certified Educator. Former Tech Integration Specialist and 4th grade teacher at Aspen School District and Spartan for life! Go Green! 
Categories
All
Archives
February 2019
|
 RSS Feed