|
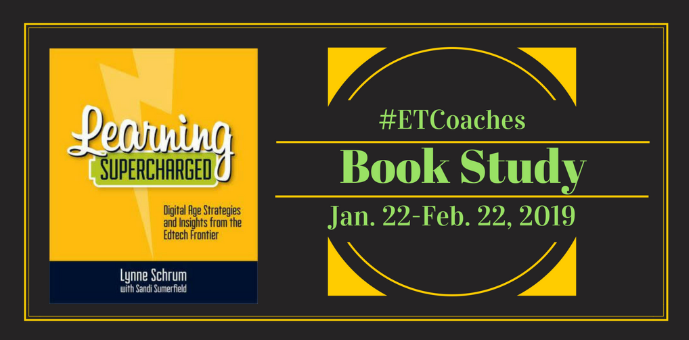
Another #ETCoaches book study and Twitter slow chat has come and gone, but my head is still reeling from all the awesome information I gained from reading Learning Supercharged and engaging in some awesome discussion and reflection with hundreds of other coaches and educators. If you haven't participated in one of their book studies and slow chats I highly recommend it as a great way to experience Twitter PD in a fun and informative way. The hardest part is trying to process all the information that is circulating, but with the use of hashtags and tools like TweetDeck you can keep yourself organized. The Edtech Coaches Network also curates all the information regarding the book study and slow chat on a website archive to enable participants to review any and all the information shared (which is a lot!!). In addition to perusing the web archive yourself here are my biggest take-aways from the book and the slow chat:
STEM and Makerspaces come in all sorts of shapes and sizes - I think many educators struggle with the thought of implementing STEM (Science, Technology, Engineering, & Math) and makerspaces in their teaching, classrooms, and schools. Though the concepts are "new" the drive and ability to enact them is not. Take a look at my last post to see how STEM is not as scary as you think. The book talks about the focus of STEM moving towards coding and robotics which is the easy and sexy pick to get students excited about diving in. Teachers may hesitate at the thought of trying to incorporate code or program robots, but in reality I don't think there is a better way to incorporate STEM skills into your existing curriculum.
Makerspaces are even less intimidating when you get down to the nuts and bolts of what makes a space into a makerspace. Whatever you can provide to all students the chance to explore, tinker, create, invent, and build can constitute as a makerspace. These can be designated spaces or mobile labs depending on your logistics. From the simplest form of creating with recycled materials like cardboard to complex designing and printing objects with a 3D-printer. When you provide students with a chance to problem-solve and create their own solutions you are opening up a whole new world of learning to them!
Will Gamification & Game-Based learning work in education and how do we stress the importance of Digital Citizenship?- It seems like a no-brainer, make learning a game and students will absorb any and all information we can put in front of them without feeling the typical lag of traditional learning methods. So began the hype of gamification and game-based learning, badges, points, levels are available in a variety of platforms or by your own creation to keep students engaged during class and motivated to perform for that next 'thing'. The digital classroom has made turning learning into a game as easy as a couple of clicks of the mouse. Tools and sites like Kahoot, Flippity.net, Scratch, Minecraft, Code.org, Classcraft etc..., plus the plethora of apps for iOS or Android devices (check out CommonSense Media's curated lists of teacher/parent approved apps) all provide ways to take learning objectives and put them in a game simulation to engage students.
With everything being so ingrained in the digital realm as we evolve in education the importance of Digital Citizenship cannot be overstated. Students and staff are coming face to face with the consequences of improperly using technology or the content they find online. We celebrate Digital Citizenship week in my district and have attempted to integrate the CommonSense Media curriculum into all grade-levels, but have run into some resistance as Teachers view it as 'one more thing' they have to do. As more and more teaching and learning is happening digitally the option to discuss digital citizenship is no longer an option, but a necessity. The key is creating a collective responsibility for raising digital citizens. It's not the sole responsibility of the teacher, or the tech team, or the student, or the parent. It's the responsibility of all these stakeholders to reinforce the concepts that help make up the core of Digital Citizenship: Digital Communication, Digital Literacy, Digital Etiquette, Digital Law, Digital Rights and Responsibilities, and Digital Security.
Everyone wants to implement PBL (Project-based Learning) and how we bridge the Digital Divide- From all sides the concept is great, use student driven projects to engage, excite, and motivate student learning and meet standards and objectives. It takes a shift in teacher mindset as they no longer become the drivers of content delivery, but rather facilitators of student learning and they make progress in a project of their choosing. Since a big focus of PBL is the students' ability to construct new knowledge the shift towards a digital classroom has opened up countless opportunities to accomplish this with a variety of student learning types. Learning can be personalized to meet individual student needs without creating an overwhelming amount on analog work for a teacher.
The same way the new digital classroom is making PBL easier to implement it also has an affect on how our students are able to access digital tools and materials that wasn't previously possible. The technology we have whether it be things like Chromebooks, Google accounts, iPads, high speed internet access, assistive technology, and the countless amount of web 2.0 resources, iOS, and Android apps are leveling the playing field when used purposefully and thoughtfully. The importance of ensuring students all have equity of access to these resources is crucial to ensure everyone has a fair chance to prepare to take the next steps in their educational or life careers. Countless programs exist to assist in ensuring this access for our students. One great resource mentioned in the book is the CoSN (Consortium for School Networking) Network to help get you started on addressing this need.
Blending Formal, Non-formal, and Informal Education and what are the big take-aways- There has been a wide-spread recognition of the differences in student learning success. It feels like we have finally accepted the fact that our students all excel in different ways and we need to do our best to try and accommodate these styles and preferences to help them be successful. As the theme that runs throughout this book and blog post the ability to blend these educational styles has become far easier with the advent of technology and the digital classroom. We no longer need to focus on a traditional, boring classroom style that only benefits a few students, but can bring in the dynamic learning that happens outside of the classroom to engage our students in real-world learning that they and their peers can relate to.
So what are the big take-aways? It all boils down to taking advantage of what the development of digital age and classroom has to offer to our teachers and students. We don't have to reinvent the wheel when it comes to education, but we do have access to a lot of tools that are going to make that wheel much faster and efficient. Reading this blog is not a sufficient replacement for taking the time to read the book Learning Supercharged (though it's much appreciated!) and getting all the great resources at the end of each chapter and reviewing the case studies and spotlights on how these topics/concepts can be put into action. The ability to not only read this amazing resource, but then discuss and reflect on it with hundreds of fellow educators amplified the professional learning I took away and empowered me to put plans into action. If you are an Edtech Coach or highly motivated educator I would strongly encourage you to participate in the #ETCoaches twitter community and their vast offering of webinars, book studies, and twitter chats. Please comment below if you have read Learning Supercharged or participated in this year's #ETCoaches book study.
2 Comments
We can all agree that we need to include STEM integration into our students' education. The hard part is figuring out how to best and most effectively do that. Though we have been talking about STEM for a while I feel like it's often thought of as an unrealistic goal and something only really tech savvy teachers could even begin to understand and relay to their students. Even as a "tech" person I often found myself questioning if I could effective speak on the subject and share that information with teachers and students.
Enter my amazing co-integrator, Anita Moose (@amooseIT), with a plan to provide quick and easy professional development to math teachers on ways to integrate STEM into their existing teaching and open the door to using the robotics coach (@amshanson) and tech team as supports in making it happen. You can review the brief presentation below, but the main focus was on using two tools we have readily available to teachers: Lego Mindstorms are great robots for teachers and students of all skill levels to dive into robotics. The activity we used to get teachers an idea of how robots could help teach math is the very simple "Closer" activity which has students guess how many rotations and how much power is needed to get the robot closet to an object. There are many modifications and adaptions that can be done to make the math more challenging or complex and address several different concepts such as place value, measurement from standard to metric, estimation, multiplication, ratios, degrees, geometry vocabulary: diameter, radius, circumference, proportions, variables, graphing, statistics, interquartile range, graphing, Pythagorean Theorem, and systems of equations. Check out more details with the links from the presentation and interject some awesomeness into your math class! If you read my last post you already know about my love affair for Ozobots! These little guys are such an easy and fun way to dive into the basics of robotics and block coding that I guarantee you could be up and running with a class in 15 mins or less! We showed teachers a really simple lesson they could do to cover geometry concepts, but there are many other lessons out there to teach things like Slope Practice, Calculating Areas of Common Geometric Figures, Determining the Value of π with Ozobot and a Stopwatch, and Make a Multiplication Algorithm. Ozobots lessons don't just cover math topics so be sure to check out their educator portal and search for a variety of topics you may be teaching that can be spiced up with some robotics! That's it! With this simple presentation and links to resources and roughly an hour we had exposed teachers to a few quick and easy ways to become STEM educators themselves and not have to add more to their already overflowing plates, but simply rethink how they could teach concepts they were going to do anyway. One last piece that really added some authenticity to the whole process was having a couple of robotics students come talk to the group and help show them how to use everything. Seeing students who were already engaged and capable of using these tools effectively really hit home with the teachers in attendance. Hats off to Anita for taking the lead and making this a priority for our schools and backing up her thoughts with actions and support. Feel free to use the resources shared in this post and share any other great ways you are doing STEM in the comments below!
Another year, another chance to get students and teacher excited about computer science and coding during #CSEdWeek! This year we reloaded many of the activities we used previously because of the success we had with them, but we did some exploring and took our use of Ozobots to the next level and were extremely happy with the results.
We decided to use a push-in model this year to try and bring fun, engaging activities right to the classroom and give teachers the experience of how CS can be implemented in their classes for a variety of subjects. We made this effort because in previous years we only offered lunch time activities and stations in library which resulted in teachers not being present when students were engaged and participating making those classroom connections tough to make and try and continue the momentum throughout the year. For those of you not familiar with Ozobots they are great little devices to take students from basic introduction of coding all the way through more complex block coding sets. We currently have a class set of Evos which are the slightly more robust version that include a few more bells and whistles as well as the ability to update firmware. The Ozobot website has an amazing resource of lessons you can search through (grade-level, topic, standard) to really take advantage of their capabilities from the basic color coding through the more complex Ozoblockly coding.
Ozobots start simple with color-based coding using markers and paper. The colors you need are black, red, green, and blue which allow you to create paths for the Ozobot sensors to follow. Colors can be combined to create simple codes for speed changes, directions, timers and fun moves like tornadoes or zig-zags! We used the color coding function as a way to introduce coding and the Ozobots to younger grades (K-2) and had them create code paths that spell out their names or initials.
Though this is the second year we have had the Ozobots, this was the first year we dove into using the Ozoblockly coding aspect of them and frankly, we were blown away at how easy it is to get started and have students do simple to complex programming in such a short amount of time. Loading the code can be done across multiple different devices including our favorite, Chromebooks, as it just takes a series of flashing color lights read by the Ozobot sensors. We had our older students (3rd-8th) use the Ozoblockly coding to guide their Ozobots through a maze of their own creation and program their bot to move from one point on a grid to another to combine the coding practice with identifying points on a x and y-axis.
We had such great success and engagement with the Ozobots during #CSEdWeek that my fellow integrator, Anita Moose (@amooseIT), and I are currently creating schedules to continue push ins with classrooms in all three buildings and allowing for Teachers to request specific topics and standards for us to plan around to make the best use of the Ozobots integration into a teacher's curriculum. If you have had similar success or other great experiences with the Ozobots please leave any feedback in the comments below.
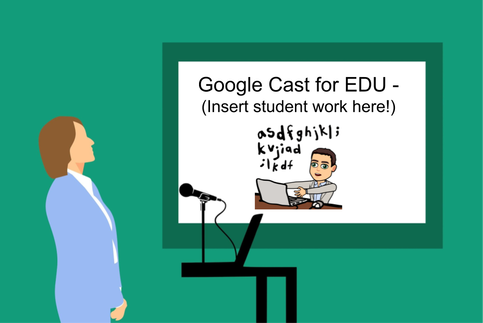
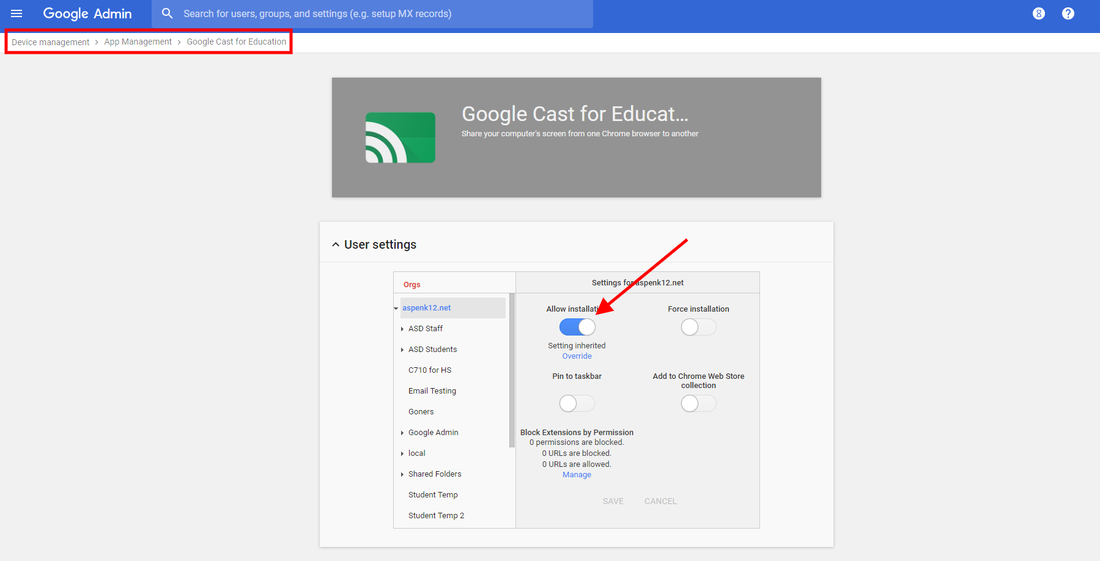
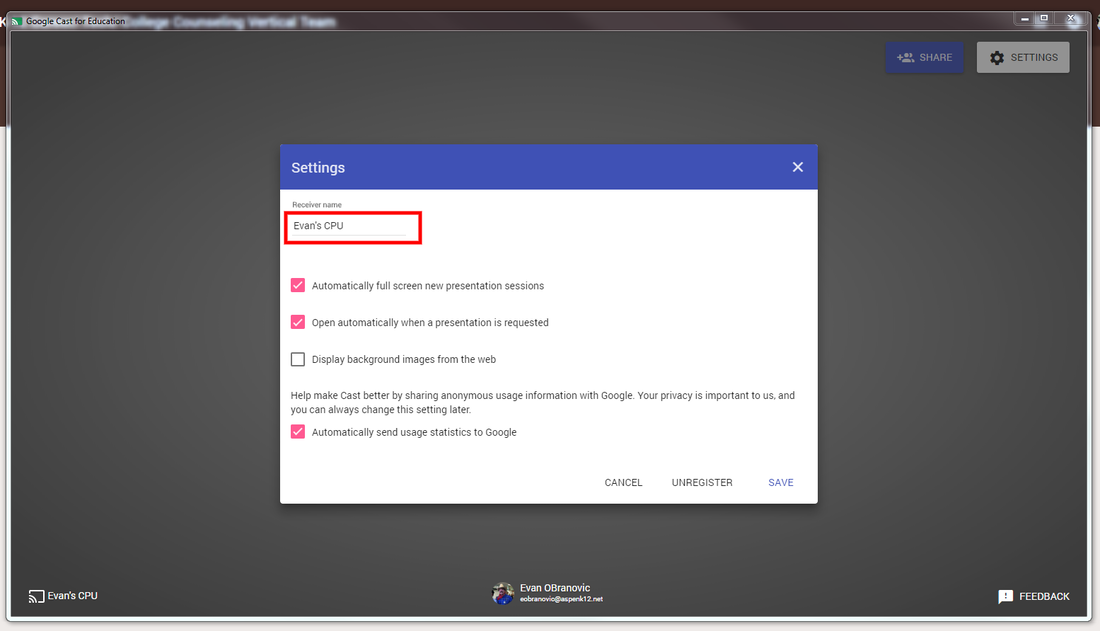
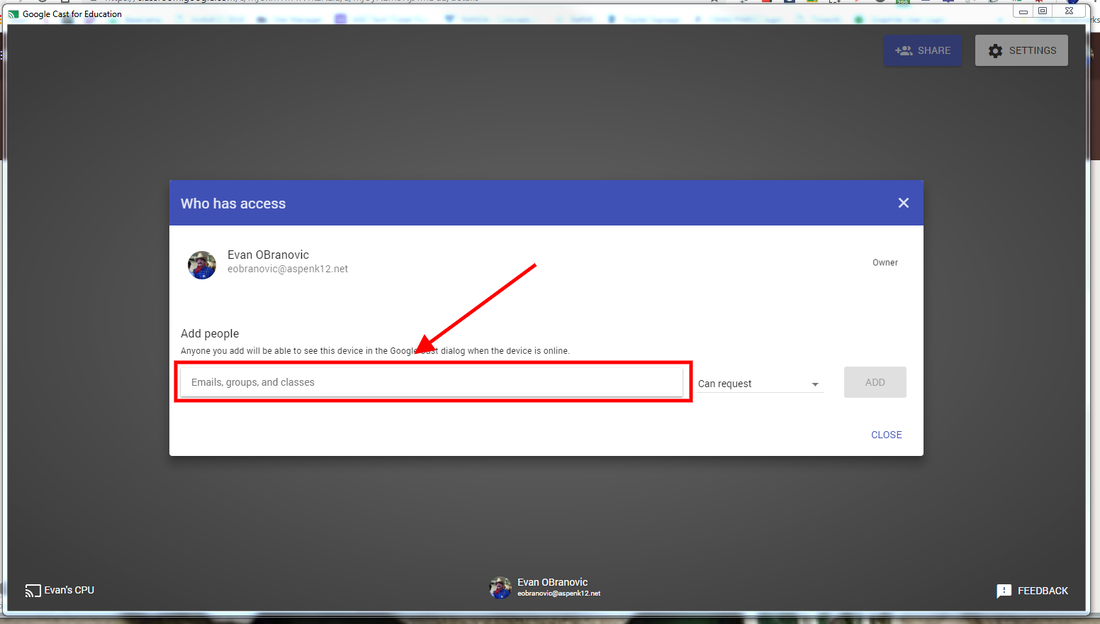
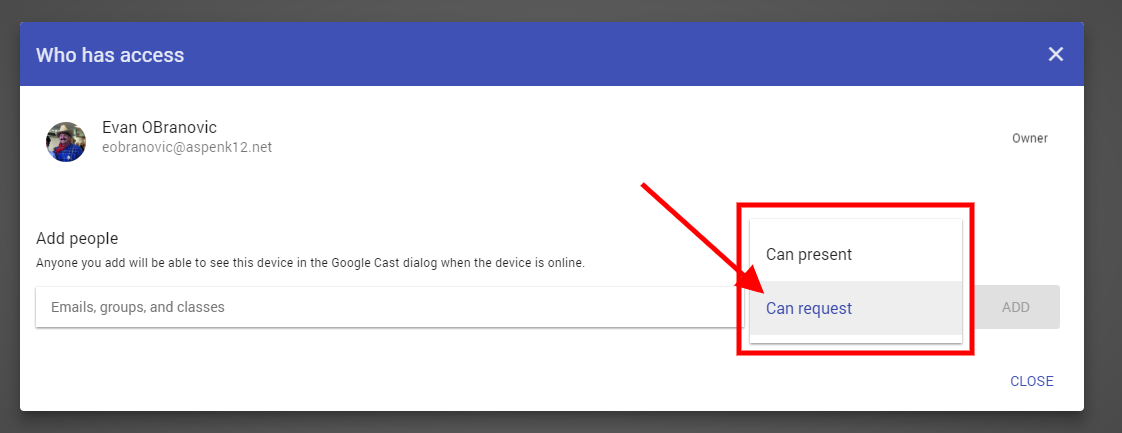
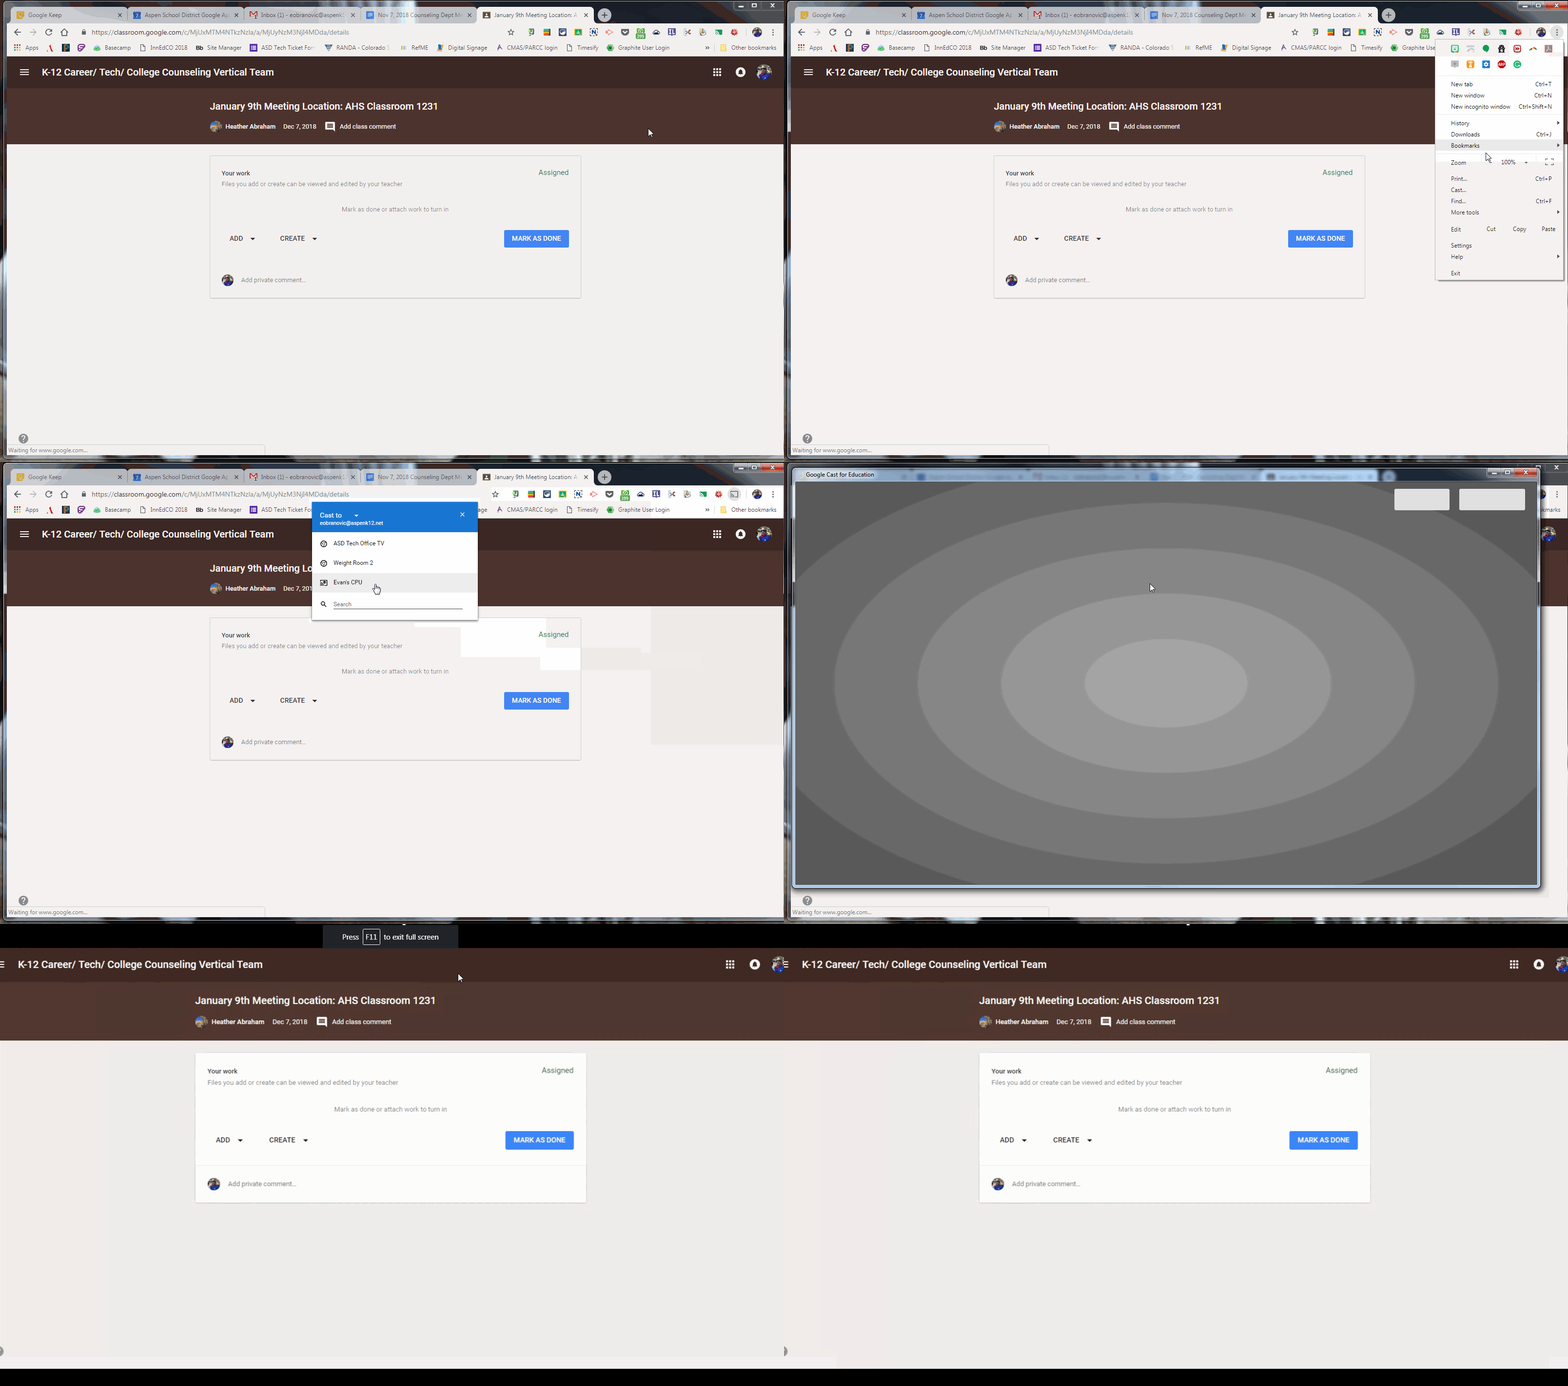
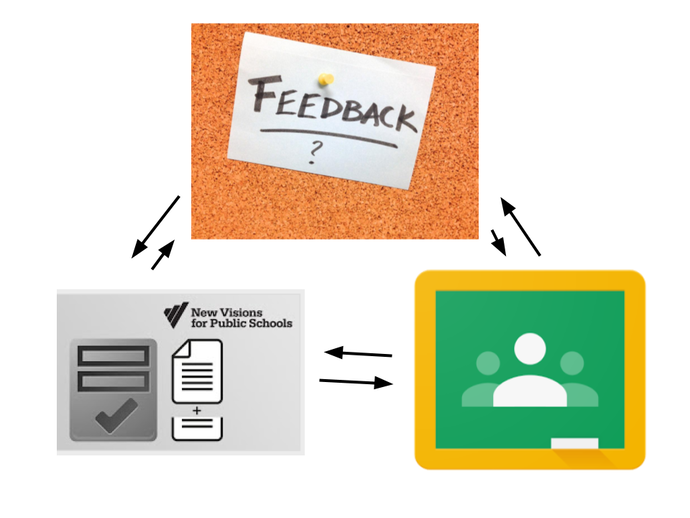
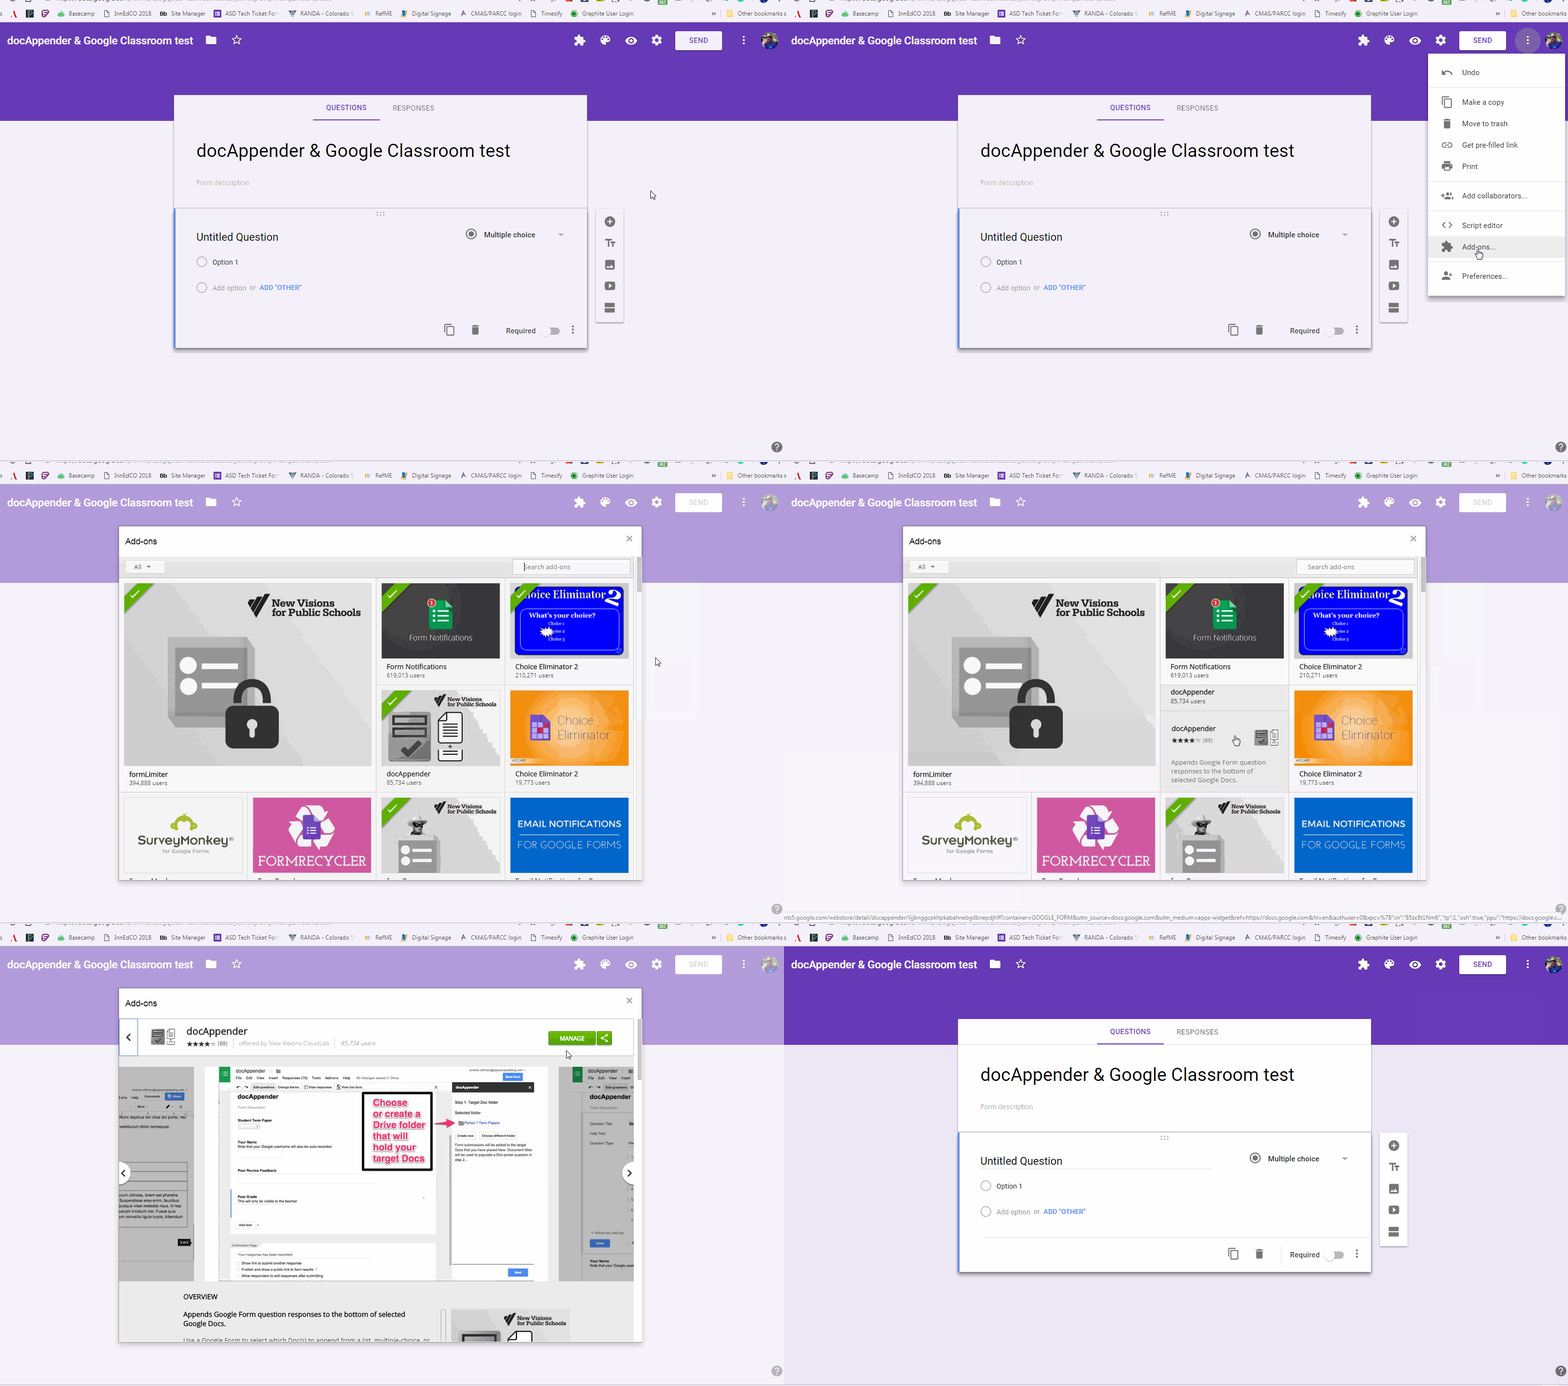
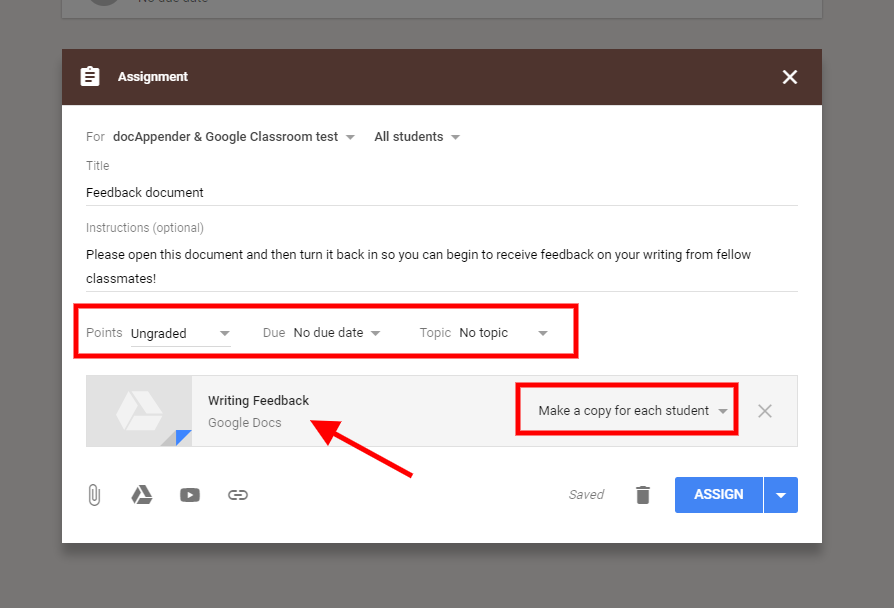
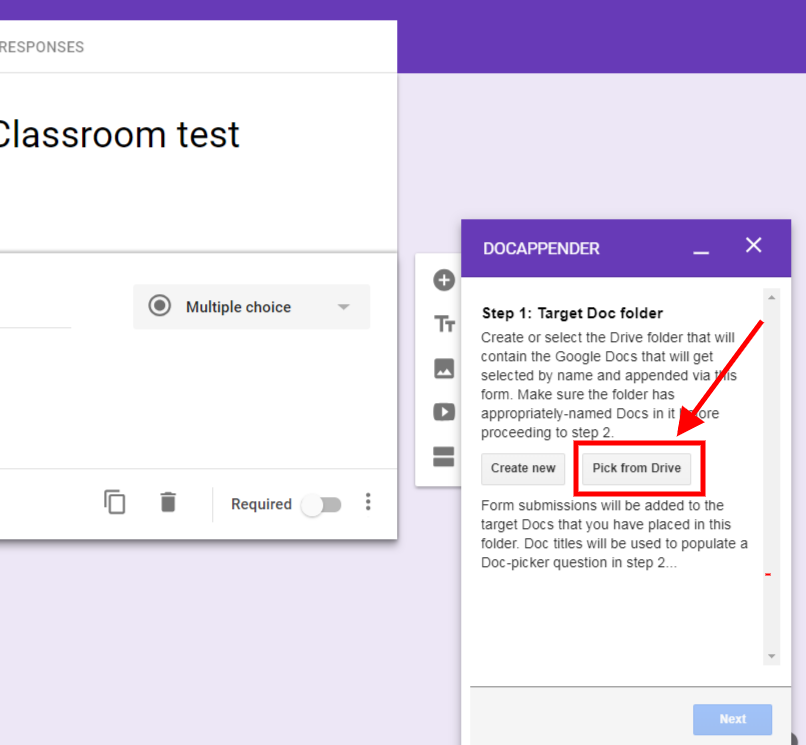
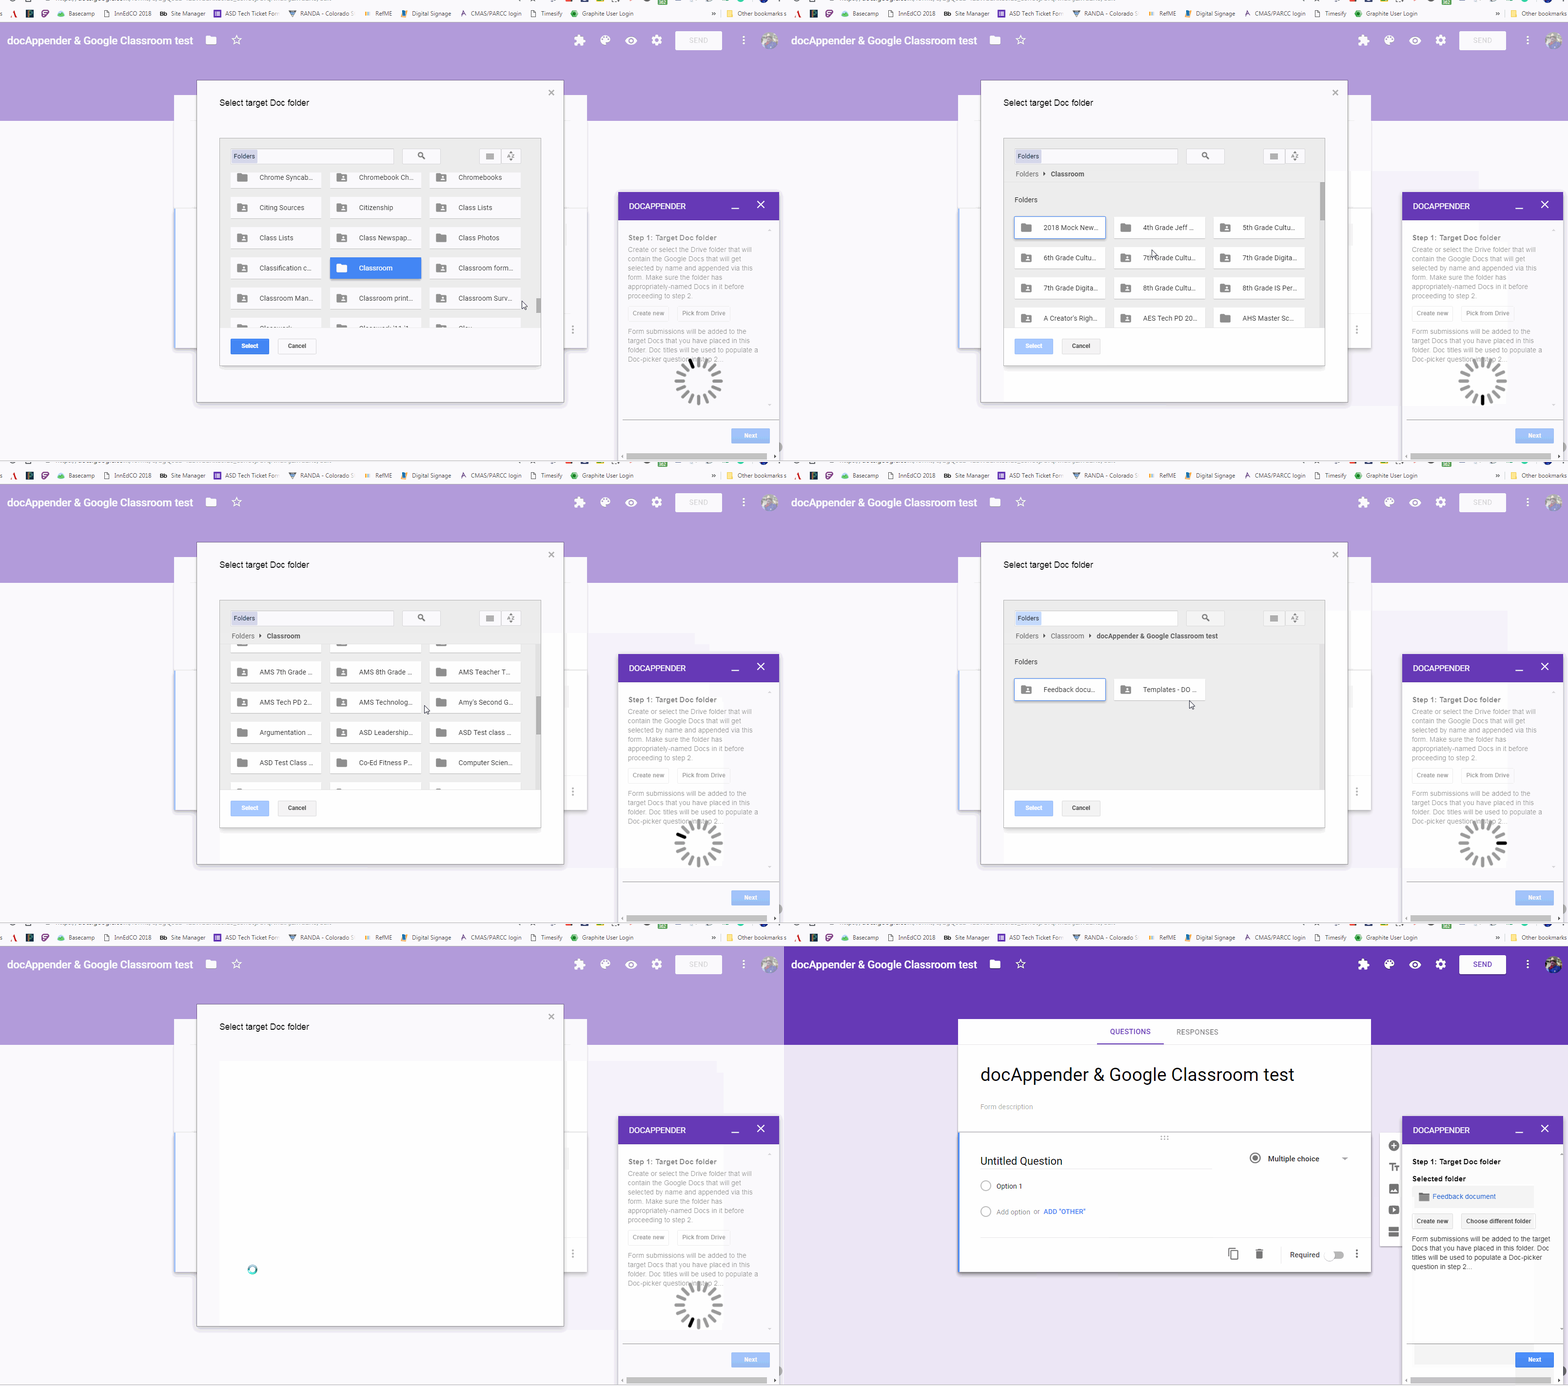
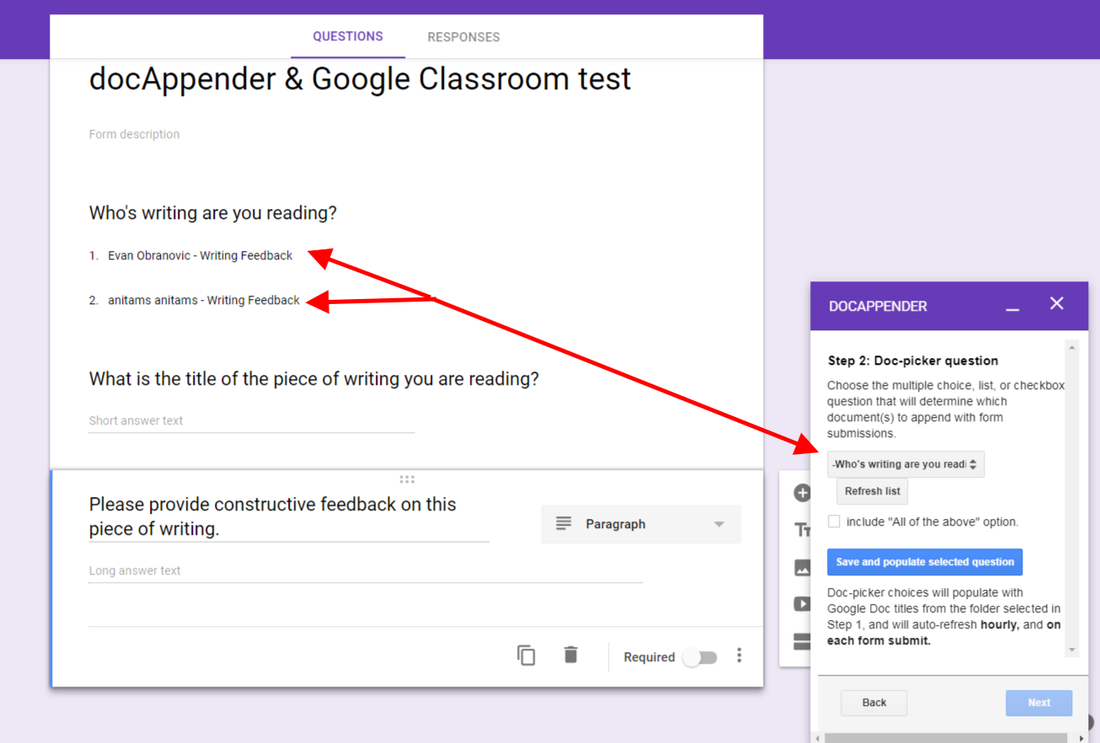
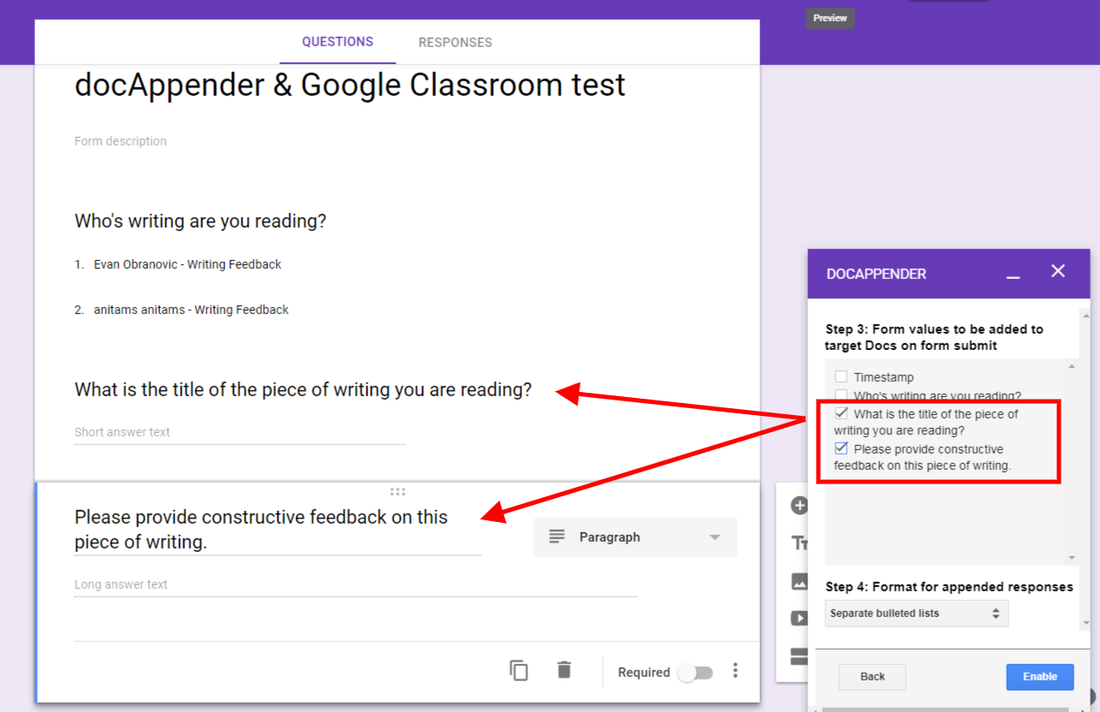
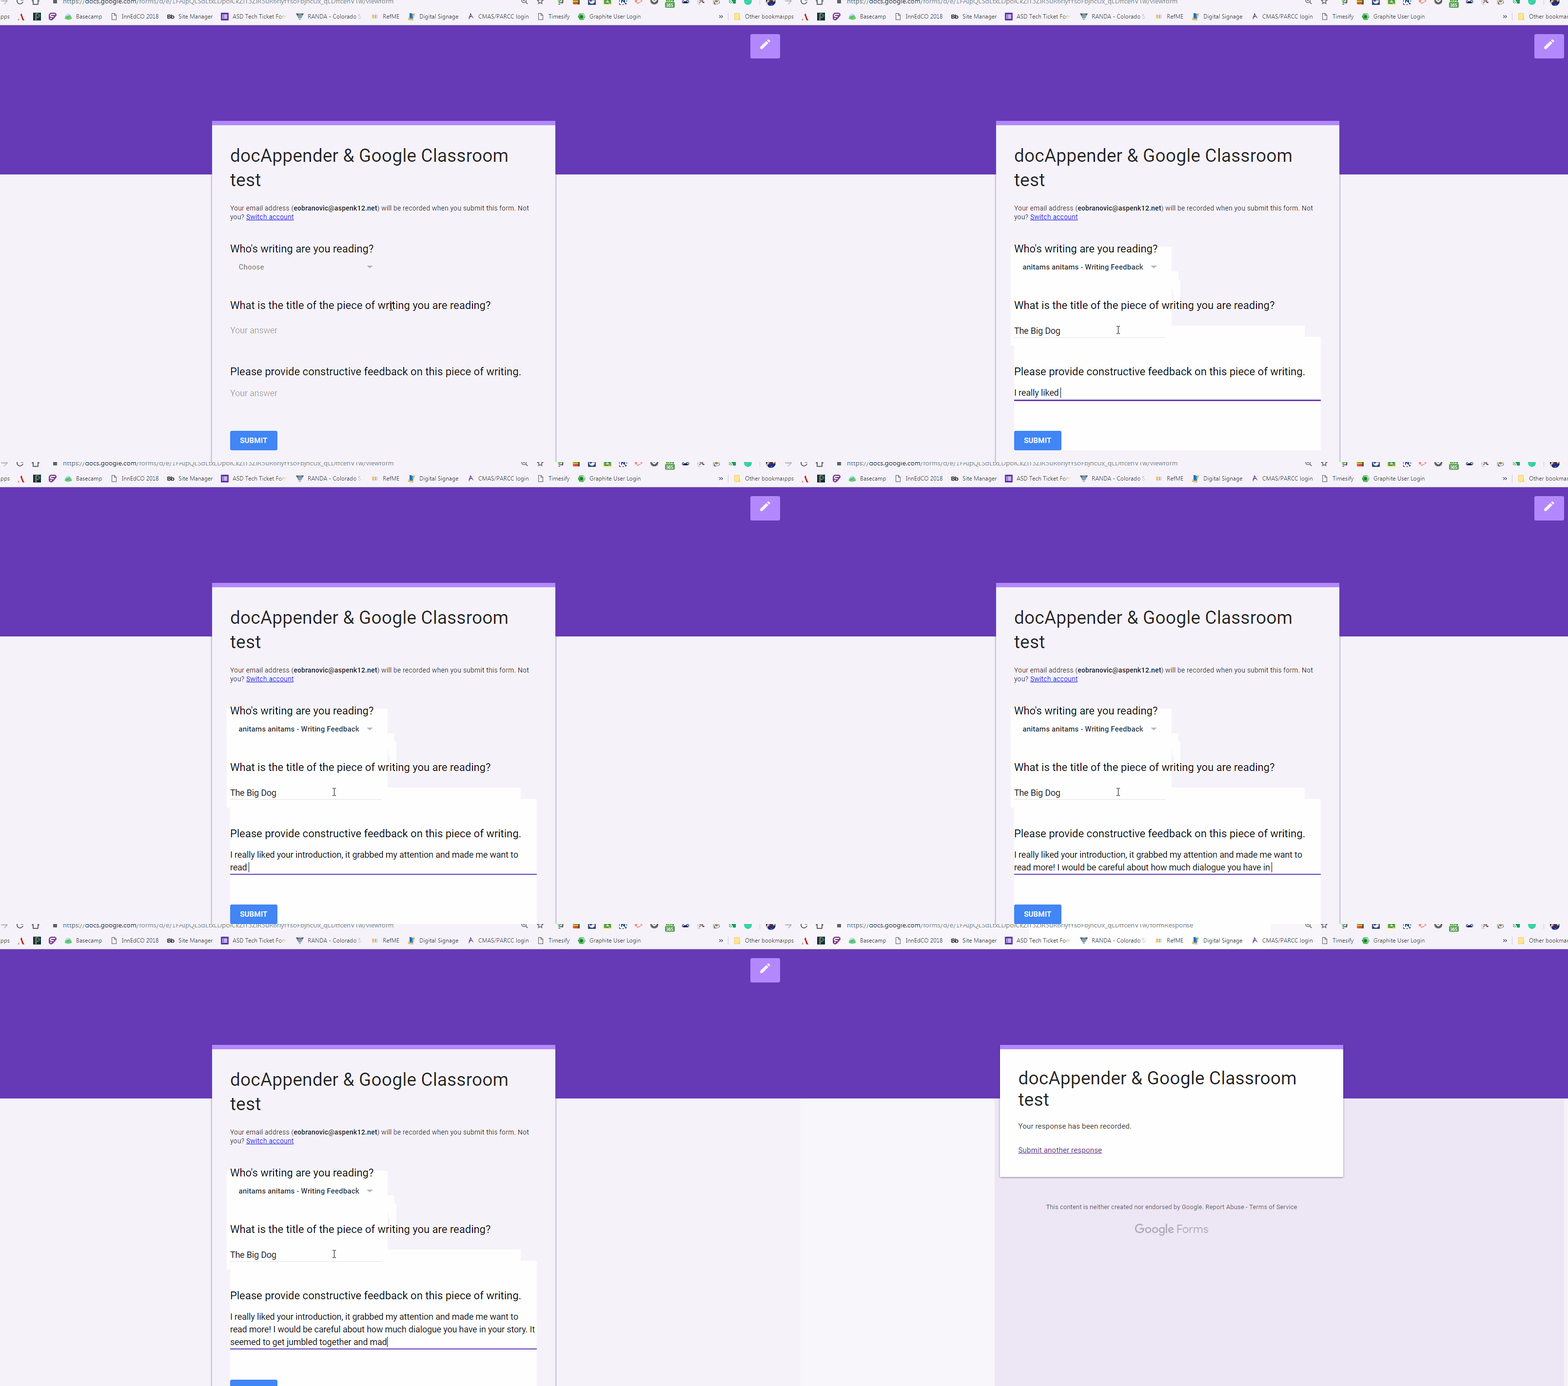
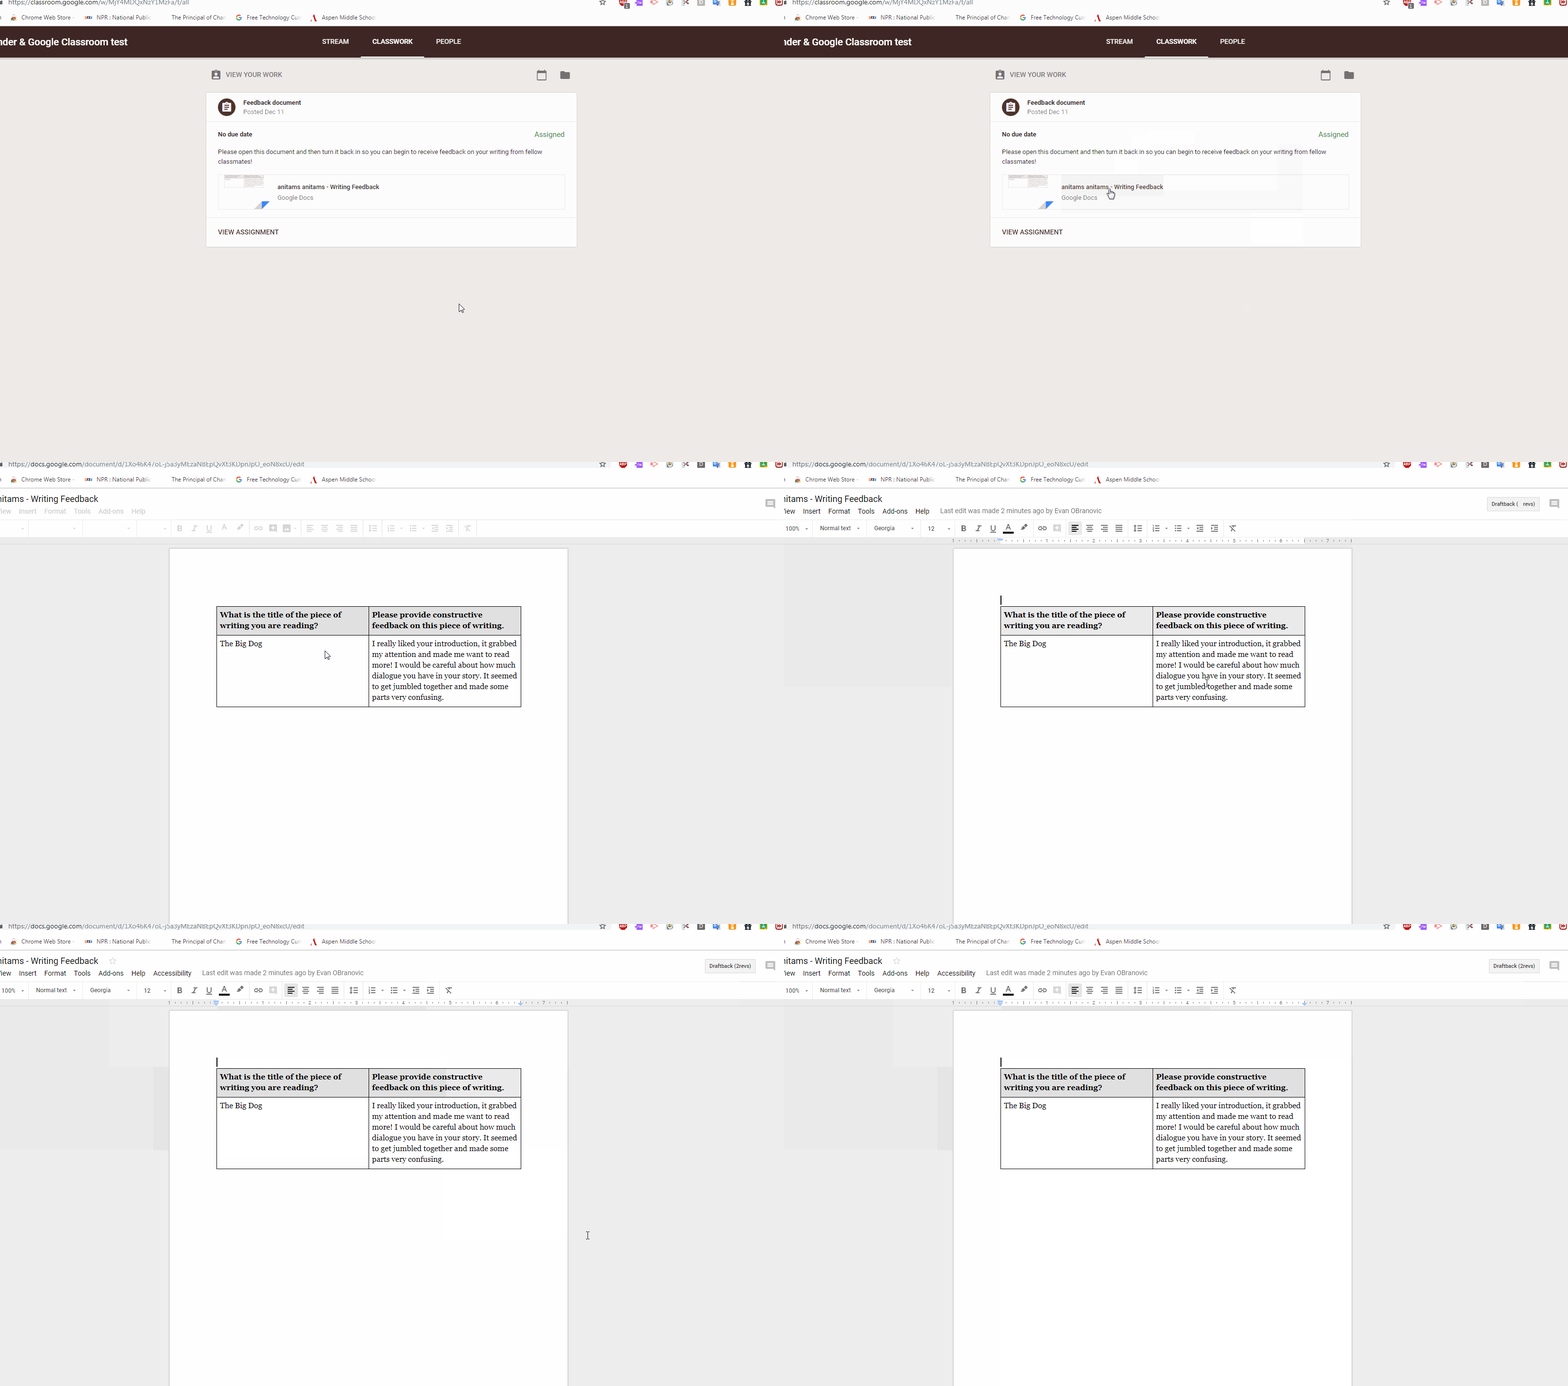
With Google Cast for EDU student sharing has just taken on a whole new level! This amazing extension for the Chrome Web Browser allows a teacher to easily give students access to share what they are working on quickly and in real-time. The Google Cast for EDU extension is quick to install and very easy to setup for teachers, enabling them to turn their device into a display for an entire classes' devices when it comes time to share with the group. At the admin level we have limited the ability for students to install this extension in the admin console since teachers are the primary users for displaying content being shared by students. With Chrome now having Cast built directly into the settings it's very easy for students and teachers to access the tool in order to share their screen. Within a few clicks you can access a preset teacher device and quickly begin sharing your screen to present. Refer to the screenshots below for visuals on how to get started, but don't miss this opportunity to take advantage of a great tool to seamlessly share student work! **For all my techies out there, all of our testing has shown that devices don't have to be on the same network in order to cast to one another. This has been extremely important since we have student and teacher devices on separate networks** Providing meaningful feedback for students is one of the most powerful tools for educators to create meaningful connections and learning. It never seems like one method will check all the boxes in allowing students or teachers to get that feedback to other students so they can reflect on their own work. With the addition of technology in the mix, it has proven even more difficult to find effective ways to allow students to give and receive feedback on digital work. Working with a 2nd grade teacher we were struggling to find ways for her students to make comments on hand-written and digital writing in a way that could be collected and reviewed later by both the teacher and the students. Some of the obvious options came up: wanting to use Google Forms for students to easily type in comments and Google Classroom to collect and share digital writing. We had the outline to how we thought we could get it done and now we had to find how to best adjust the tools at hand to work in a way that was easy for the students and teachers and could be replicated over and over again. docAppender - If you haven't heard of docAppender it's a Google Forms add-on that will send responses to an specific Google Doc based on some of the parameters you set-up ahead of time. The initial set-up can take a bit of time (this is where Google Classroom comes in), but then you have a form that will send each response to a easily readable Google Doc that can be shared and used repeatedly to create a running record of feedback. Google Classroom - I'm only going to assume you haven't heard of Google Classroom because you have been living under a rock with no Wifi and refuse to join most of the world in utilizing GSuite (j/k, well kinda...). The ability to organize a workflow between students and teachers with Classroom is game changing. It has made working in a digital, "mostly" paperless environment user-friendly and effective. When it comes to creating assignments, handing out individual templates, and easily collecting student work of a variety of medias I don't have much negative to say. There are no perfect systems, but we won't get into those in this post. So now you know the tools, but the key is how you make them work together. The docAppender add-on doesn't need Google Classroom in order to function, but it makes it go much smoother. As mentioned above the docAppender add-on will allow you to sort and separate responses to a Google form onto specific Google docs which makes it a great way to get written feedback for specific people and then share that data with those people without sharing other feedback. Using Google Classroom lets you easily create a document and folder location to keep all the feedback documents together for easy sharing and use. Take a look at the screenshots below to get an idea how to get the process started. So there you have a "daisy-chain" of two great tools to help facilitate peer feedback in your class. Many modifications can be made to suit your specific needs such as creating multiple documents for different types of writing, but if you include the right identification questions it may be just as easy to keep one big running record of feedback to not overwhelm a student with different documents to sort through in order to see their feedback. Making the connection through Classroom makes it really easy to create the documents and identify them by student name as well as give you as the teacher access to everyone's work and feedback. If you have any systems like this or good modifications/suggestions please leave them in the comments below.
What is the best way to provided professional development to staff, especially when your focus is educational technology? What my fellow integrator, Anita Moose, and I have found is to remove the concept of educational technology out all together! One of the biggest complaints and issues we hear from teachers is a lack of time to thoughtfully plan anything out and feel confident implementing it in the classroom. So after sitting down to brainstorm how we can create a PD that will hold value to teachers of a a variety of subjects and grade-levels we decided to keep it simple. We hosted half-day sessions of Curriculum Planning for teachers to come in and have paid time (stipend or PD hours) to work on any upcoming curriculum they need to plan out and have our Technology Integrators "moderating" and available to answer any questions and provide support in finding places to use technology to enhance teaching and student learning.
We marketed these sessions as opportunities to get planning done on 'paid' time (we offer stipends or PD hours for in-house salary advancement programs). We had a variety of teachers attend from all grade levels and subjects and use their time to get organized for the start of the year with tools like Google Classroom, create content with Google Slides and SMART notebook, flipping the classroom with Edpuzzle and Educreations, and setup digital portfolio templates with Google Sites. We were consistently told how helpful this time was and one of the best PD offerings they've attended! So by removing the focus on trying to master a tech tool or process we were able to attract a variety of teachers to make use of always needed planning time and then hold meaningful discussions about where technology might help accomplish curriculum and student learning goals. Teachers weren't overwhelmed by a sit and get and were engaged in getting work done that was specific to them. It turns out one of our simplest attempts at PD was one of the most successful and created an easy recipe to repeat at various times throughout the year. Please make any comments regarding some of the most effective and successful PDs you've designed, run, or attended.
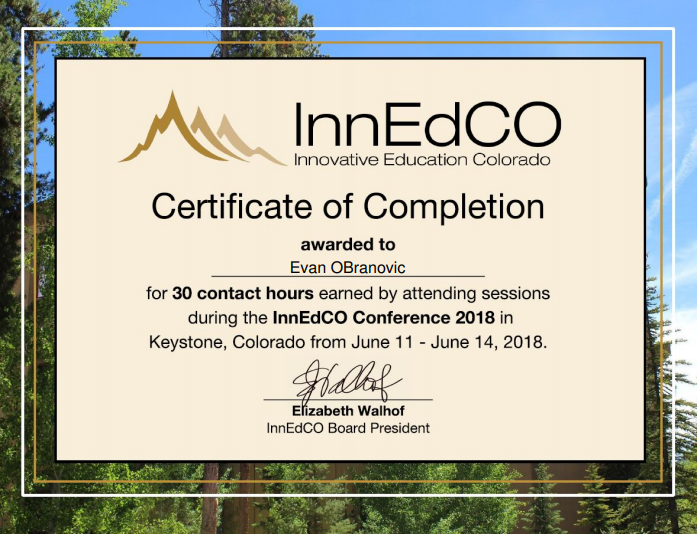
Another school year down and another amazing visit to InnEdCO 2018 in Keystone, CO! It's been so great to have such an amazing conference local to Colorado when ISTE only comes to Denver once every 5 years. After 4 days of learning, connecting, and growing I want to highlight several things I took away from this incredible experience.
Everyone needs to be at the table when it comes to innovation - Several of the sessions I attended discussed how we can innovate in our teaching, student learning, curriculum, and professional development. There are so many great tools and resources to help us become innovative but one of the most important themes I took away is who you have at the table in order to accomplish this innovation. Without the support and shared vision of administrators, an educator may not feel comfortable or supported in taking the risks and making the changes necessary to help students become innovative.
Building relationships is crucial - Edtech Coaches, Technology Integrators, Digital Coaches, etc.. are becoming more and more common in school districts across Colorado. Many sessions focused on how these positions can be successful in helping support teachers and students in using technology to accomplish learning goals. With these roles being often viewed as 'one more thing' for a teacher it has become important to show value to teachers so they feel like using coaches or integrators as a resource will greatly help them and be an asset. Two of the sessions centered around the DPS MyTech program which looks to successfully implement 1:1 devices in 14 schools and that included putting Digital Coaches in place to help support teachers and students.
All the groups and individuals I listened to from DPS, St. Vrain, Boulder Valley and others made a point to emphasis how important it was to establish relationships with their teachers and administrators to create meaningful connections. Once these relationships were established it then became possible to help teachers integrate technology to dynamically accomplish learning goals.
Design Thinking, Inquiry Learning, & Project/Problem based Learning are still the goal - These aren't new ideas and over the past few years the ways to implement them has been all over the map (and I don't think that's a bad thing). Many sessions used the design thinking framework to help the audience work through concepts and rethink how they are addressing student learning, teacher professional development, and technology implementation. I really like this process and find it so useful in designing dynamic experiences and coming up with great ideas. It is exciting to see it become somewhat of a standard for working through a process to utilize the best thinking of all the people in the room.
Can you really create an innovative and dynamic lessons if you aren't incorporating inquiry or project-based learning? Students are no longer engaged with old school drill and kill pedagogy. If we aren't letting our students identify problems, ask questions, and come up with solutions then we aren't preparing them for the next level in their education and beyond. Thankfully with the help of edtech there are a ton of ways to implement these strategies.
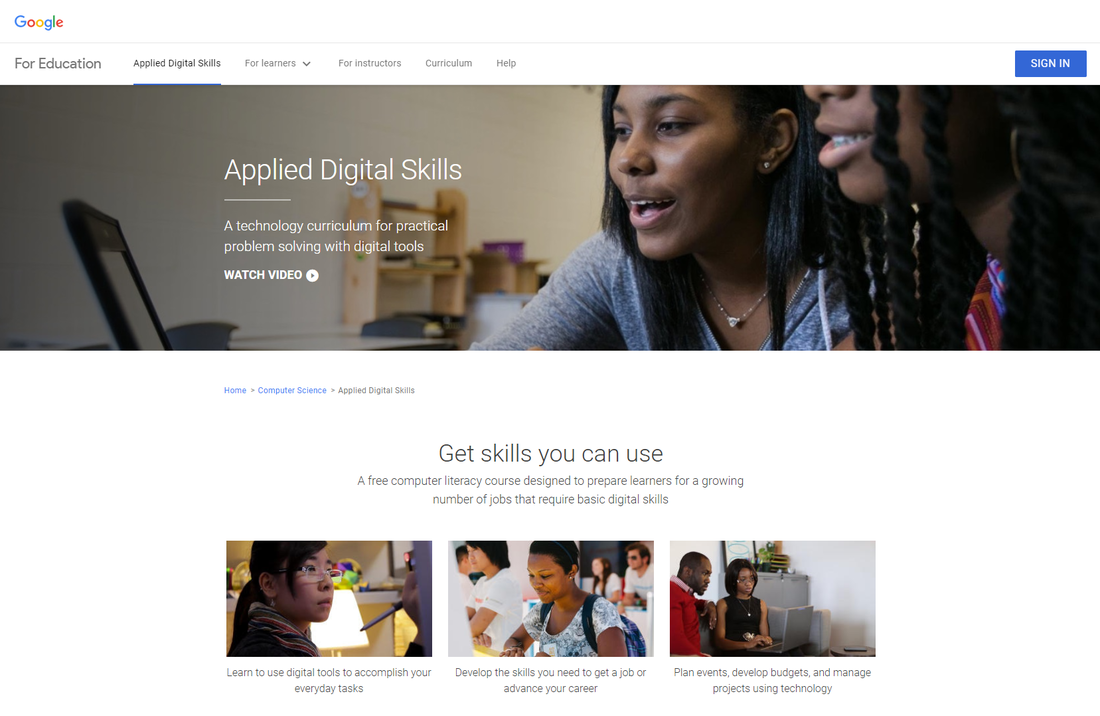
How do we teach Digital Citizenship and Digital Skills to our students?- We can't expect to inject all of this educational technology in our teaching and not help prepare students to be thoughtful and purposeful with its use. There are several programs out there to try and help a educator pass on these skills to students, but Google has recently jumped in the game with their Be Internet Awesome digital citizenship program and Applied Digital Skills program for utilizing GSuite. Both of these programs are filled with resources that can be modified or plug and play to get a teacher going with their class. Check them out if you haven't already!
Google now has a digital citizenship & safety curriculum (3-5th grade) that’s free online and doesn’t require a sign-in https://beinternetawesome.withgoogle.com/en Applied Digital Skills curriculum provided by Google to help teachers teach applicable digital skills to students using GSuite. Resources are available online and can be modified for differentiation. https://applieddigitalskills.withgoogle.com/ -Does require Google account to track progress and access materials.
So there you have my big take-a-ways from this year's InnEdCO conference in Keystone, CO. If you've never been make sure to plan on attending this summer and connecting with a ton of amazing educators who all are looking to utilizing edtech and innovative thinking to improve how we educate in Colorado. Please add any of your highlights in the comments section if you did attend.
In my role as Technology Integrator it can be overwhelming to decide on the right direction when looking to advance staff in their teaching practice and students in their potential. It's easy to get lost in the bells and whistles of technology engagement instead of focusing on the purposeful use to deliver curriculum and achieve academic standards. Thankfully, one of the best ways I have found to keep things in perspective is using the ISTE standards (Student, Teacher, Coach, & Administrator) when trying to be thoughtful about how we are using technology to enhance our teaching.
We have been making progress in meeting regularly with grade-level teams and departments K-12th. They were originally set up as 'tech check-ins' to give teachers a voice to address immediate and small concerns and then allow for planning conversations in upcoming lessons. My fellow integrator and I wanted to move the needle a bit faster and felt many teachers time and ability to process the ISTE standards when planning lessons was often limited. We decided to use some of the time already dedicated to our tech check-ins could be used to help teachers process the ISTE standards and jump start the conversation about effective technology use in their classrooms. So the question was: "How do we quickly introduce portions of the ISTE standards to teachers during these check-ins and still have time to let teachers ask other questions or bring up concerns?" Our first decision was to start with the Student Standards in order to hold discussions that would engage teachers around student learning, we would circle back with the teacher standards in larger-scale PD. It was then determined that we needed to develop protocols in which to frame these discussions. My fellow integrator, Anita Moose, has been well-versed in our District initiatives of Cognitive Coaching and Adaptive Schools so we decided to adapt several of their protocols in order to hold meaningful and productive discussions with our teachers that could be executed quickly. We broke the standards review into two pieces: 1. A general overview of all 7 of the student standards. (Empowered Learner, Digital Citizen, Knowledge Constructor, Innovative Designer, Computation Thinker, & Creative Communicator) 2. A deeper dive into the sub-standards. This process has just begun and we plan on carrying over into next year, but the first few meetings we have had promoted some great discussion and got teachers thinking critically about the ISTE standards and how they apply to their own teaching and student learning. You can review and use the protocols we came up with below and feel free to make any suggestions for improvement in the comments. I'm sure I'll be writing an update post as we dive deeper with what's working and what needs improvement so stay tuned! ISTE-S Standard Protocols
We did it! Aspen Schools has successfully held its first EdTechTeam summit to promote some great things happening in edtech and motivate and empower educators from across the state. The goal of the summit is to improve teaching and students' learning with the help of some awesome tech tools and ideas. The process of hosting the summit at your home school is time-consuming and exhausting, but incredibly rewarding. Here are 5 takeaways or ah-ha's I had from this amazing experience:
1. We need to give Geo a chance- One of the incredible members of the EdTechTeam, Jeffery Heil, gave an inspiring keynote to kick off our summit and presented a session on taking advantage of the Google Geo tools to engage and excite your students.
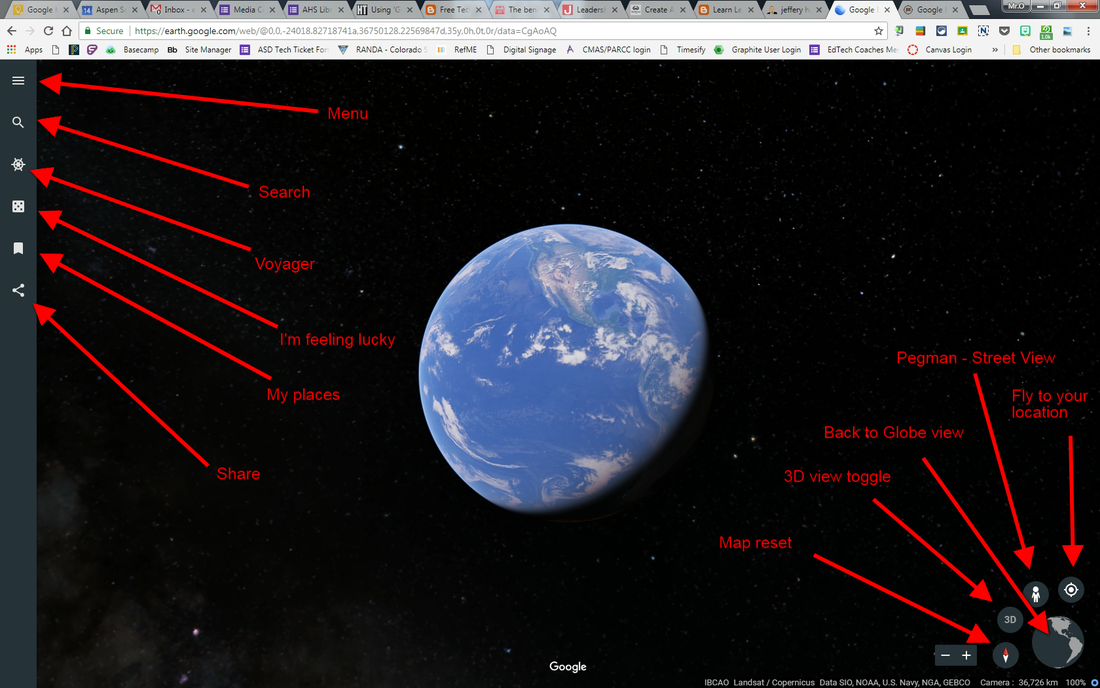
Taking advantage of Google Earth now being web-based is a must for teachers of just about any subject or content area. The 'Voyager' component of Google Earth is an incredible educational tool that curates content normally not available to students. Google Maps and My Maps are great ways to create custom maps and really individualize your experience in a variety of places. Once you have created a map you can export it as a KML file to import into another My Map or do a Google search for relevant KML files that have been created by others that you could use. Street View lets students get up close and personal with places inside and out that they may never have a chance to visit in person. The ability for everyone to contribute to Street View puts an incredible amount of power and agency in students' hands that can lead to powerful learning and connections, but please be considerate of students' privacy and safety when encouraging sharing. Google Expeditions is a powerful AR (Augmented Reality) tool that lets you use mobile devices to take students all over the world and beyond for fun and interactive experiences. Starting its full roll-out this fall the power of this is unlimited whether you have a full class set or a few to run an engaging center. I can't wait to see how this develops!
2. Google Applied Digital Skills Curriculum- Google has recently released it's Applied Digital Skills Curriculum which walks through practical life applications that can be accomplished with the GSuite tools. Use this to teach students (or adults) how to research properly, create a budget, stay organized, and much more. Teachers can guide students through the self-paced learning that can be done individually or in groups and the lesson plans and resources can be downloaded to allow modification to meet your specific needs. I think we are finally getting to the answer to all teacher's favorite question: "When am I going to use this in real-life?"
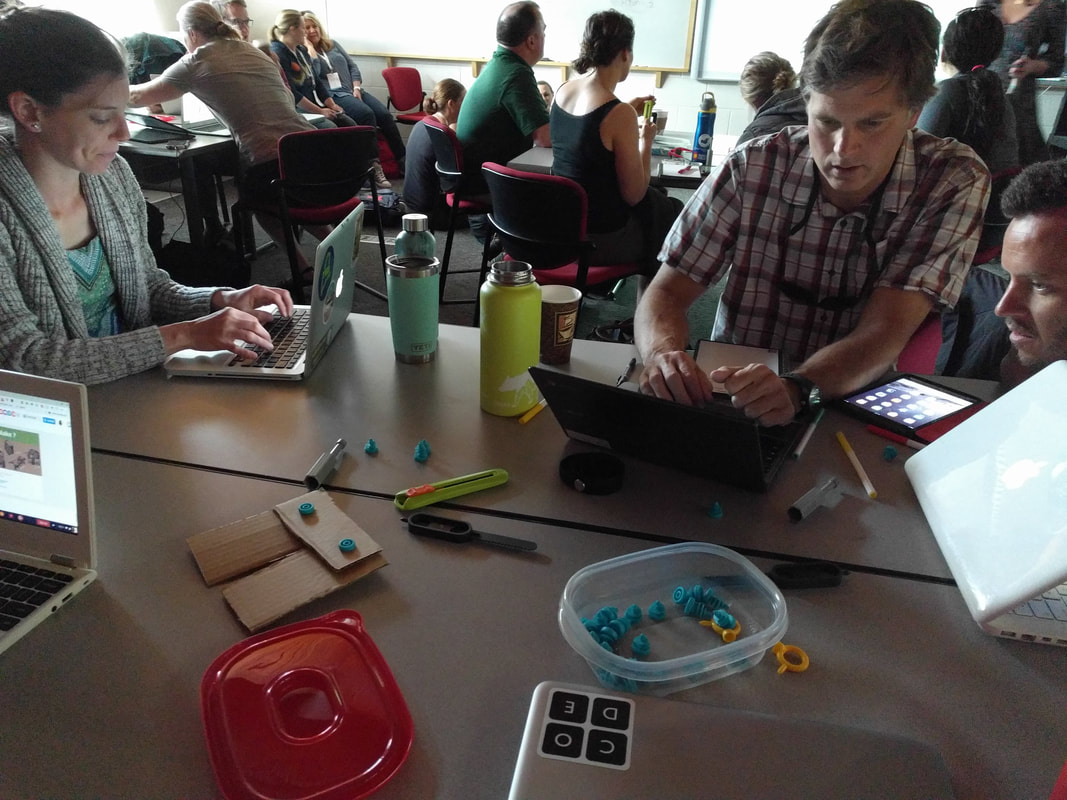
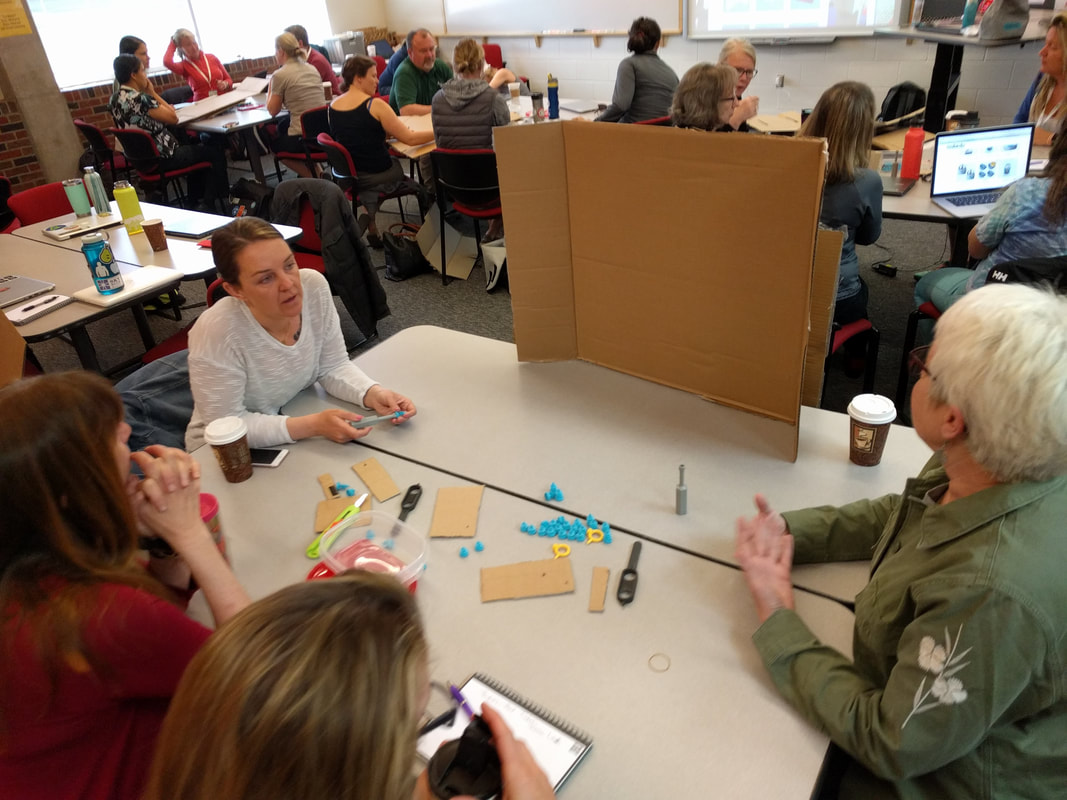
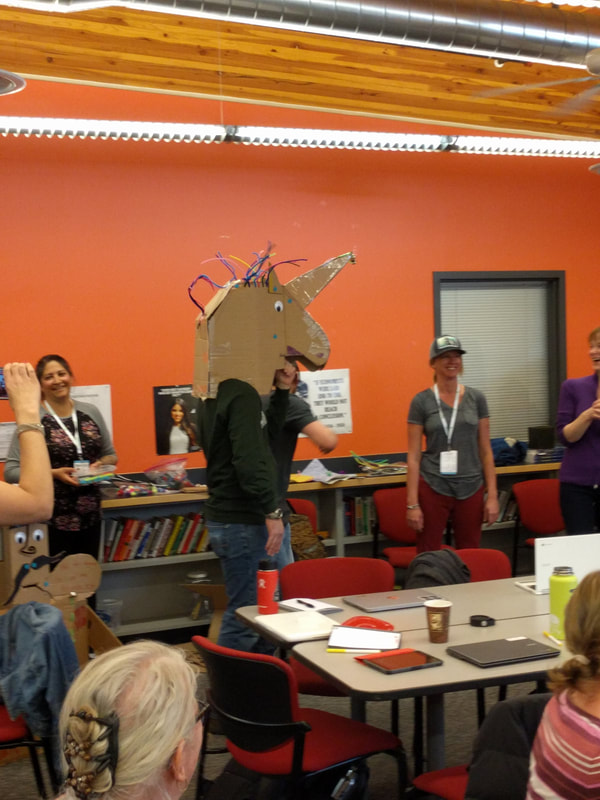
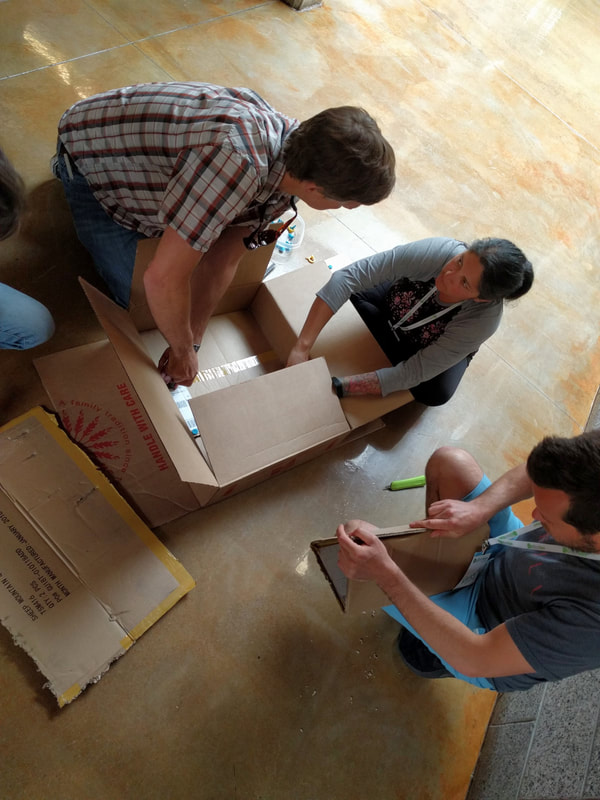
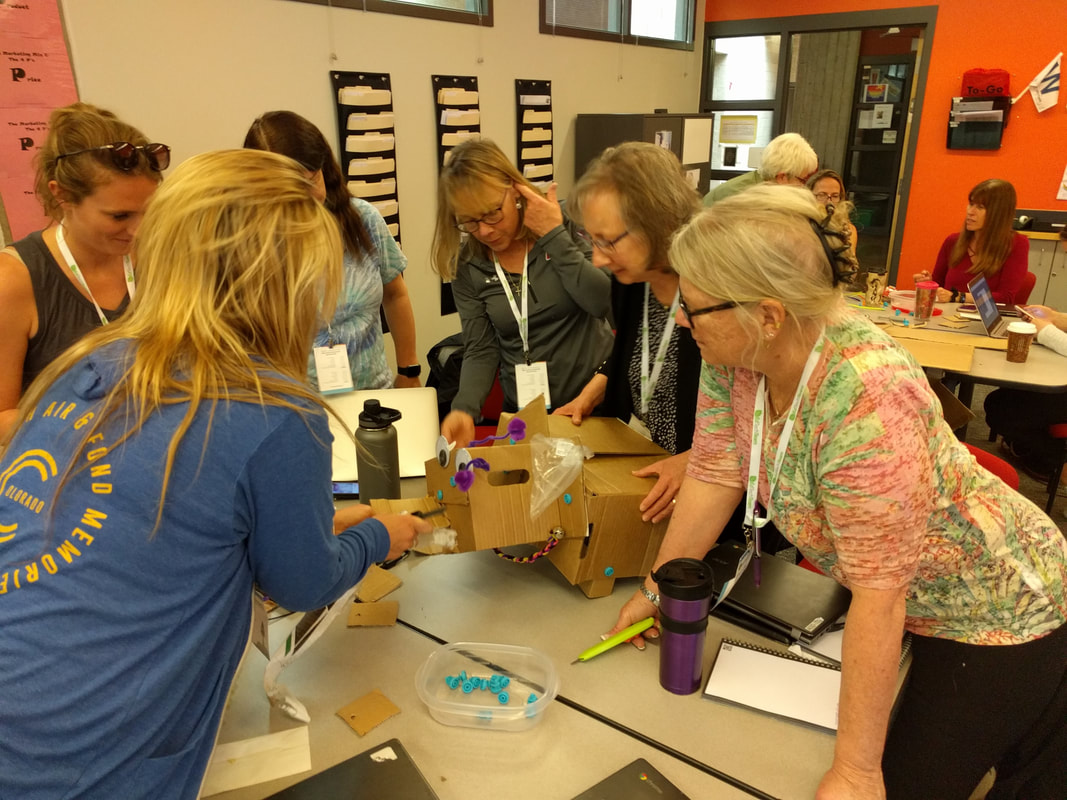
3. Tinker Thinking is important- We were extremely lucky to have very energetic and innovative Jessica Loucks presenting at our summit. I attended her session called Thinkers That Tinker and was motivated to integrate more design thinking into our teachers' lessons and students' learning starting at the most basic of levels. Our first activity was using Makedo kits to design and build a creature out of cardboard! We were given a few requirements and then set off in groups to get creative. In a short amount of time we had all created very different concepts that we presented to each other and participate in a Launch Cycle that can easily be adapted to working with our students. I think the simplicty of design thinking and creativity is often lost on educators as we are pressured to juggle so many things and to step back and slow down is good for us and our students to be creative problem solvers that aren't defined by the barriers around us. Moral of the story: don't be afraid to tinker and let your students tinker!
4. Leadership- In addition to hosting the weekend summit we were also able to have a leadership pre-summit specifically for administration, teacher-leaders, and other school leadership positions. The Leading & Learning session was led by Mark Garrison who did an amazing job of motivating and inspiring us to think about how our students are learning and what ways technology can play a role. We covered several of the models for thinking about and evaluating tech use with teachers (TPACK & SAMR) and students (4Cs, TIM, & T3) and framed our discussion about what good teaching can look like with the assistance of technology as well as how we can coach teachers to use technology effectively in their teaching practice.
Participating in the pre-summit and the full summit made one thing clear to me regarding leadership: we need our leaders to participate in these types of events in order to better understand how technology fits into the educational model and can be leveraged to promote student and teacher success. We had several principals attend the full summit and one summarized his revelation perfectly: "I went in thinking this would be all about the gadgets, and soon realized it was about ways to promote and improve student learning and great teaching!" So refreshing to hear this coming from the leader of a building who will then hopefully pass down that excitement and energy to their own staff when looking to set goals for improvement. Teachers and staff can do a lot by "leading from the middle" when it comes to improving our students educational experience with the aide of technology, but getting our leadership on board is crucial to long-term success!
5. Do you say it GIF or GIF (JIF)?- I am a lover of GIFs. Several years ago I attended a session in an EdTechTeam summit that really showed me the power of these simple graphics and how they can be easily created and used creatively to achieve a lot of different goals in the educational sphere. In hosting our first summit I decided it was time to share my love of the GIF by participating in the Demo Slam. For those of you not familiar with the Demo Slam it is an exciting, fast-paced, and competitive showcase of innovative & fun tech tips to get people motivated to try great things. We use this model in our own district to get people engaged before staff meetings and showcase the amazing things happening in the classroom.
In my attempts to be funny I opened my presentation with the statement that it's pronounced GIF not JIF along with an attempt at a witty jab at those who think otherwise and then proceeded to do a mediocre job of presenting my information. My new best friend and nemesis, Jeff Heil, decided to take it upon himself to impromtively change his original topic and troll me to the point of destruction using this simple video below:
After that short video and a quick tutorial on a very easy way to make GIFs using Google photos I lowered my head in shame and accepted defeat... Until the next day when the entire summit was presented a video message from the amazing Ken Shelton (c/o Tracy Purdy) making his case for the use of phonics and linguistics that result in Graphic Interchange Format (GIF) pronounced with a hard G! I stand with Ken and will forever hold on to my opinion that it's pronounced GIF and not JIF!
There are my 5 big take-aways from the 1st (hopefully not the last) EdTechTeam summit in Aspen, CO. If you attended please feel free to share any of your favorite moments in the comments section.
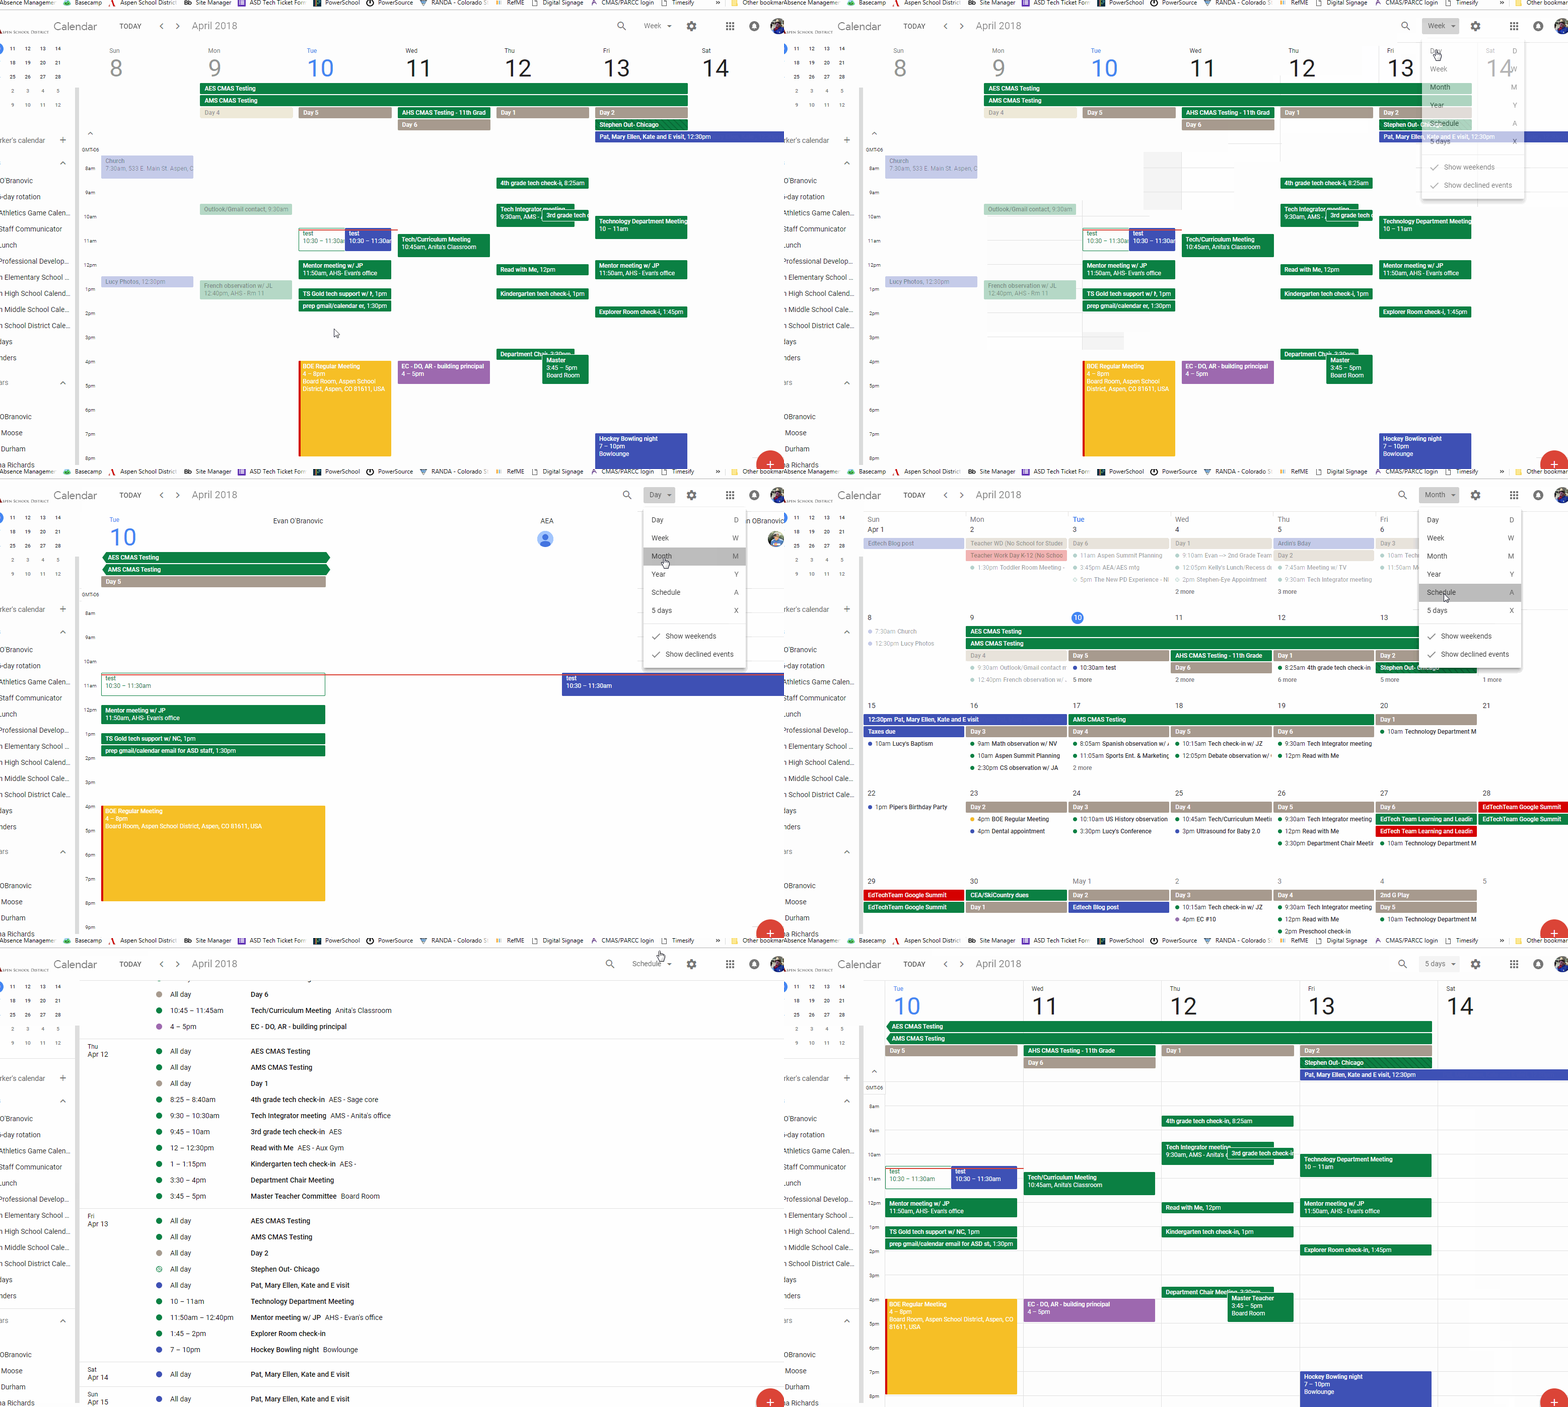
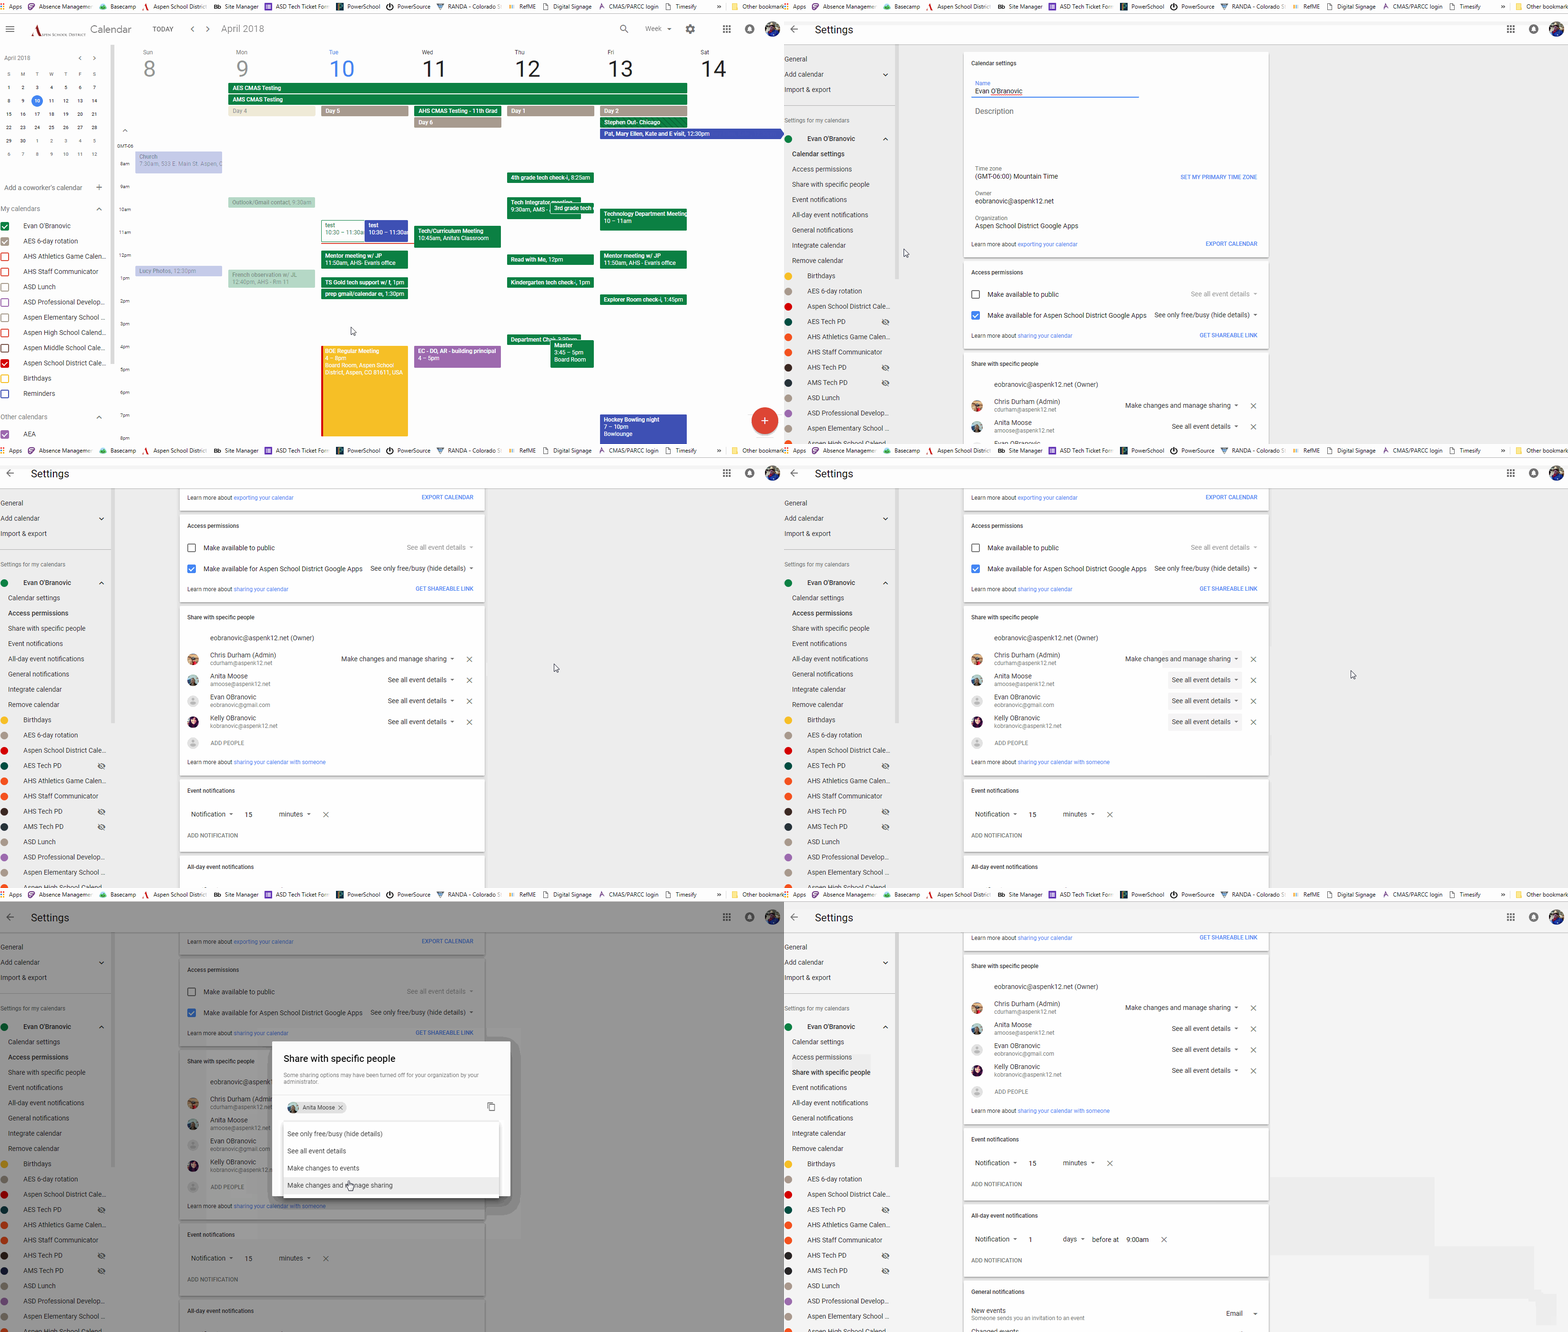
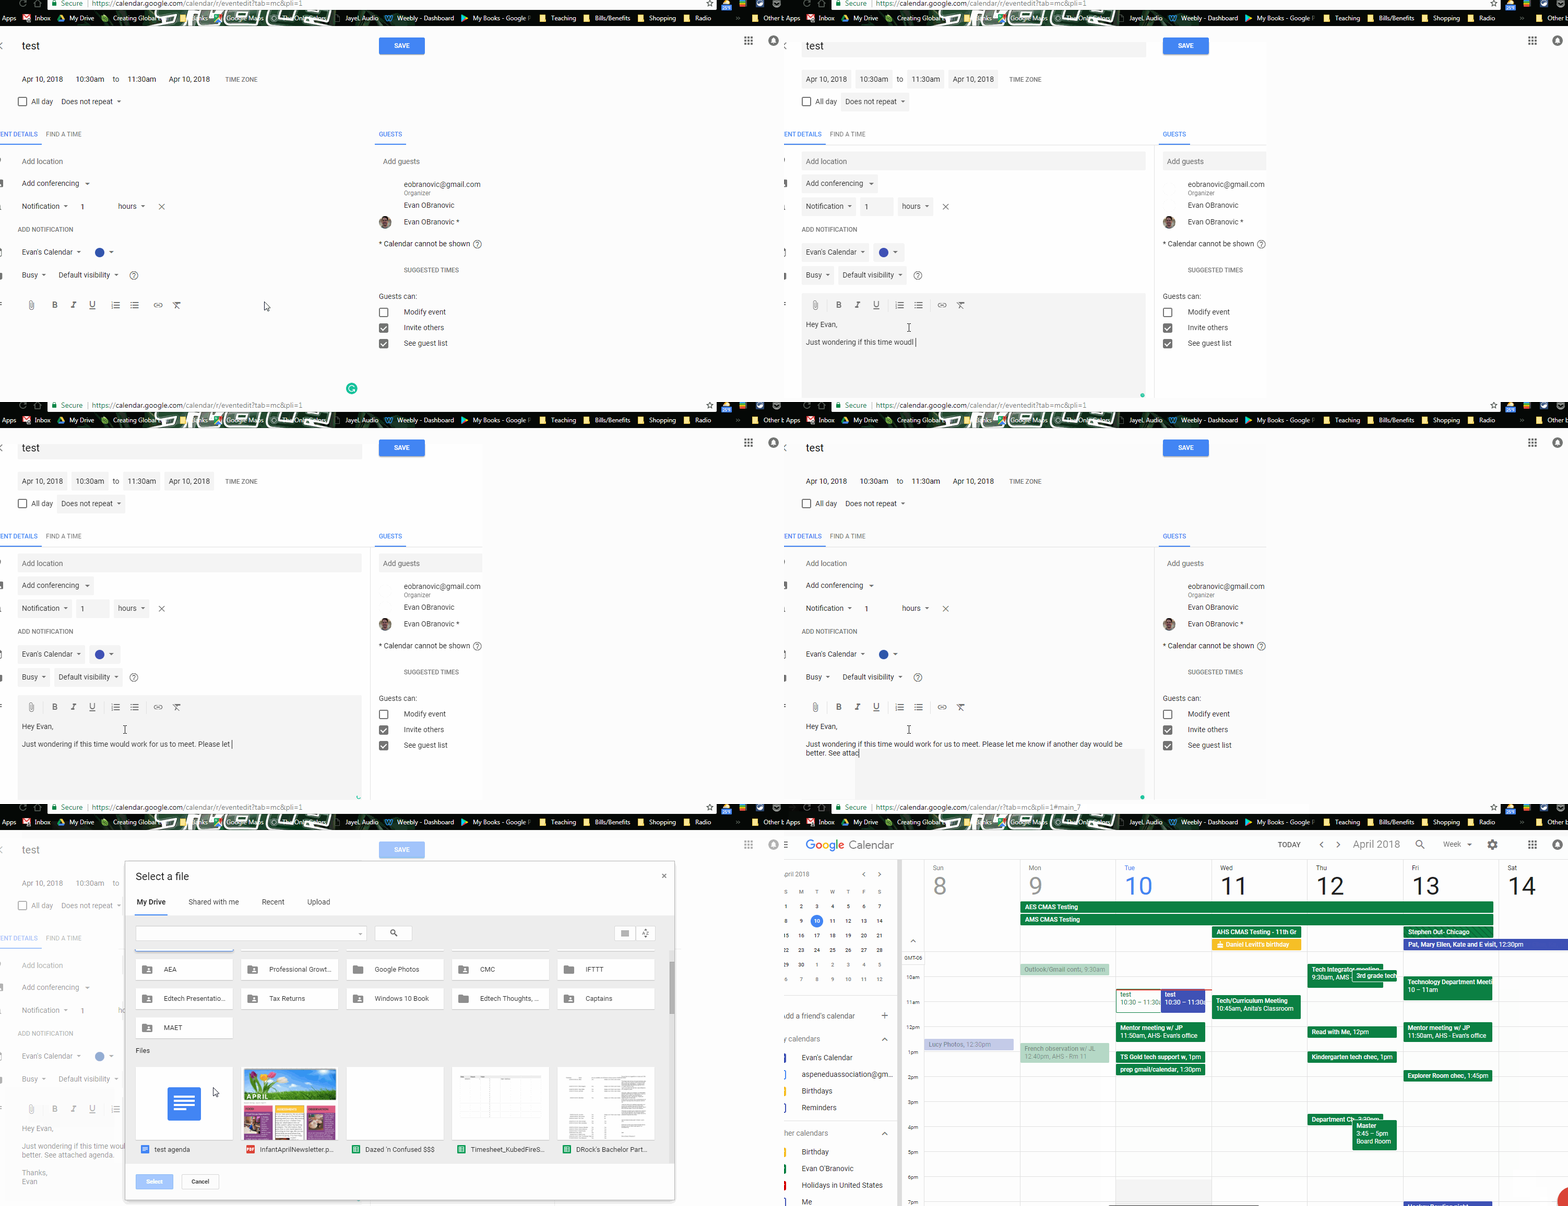
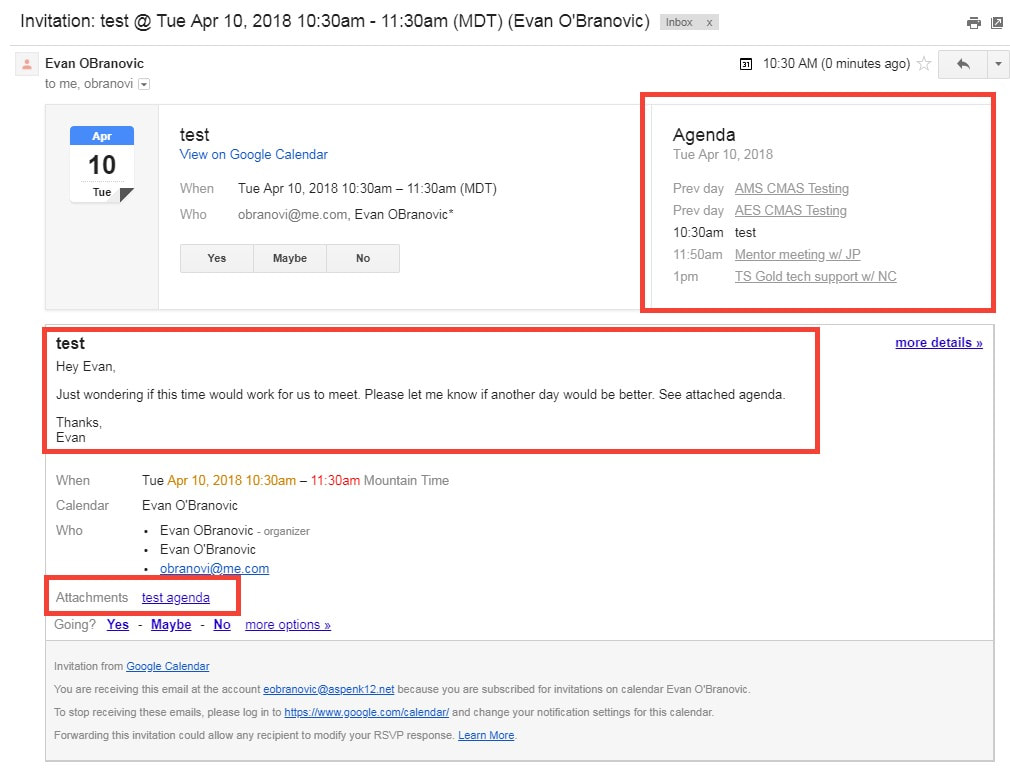
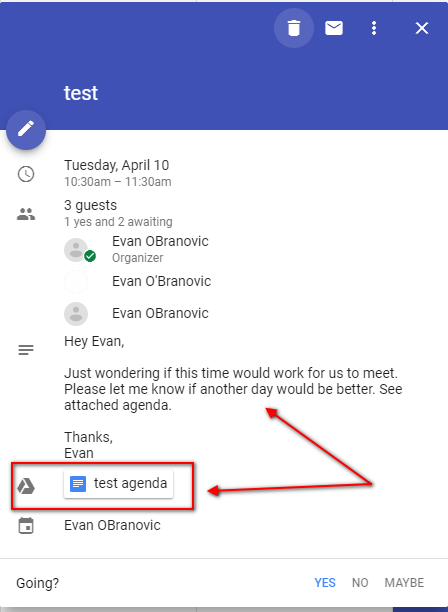
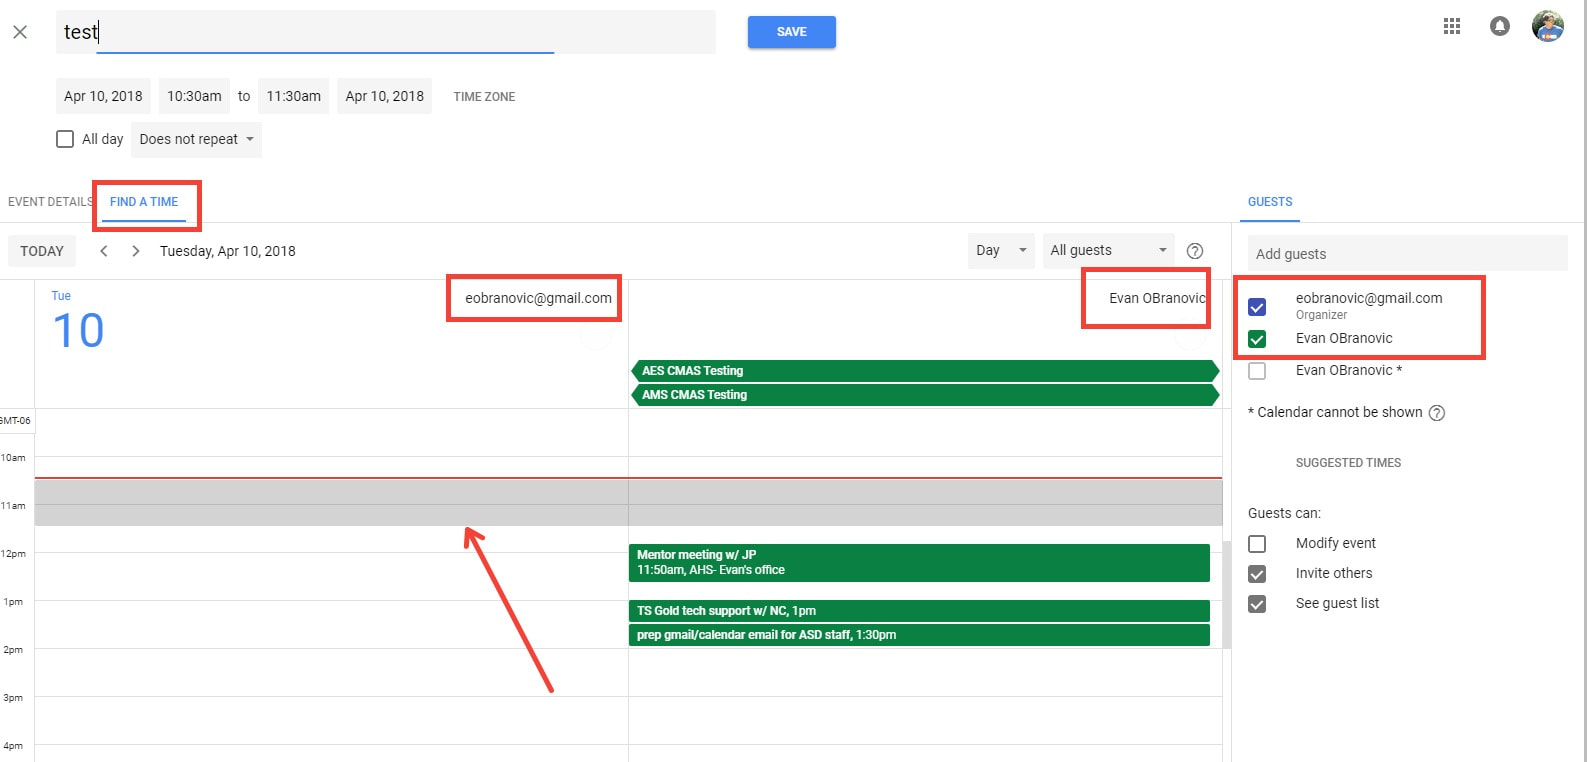
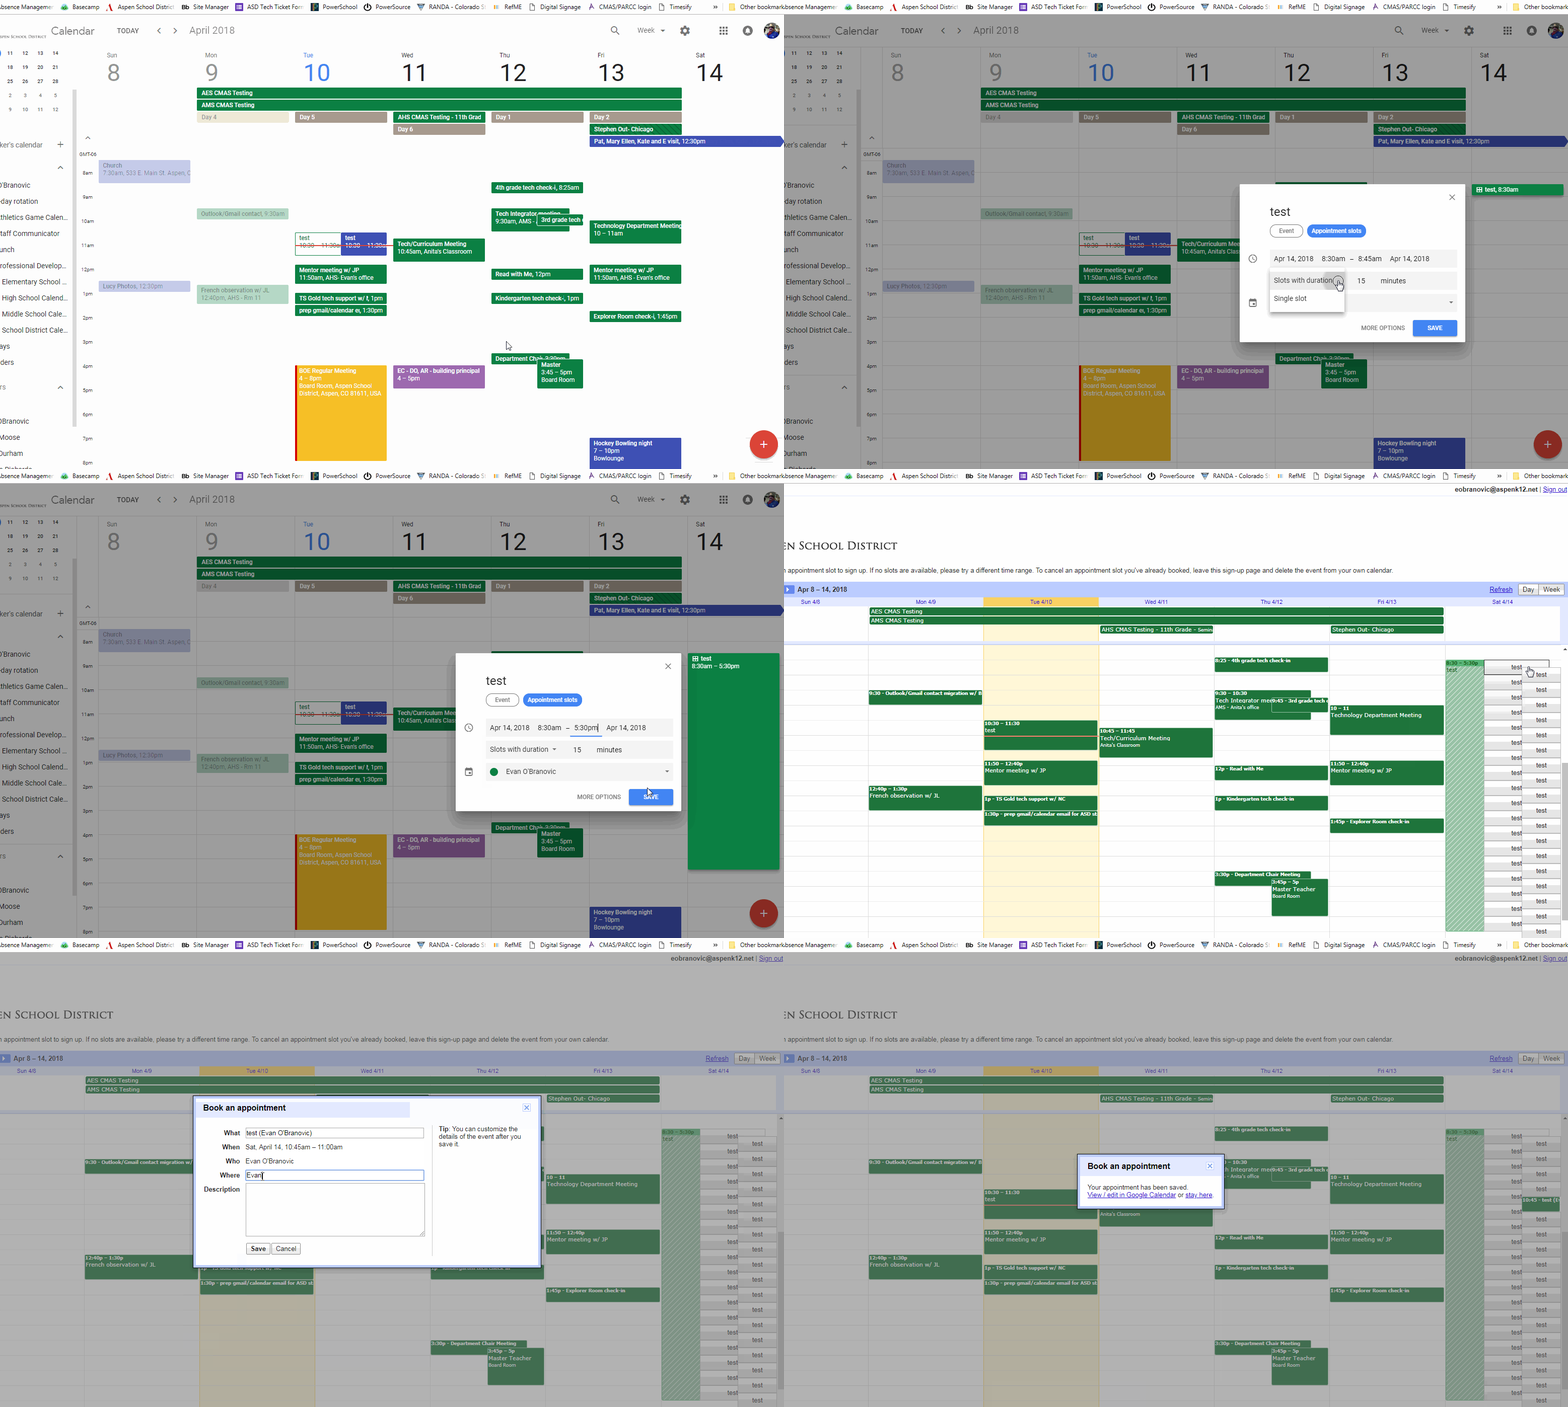
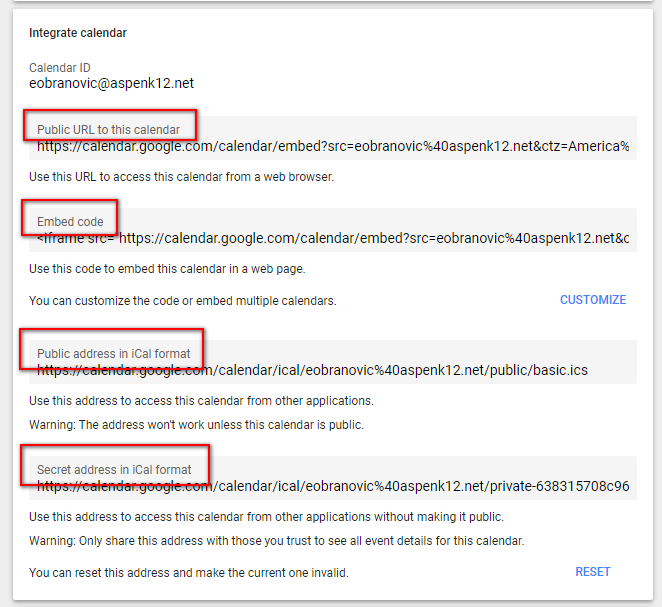
As my school staff move towards a full integration of GSuite for EDU tools to optimize our workflow. We have begun to really take advantage of Google Calendars to keep our schedules organized and accessible to others. Here are some tips and suggestions I have after working with staff in developing best practices: Layering & different views - Google Calendar works on the premise that you can easily meld a lot of different calendars together in order to stay organized. When you have a whole organization using the calendar it allows for easy sharing and access to calendars making coordination with peers simple and effective. Don't forget that you can alter how you are viewing your calendar based on your needs. Schedule view is often forgotten and can really help keep you organized if you have a lot of events. Day, Week, or 5-day view might help keep things organized if you need a clear picture of several calendars all at once. Sharing - Much like Google Docs one of the big advantages of Google Calendar is the ability to easily share it with other Google users and control what exactly they can see. Calendars can be made public or shared individually with a varied level of detail/access depending on what you deem appropriate. Avoid unnecessary emails about your availability by giving some level of access to your calendar/schedule to your cohorts. Invites & Attaching documents - One of the lynch pins of organizing your calendar with others is sending invites. This insures other parties are aware of a meeting or event you have scheduled, inserts it on their calendar, and will let you know who has confirmed or denied their ability to attend. Use the 'Find a Time' tab when creating an invite to easy see invitees availability (if you have access) to avoid back and forth correspondence about best times. When any corresponding documentation (i.e. agendas, supplemental reading, notes, etc...) would be helpful, simply attach it to the calendar invite so you have quick access. This feature is great for standing meetings that you may have a running agenda for, no need to search your Drive for the document! Making appointments - One feature only available for organizations like schools and businesses is the ability to make appointment slots that users can then sign up for and make an event on both calendars as a reminder. When you are in a support role, like myself, it is an easy way to stay organized and again avoid unnecessary emails back and forth to find times that work for everyone. View the Google Help center documentation HERE and watch the quick GIF below walking through the process. Syncing & Embedding - Everyone's using GSuite aren't they? Though a tool like Google Calendar always works best in it's home environment, it's easy to give someone (or larger audience) access to a calendar in a few different ways regardless of their Googleness. Each Google Calendar you create has the ability to be imported into a calendar viewer and grab an embed code to easily display your calendar on any webpage that allows for custom HTML. Spreadsheet import - When you have a lot of events you'd like to put in a calendar all at once, the thought of clicking on each day and entering the details can seem like a massive time suck, and it is. The ability to create a quick import template via Google Sheets is an incredible time-saver that makes populating a calendar quick and easy. Find the instructions from Google HERE and access a template I've created HERE.
There you have my advice for some of the best features and tools of Google Calendars that have really helped my district get the most out of this tool. If you have been a longtime user of Google Calendar none of this should come as a surprise, but getting everyone on your team and organization on board with these features and tools is paramount to getting the most out of Google Calendar and being efficient and organized. Please leave any tips or advice in the comment section that you've found helpful that wasn't mentioned above. |
About EvanDirector of Technology for Traverse City Area Public Schools. Level 2 Google Certified Educator. Former Tech Integration Specialist and 4th grade teacher at Aspen School District and Spartan for life! Go Green! Categories
All
Archives
February 2019
|






 RSS Feed