|
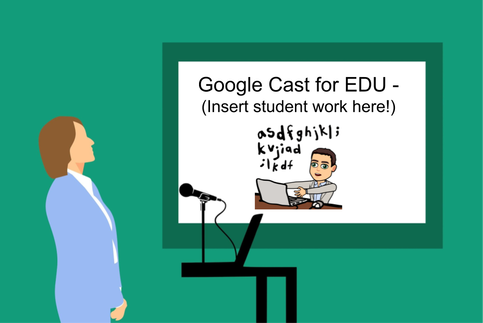
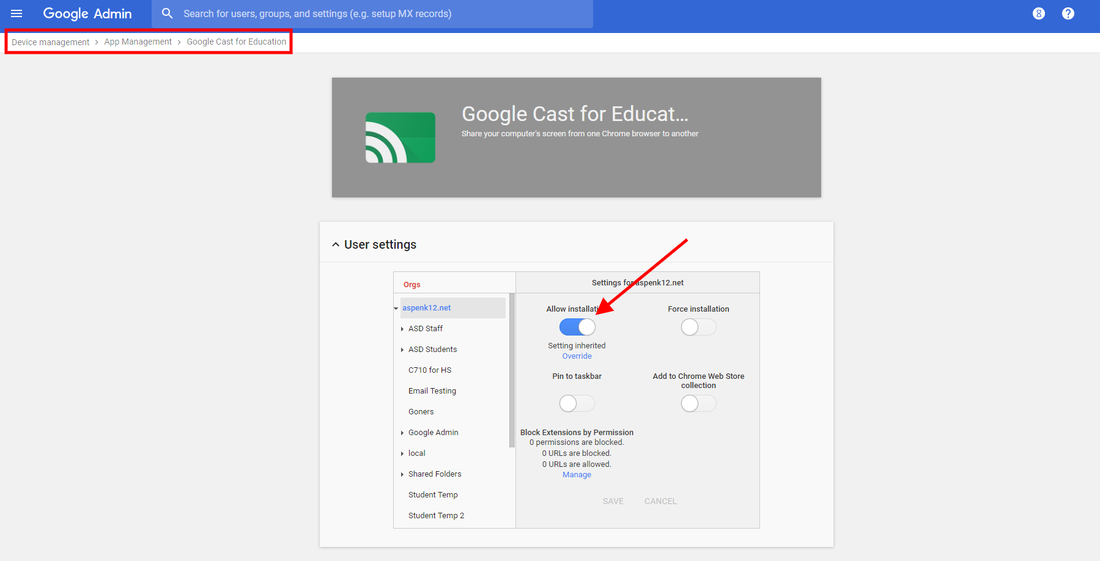
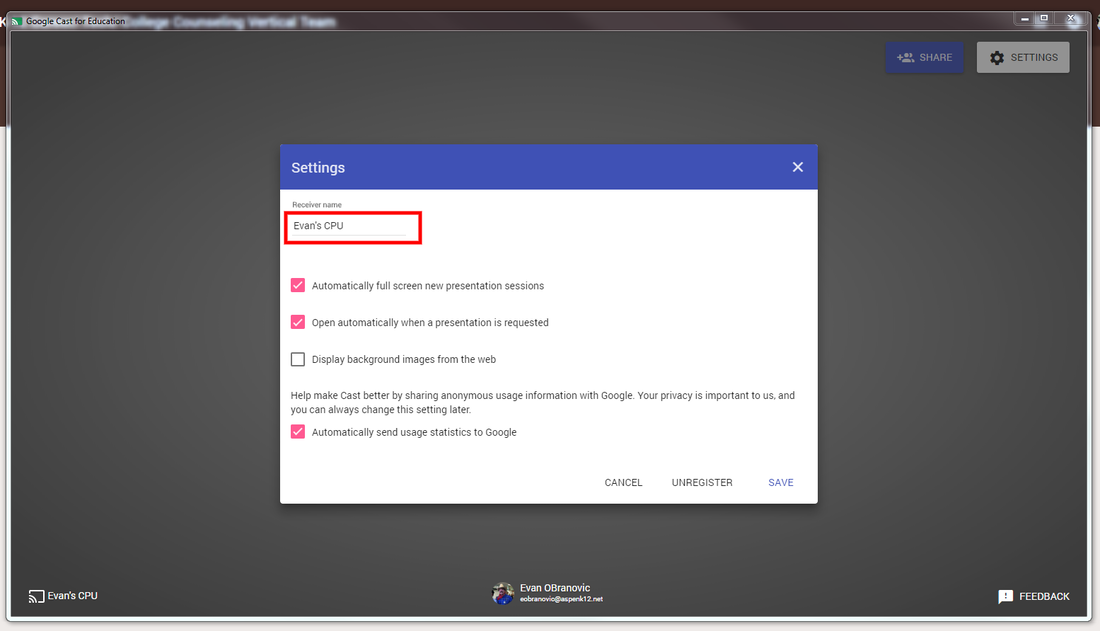
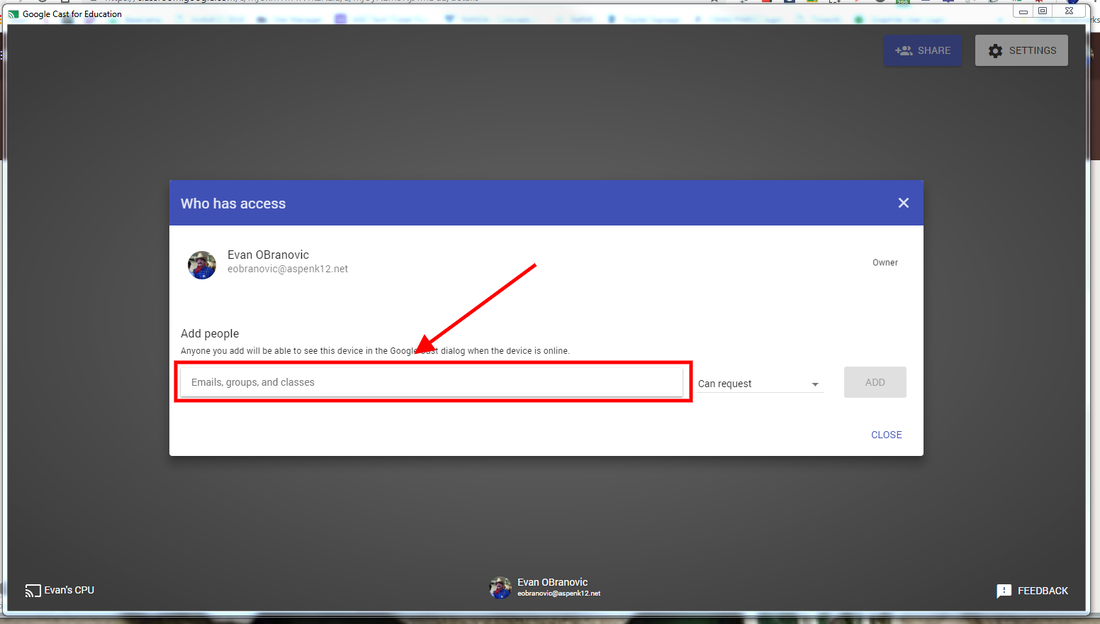
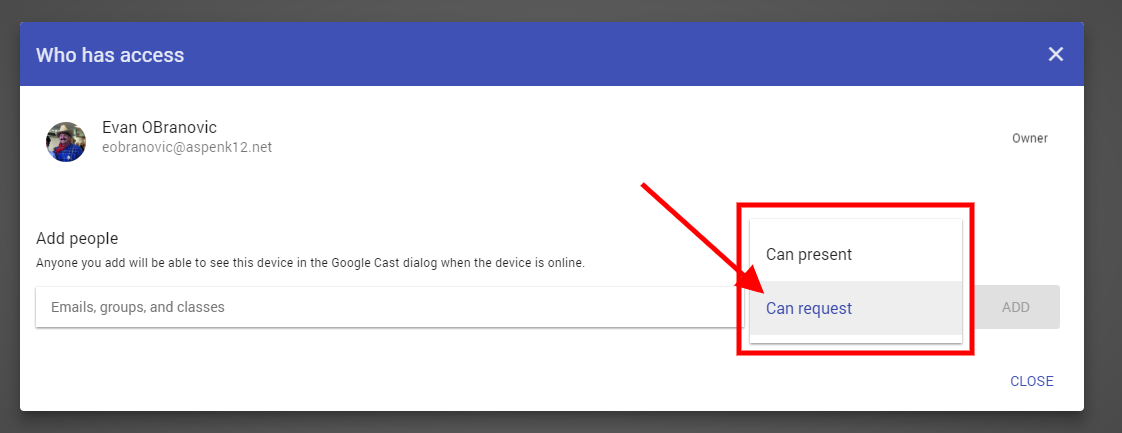
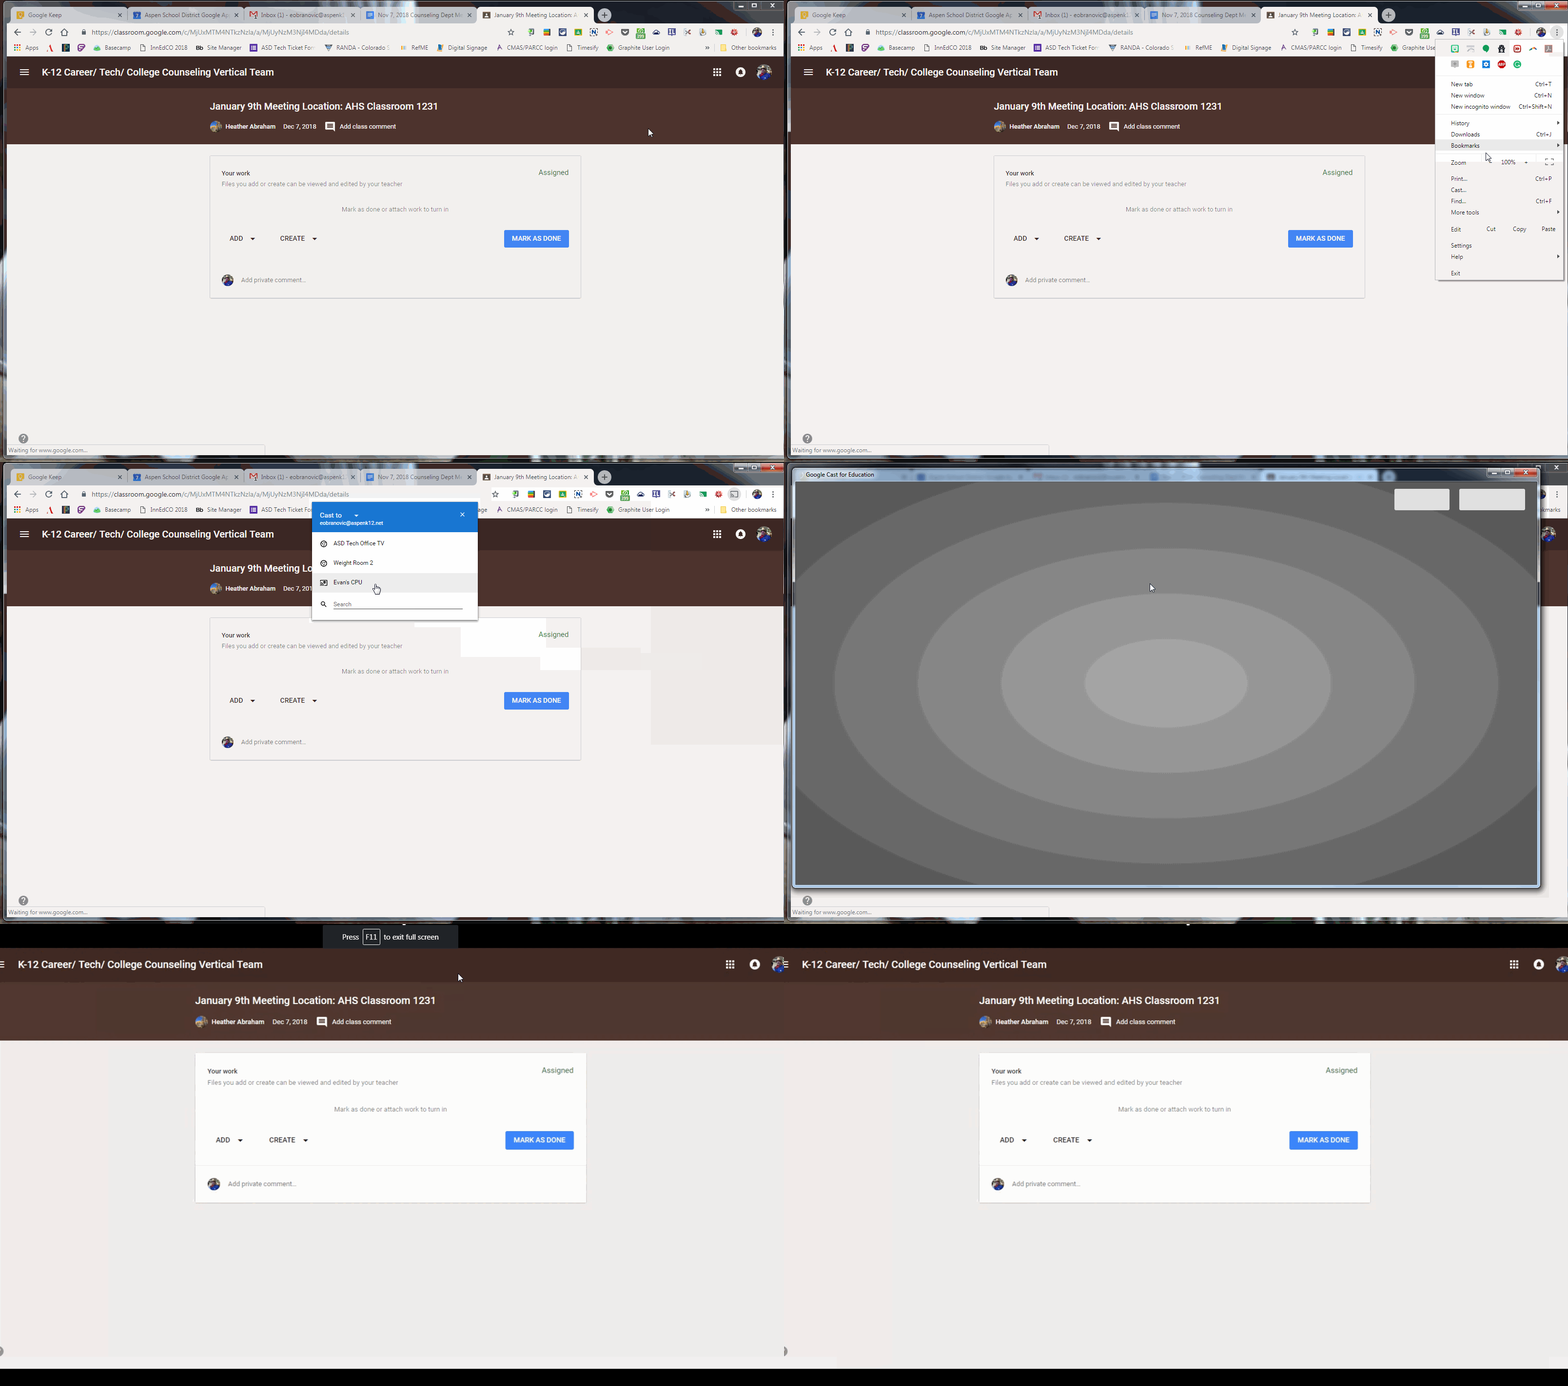
With Google Cast for EDU student sharing has just taken on a whole new level! This amazing extension for the Chrome Web Browser allows a teacher to easily give students access to share what they are working on quickly and in real-time. The Google Cast for EDU extension is quick to install and very easy to setup for teachers, enabling them to turn their device into a display for an entire classes' devices when it comes time to share with the group. At the admin level we have limited the ability for students to install this extension in the admin console since teachers are the primary users for displaying content being shared by students. With Chrome now having Cast built directly into the settings it's very easy for students and teachers to access the tool in order to share their screen. Within a few clicks you can access a preset teacher device and quickly begin sharing your screen to present. Refer to the screenshots below for visuals on how to get started, but don't miss this opportunity to take advantage of a great tool to seamlessly share student work! **For all my techies out there, all of our testing has shown that devices don't have to be on the same network in order to cast to one another. This has been extremely important since we have student and teacher devices on separate networks**
0 Comments
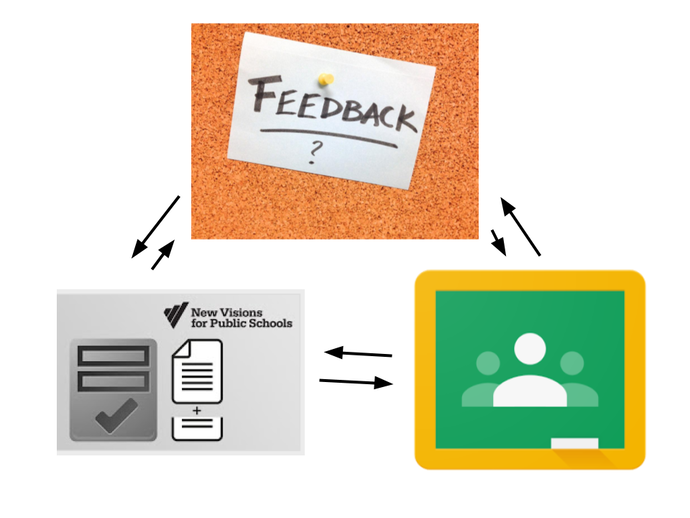
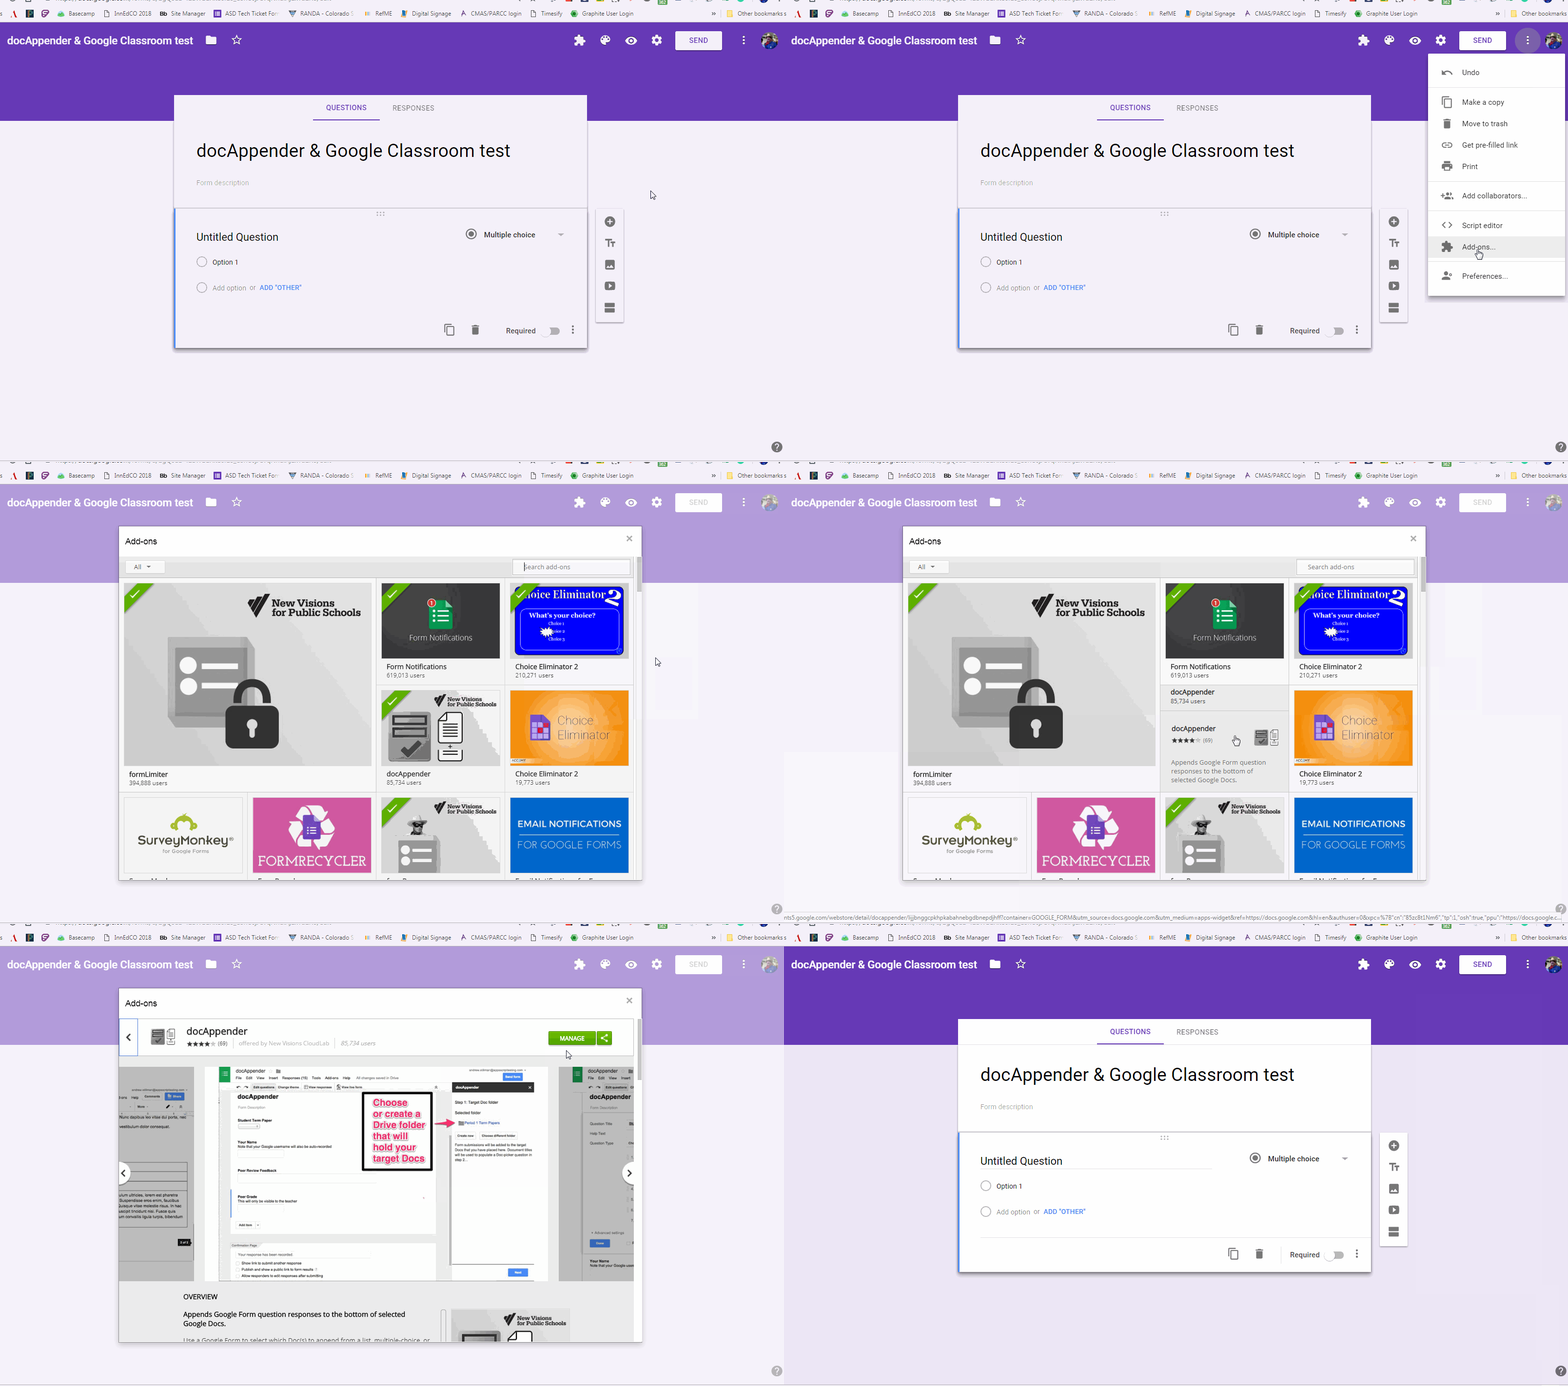
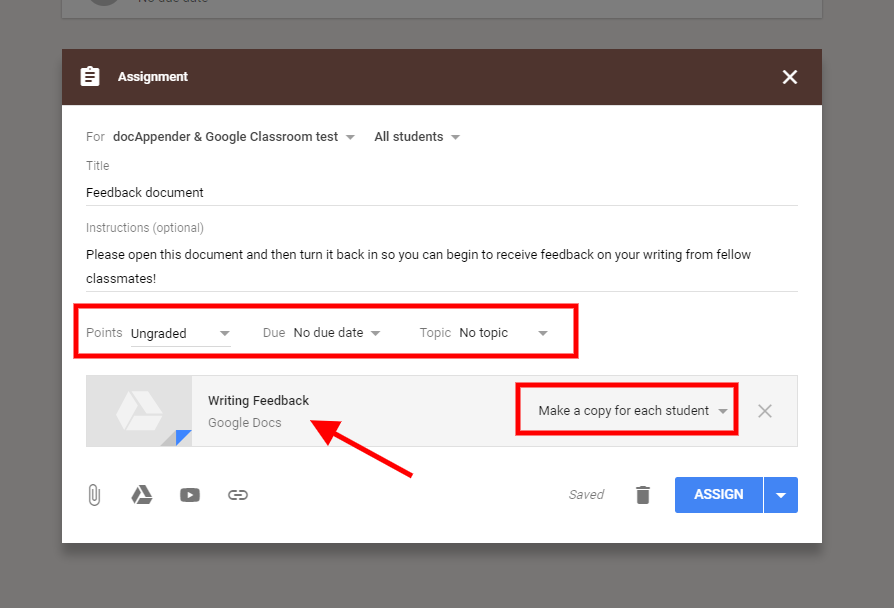
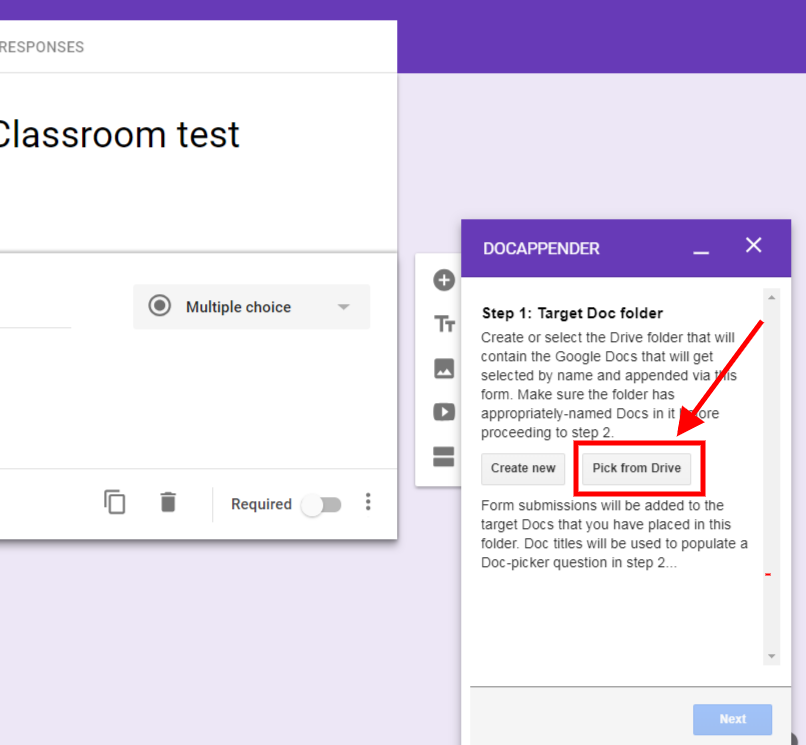
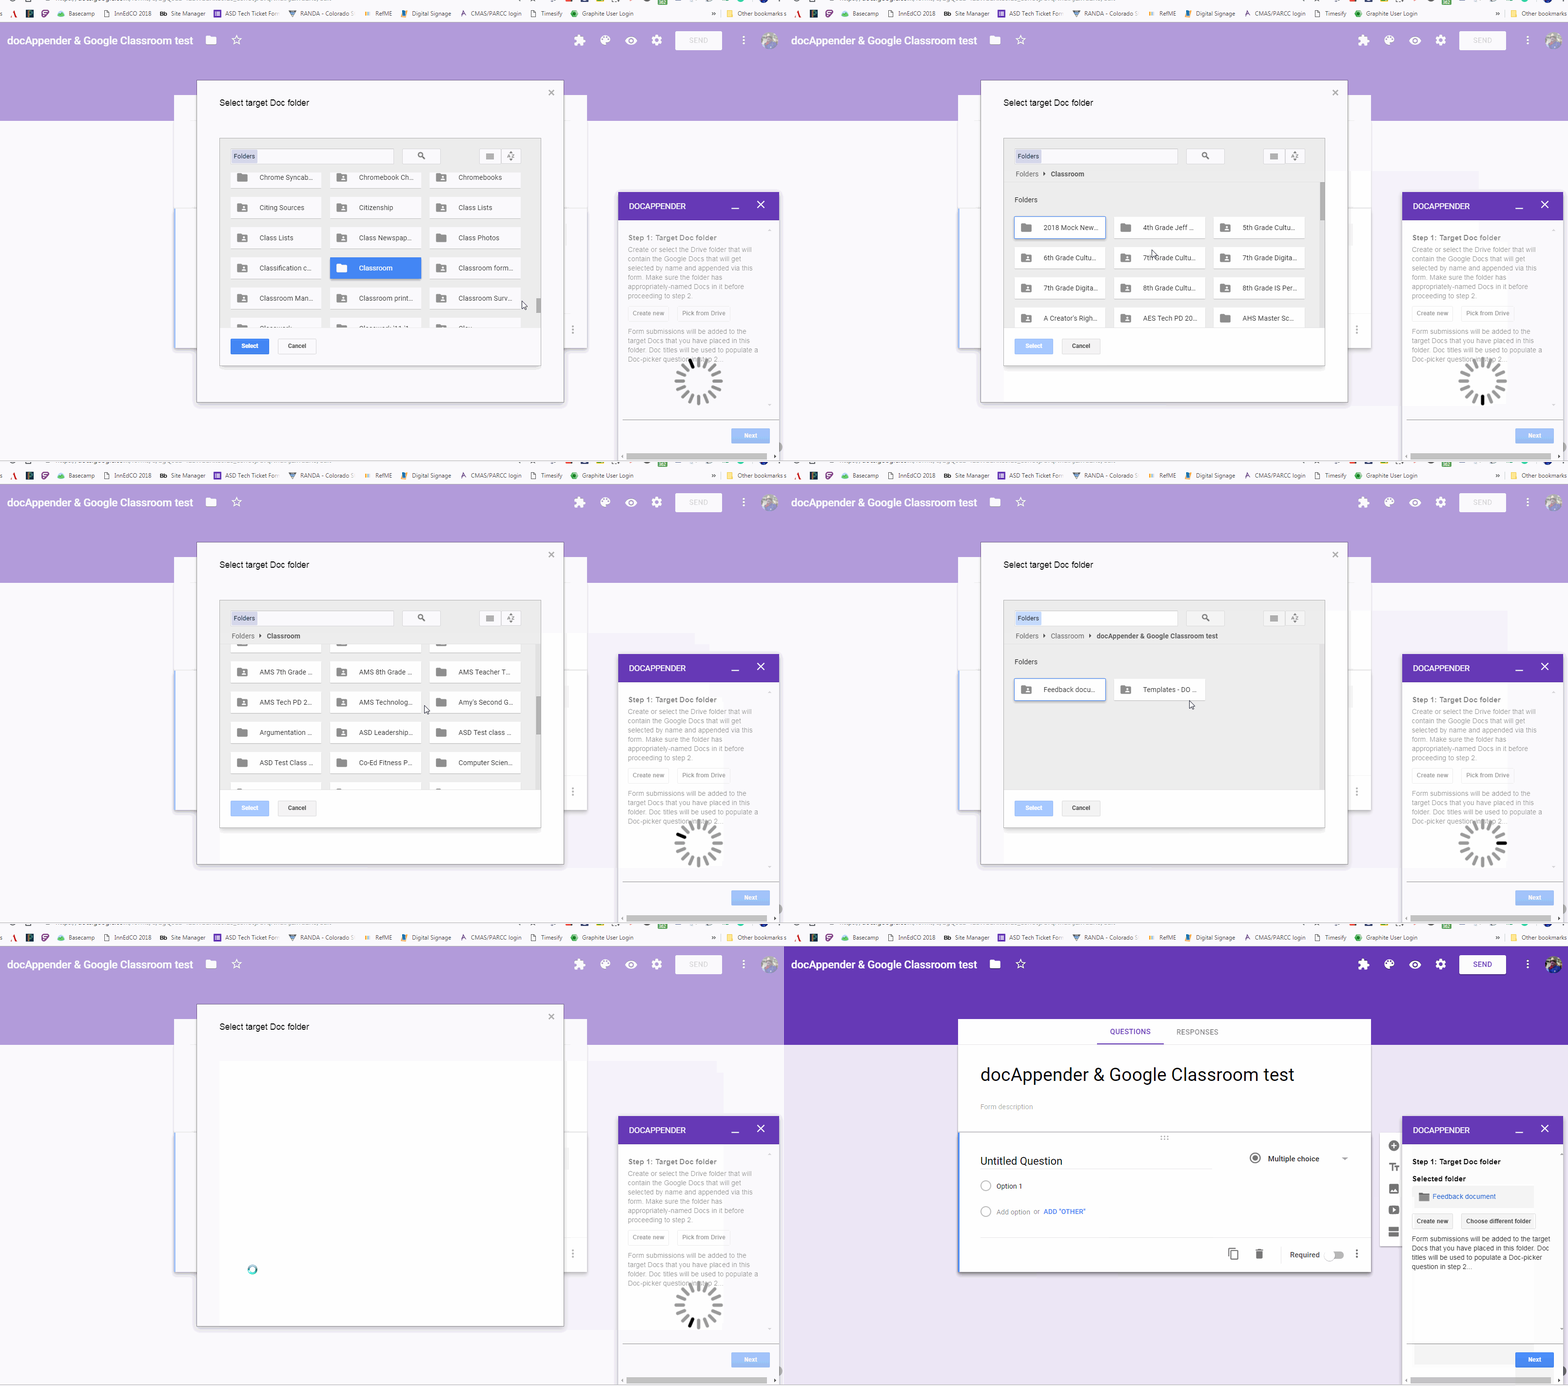
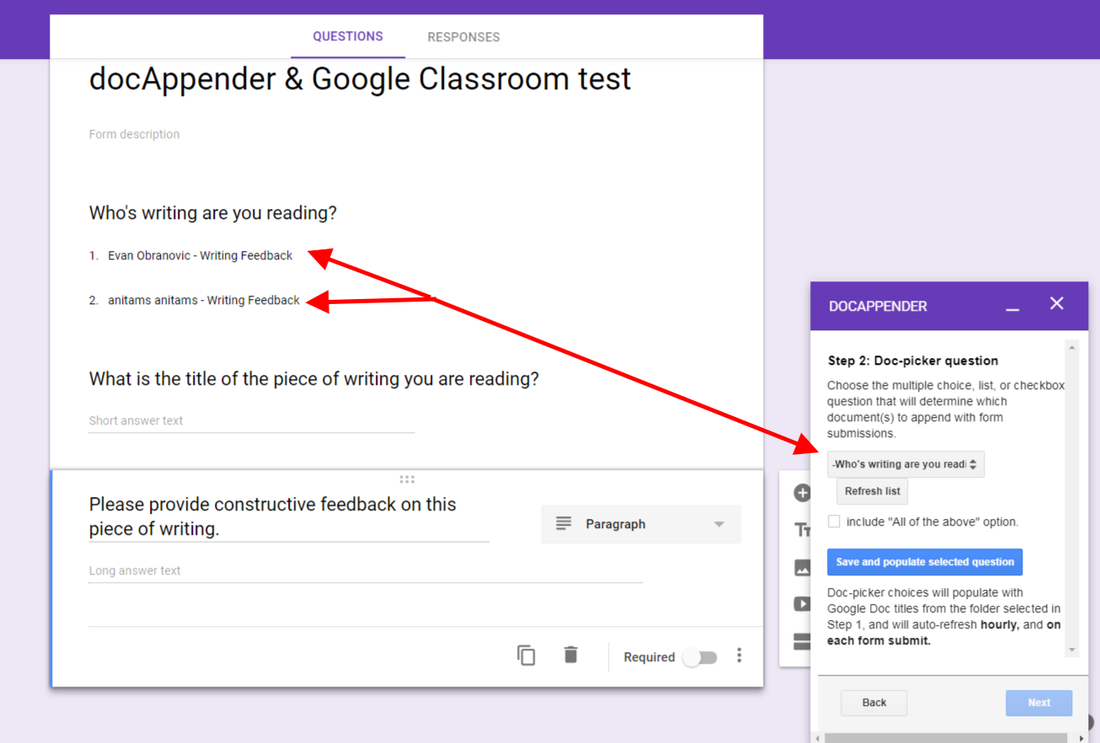
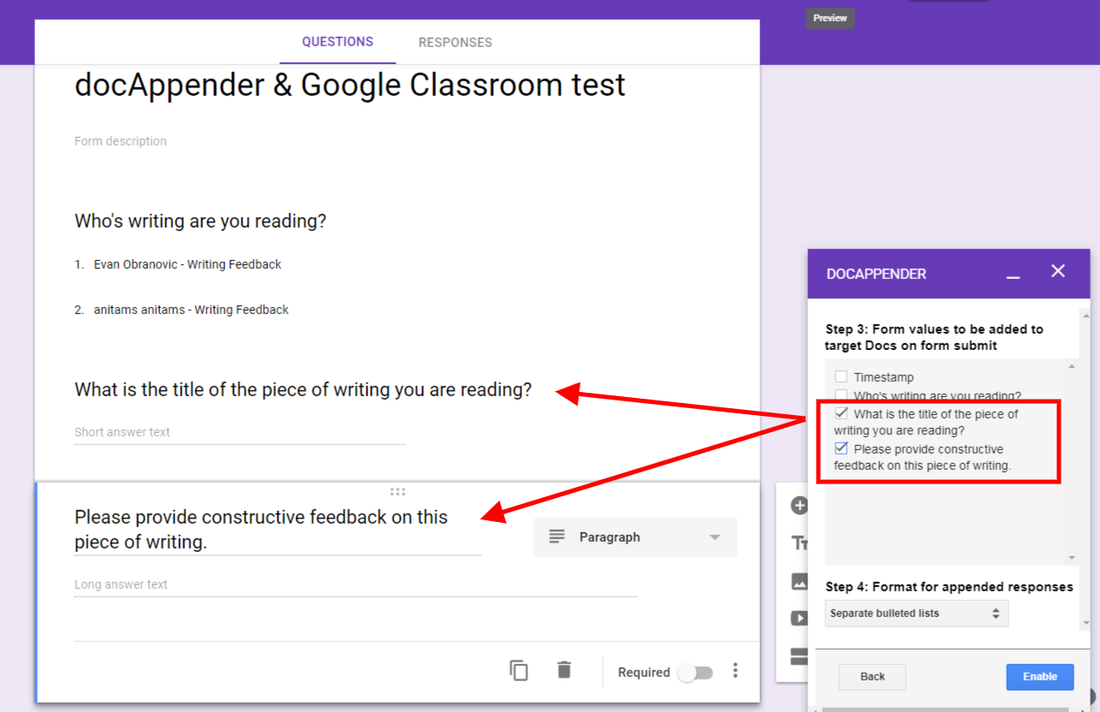
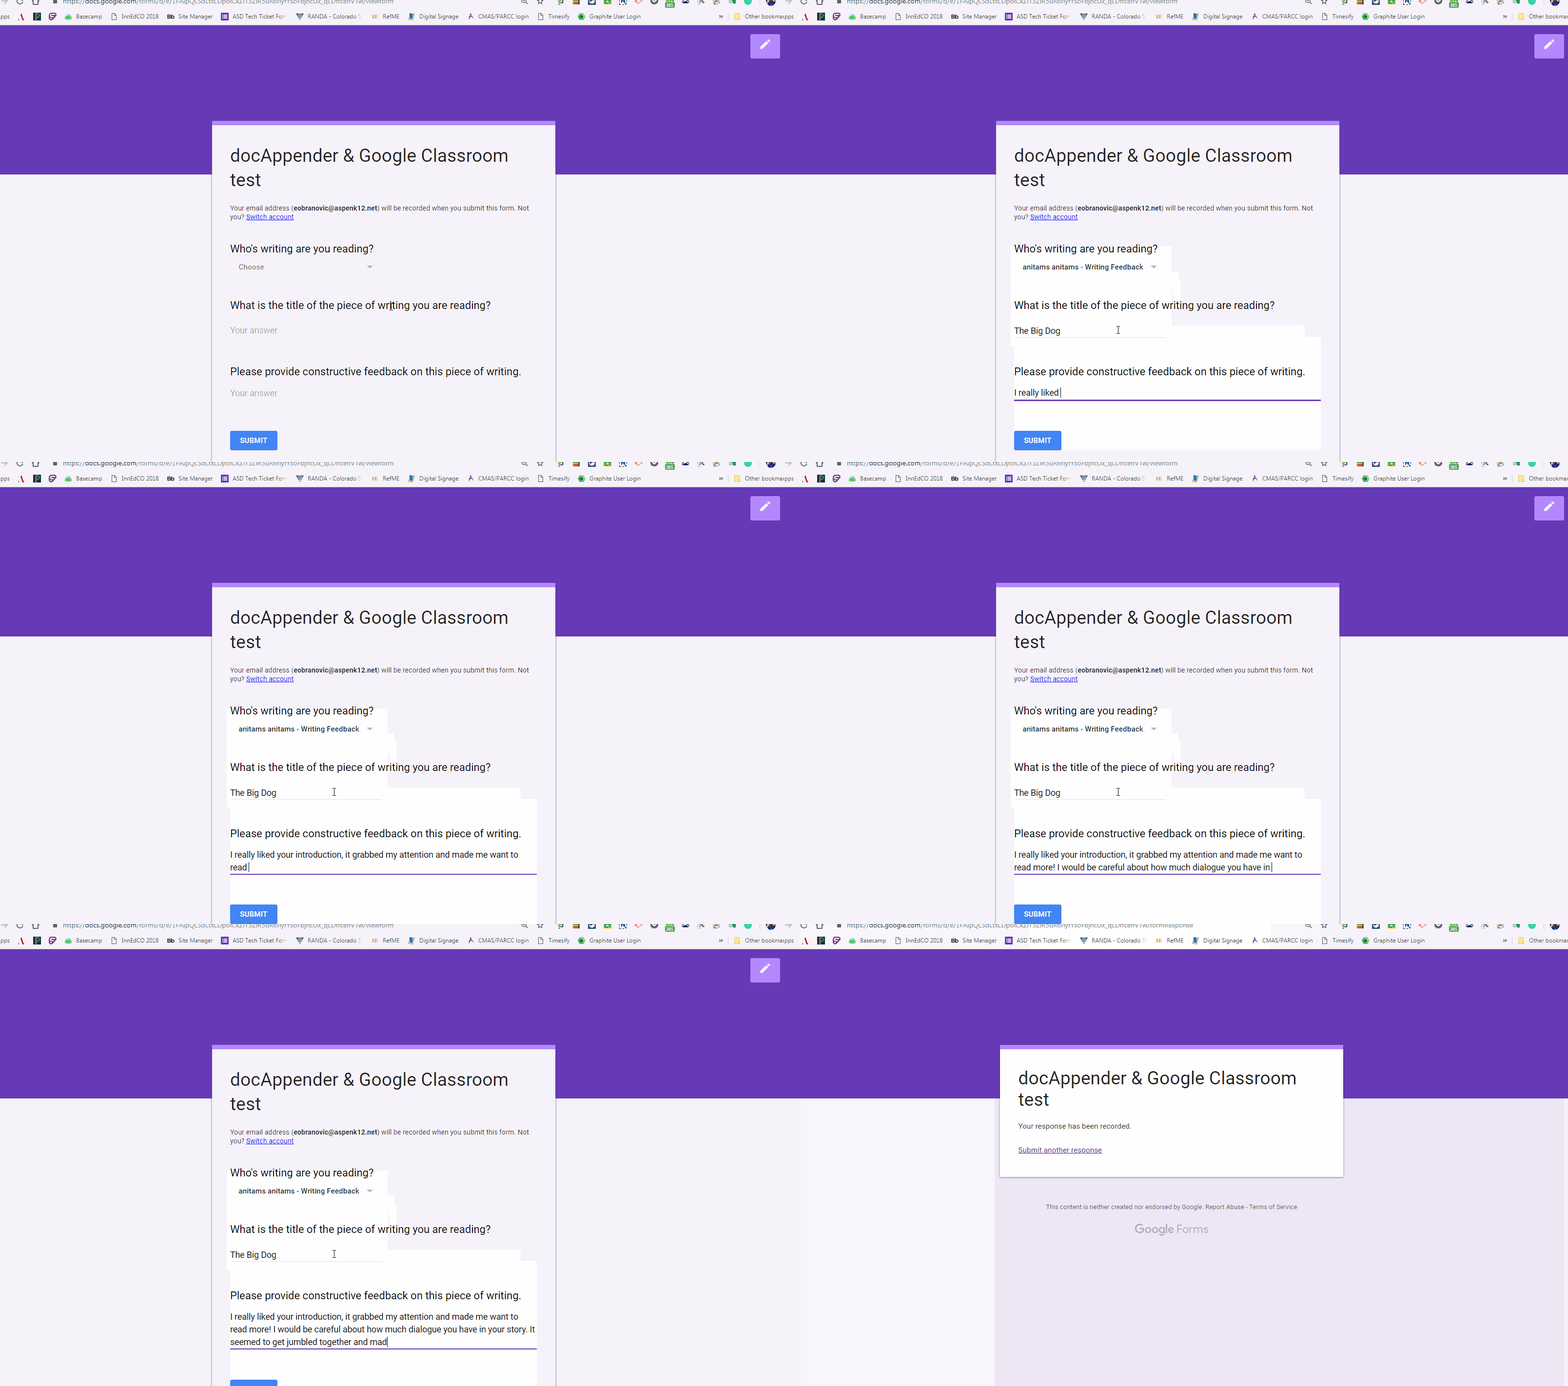
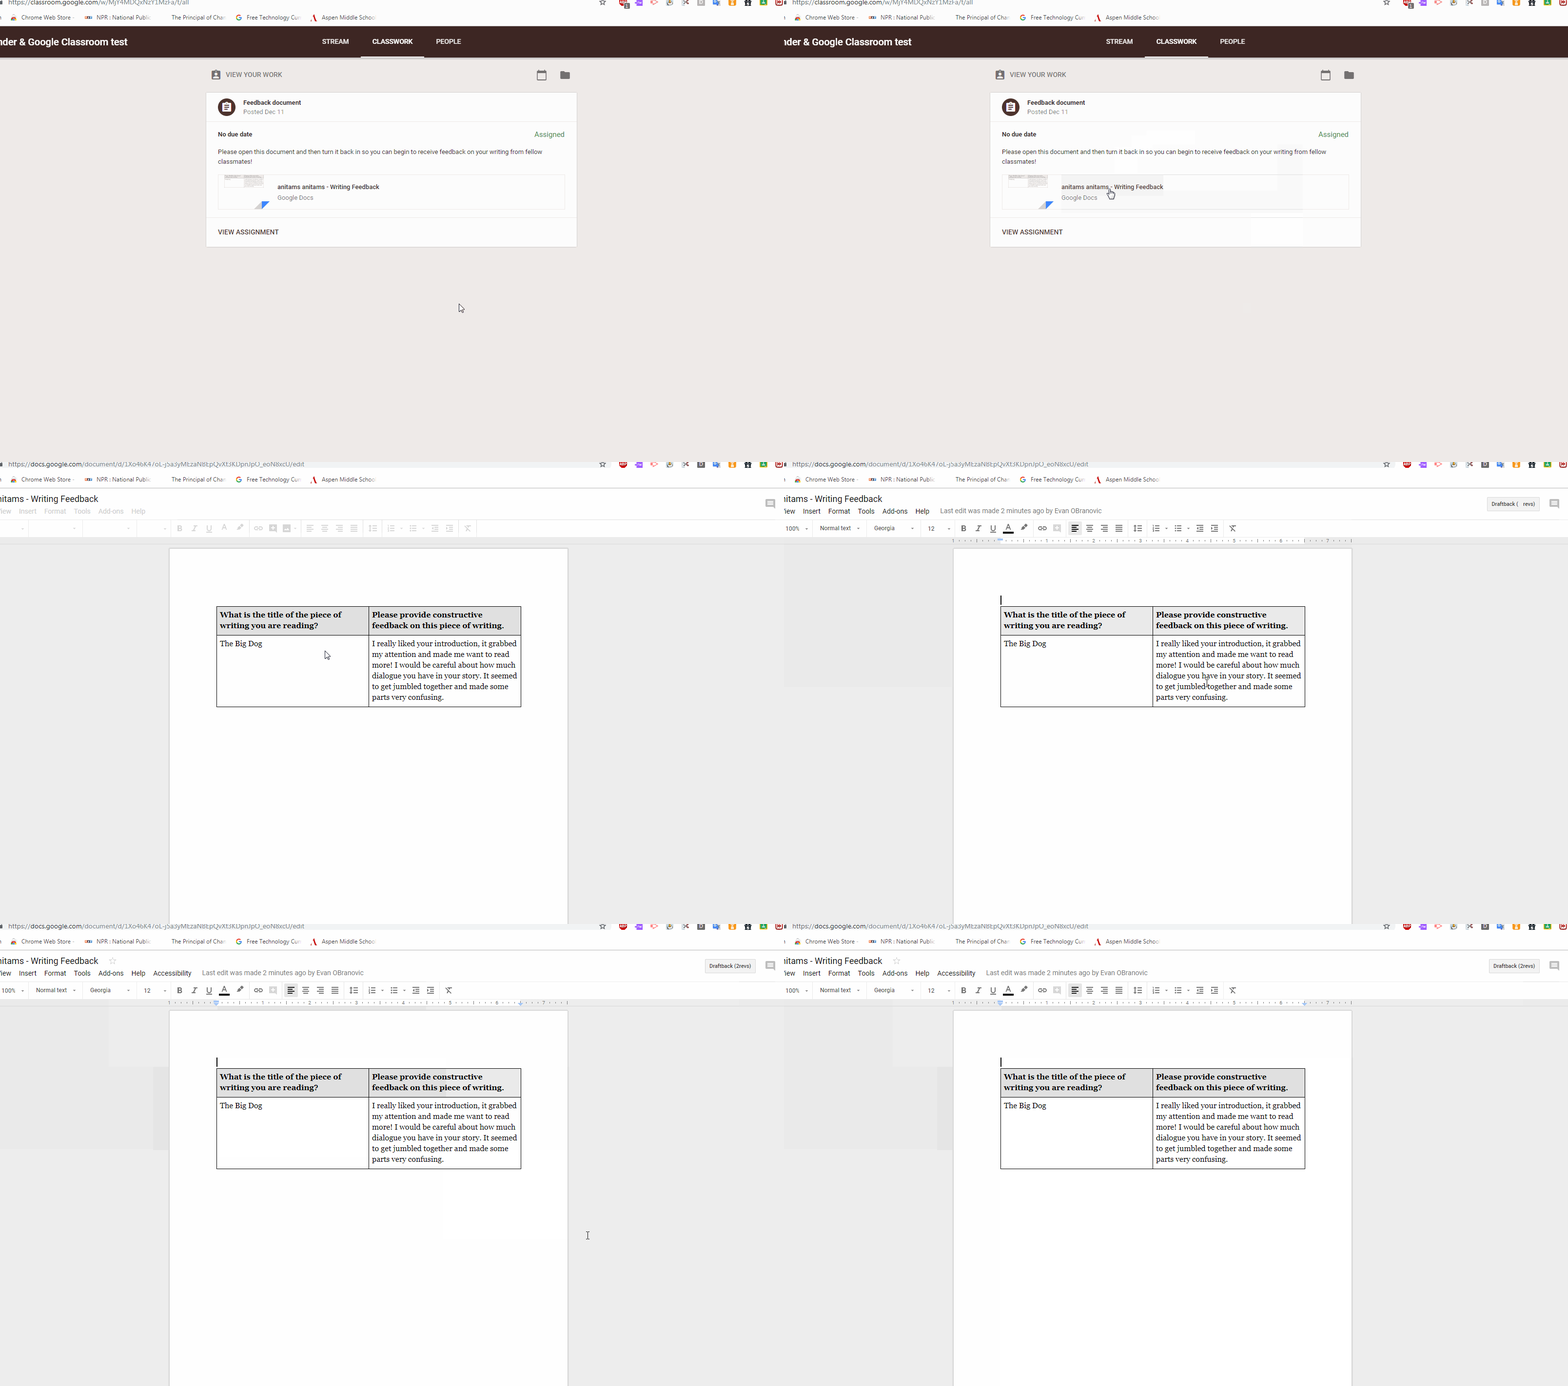
Providing meaningful feedback for students is one of the most powerful tools for educators to create meaningful connections and learning. It never seems like one method will check all the boxes in allowing students or teachers to get that feedback to other students so they can reflect on their own work. With the addition of technology in the mix, it has proven even more difficult to find effective ways to allow students to give and receive feedback on digital work. Working with a 2nd grade teacher we were struggling to find ways for her students to make comments on hand-written and digital writing in a way that could be collected and reviewed later by both the teacher and the students. Some of the obvious options came up: wanting to use Google Forms for students to easily type in comments and Google Classroom to collect and share digital writing. We had the outline to how we thought we could get it done and now we had to find how to best adjust the tools at hand to work in a way that was easy for the students and teachers and could be replicated over and over again. docAppender - If you haven't heard of docAppender it's a Google Forms add-on that will send responses to an specific Google Doc based on some of the parameters you set-up ahead of time. The initial set-up can take a bit of time (this is where Google Classroom comes in), but then you have a form that will send each response to a easily readable Google Doc that can be shared and used repeatedly to create a running record of feedback. Google Classroom - I'm only going to assume you haven't heard of Google Classroom because you have been living under a rock with no Wifi and refuse to join most of the world in utilizing GSuite (j/k, well kinda...). The ability to organize a workflow between students and teachers with Classroom is game changing. It has made working in a digital, "mostly" paperless environment user-friendly and effective. When it comes to creating assignments, handing out individual templates, and easily collecting student work of a variety of medias I don't have much negative to say. There are no perfect systems, but we won't get into those in this post. So now you know the tools, but the key is how you make them work together. The docAppender add-on doesn't need Google Classroom in order to function, but it makes it go much smoother. As mentioned above the docAppender add-on will allow you to sort and separate responses to a Google form onto specific Google docs which makes it a great way to get written feedback for specific people and then share that data with those people without sharing other feedback. Using Google Classroom lets you easily create a document and folder location to keep all the feedback documents together for easy sharing and use. Take a look at the screenshots below to get an idea how to get the process started. So there you have a "daisy-chain" of two great tools to help facilitate peer feedback in your class. Many modifications can be made to suit your specific needs such as creating multiple documents for different types of writing, but if you include the right identification questions it may be just as easy to keep one big running record of feedback to not overwhelm a student with different documents to sort through in order to see their feedback. Making the connection through Classroom makes it really easy to create the documents and identify them by student name as well as give you as the teacher access to everyone's work and feedback. If you have any systems like this or good modifications/suggestions please leave them in the comments below.
Another school year down and another amazing visit to InnEdCO 2018 in Keystone, CO! It's been so great to have such an amazing conference local to Colorado when ISTE only comes to Denver once every 5 years. After 4 days of learning, connecting, and growing I want to highlight several things I took away from this incredible experience.
Everyone needs to be at the table when it comes to innovation - Several of the sessions I attended discussed how we can innovate in our teaching, student learning, curriculum, and professional development. There are so many great tools and resources to help us become innovative but one of the most important themes I took away is who you have at the table in order to accomplish this innovation. Without the support and shared vision of administrators, an educator may not feel comfortable or supported in taking the risks and making the changes necessary to help students become innovative.
Building relationships is crucial - Edtech Coaches, Technology Integrators, Digital Coaches, etc.. are becoming more and more common in school districts across Colorado. Many sessions focused on how these positions can be successful in helping support teachers and students in using technology to accomplish learning goals. With these roles being often viewed as 'one more thing' for a teacher it has become important to show value to teachers so they feel like using coaches or integrators as a resource will greatly help them and be an asset. Two of the sessions centered around the DPS MyTech program which looks to successfully implement 1:1 devices in 14 schools and that included putting Digital Coaches in place to help support teachers and students.
All the groups and individuals I listened to from DPS, St. Vrain, Boulder Valley and others made a point to emphasis how important it was to establish relationships with their teachers and administrators to create meaningful connections. Once these relationships were established it then became possible to help teachers integrate technology to dynamically accomplish learning goals.
Design Thinking, Inquiry Learning, & Project/Problem based Learning are still the goal - These aren't new ideas and over the past few years the ways to implement them has been all over the map (and I don't think that's a bad thing). Many sessions used the design thinking framework to help the audience work through concepts and rethink how they are addressing student learning, teacher professional development, and technology implementation. I really like this process and find it so useful in designing dynamic experiences and coming up with great ideas. It is exciting to see it become somewhat of a standard for working through a process to utilize the best thinking of all the people in the room.
Can you really create an innovative and dynamic lessons if you aren't incorporating inquiry or project-based learning? Students are no longer engaged with old school drill and kill pedagogy. If we aren't letting our students identify problems, ask questions, and come up with solutions then we aren't preparing them for the next level in their education and beyond. Thankfully with the help of edtech there are a ton of ways to implement these strategies.
How do we teach Digital Citizenship and Digital Skills to our students?- We can't expect to inject all of this educational technology in our teaching and not help prepare students to be thoughtful and purposeful with its use. There are several programs out there to try and help a educator pass on these skills to students, but Google has recently jumped in the game with their Be Internet Awesome digital citizenship program and Applied Digital Skills program for utilizing GSuite. Both of these programs are filled with resources that can be modified or plug and play to get a teacher going with their class. Check them out if you haven't already!
Google now has a digital citizenship & safety curriculum (3-5th grade) that’s free online and doesn’t require a sign-in https://beinternetawesome.withgoogle.com/en Applied Digital Skills curriculum provided by Google to help teachers teach applicable digital skills to students using GSuite. Resources are available online and can be modified for differentiation. https://applieddigitalskills.withgoogle.com/ -Does require Google account to track progress and access materials.
So there you have my big take-a-ways from this year's InnEdCO conference in Keystone, CO. If you've never been make sure to plan on attending this summer and connecting with a ton of amazing educators who all are looking to utilizing edtech and innovative thinking to improve how we educate in Colorado. Please add any of your highlights in the comments section if you did attend.
We did it! Aspen Schools has successfully held its first EdTechTeam summit to promote some great things happening in edtech and motivate and empower educators from across the state. The goal of the summit is to improve teaching and students' learning with the help of some awesome tech tools and ideas. The process of hosting the summit at your home school is time-consuming and exhausting, but incredibly rewarding. Here are 5 takeaways or ah-ha's I had from this amazing experience:
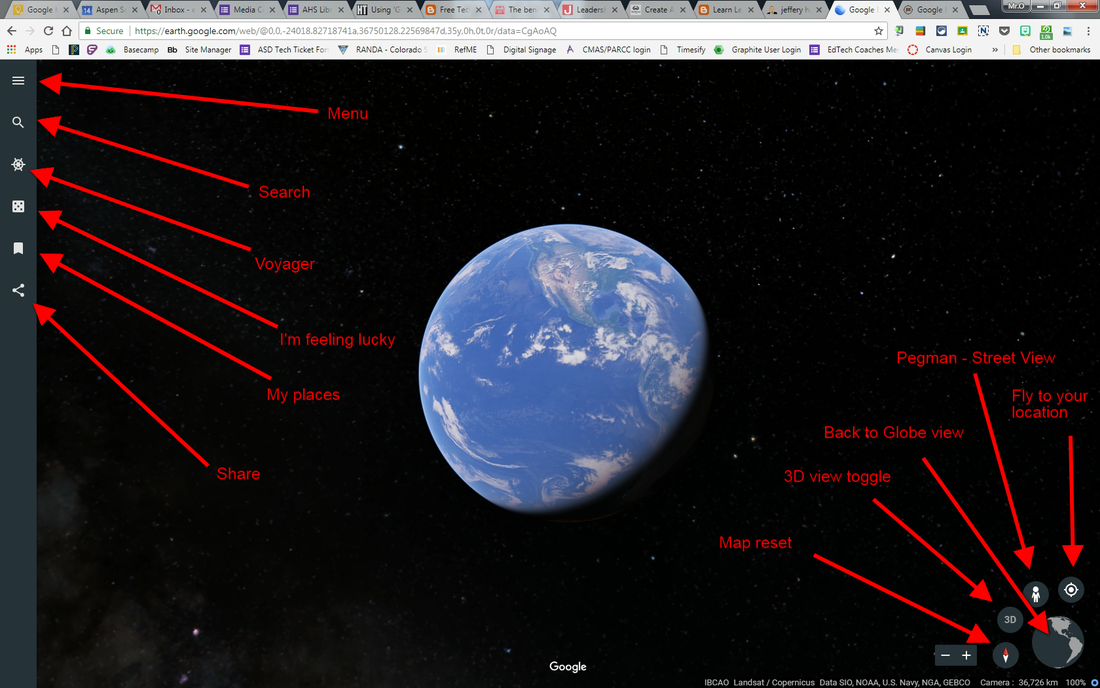
1. We need to give Geo a chance- One of the incredible members of the EdTechTeam, Jeffery Heil, gave an inspiring keynote to kick off our summit and presented a session on taking advantage of the Google Geo tools to engage and excite your students.
Taking advantage of Google Earth now being web-based is a must for teachers of just about any subject or content area. The 'Voyager' component of Google Earth is an incredible educational tool that curates content normally not available to students. Google Maps and My Maps are great ways to create custom maps and really individualize your experience in a variety of places. Once you have created a map you can export it as a KML file to import into another My Map or do a Google search for relevant KML files that have been created by others that you could use. Street View lets students get up close and personal with places inside and out that they may never have a chance to visit in person. The ability for everyone to contribute to Street View puts an incredible amount of power and agency in students' hands that can lead to powerful learning and connections, but please be considerate of students' privacy and safety when encouraging sharing. Google Expeditions is a powerful AR (Augmented Reality) tool that lets you use mobile devices to take students all over the world and beyond for fun and interactive experiences. Starting its full roll-out this fall the power of this is unlimited whether you have a full class set or a few to run an engaging center. I can't wait to see how this develops!
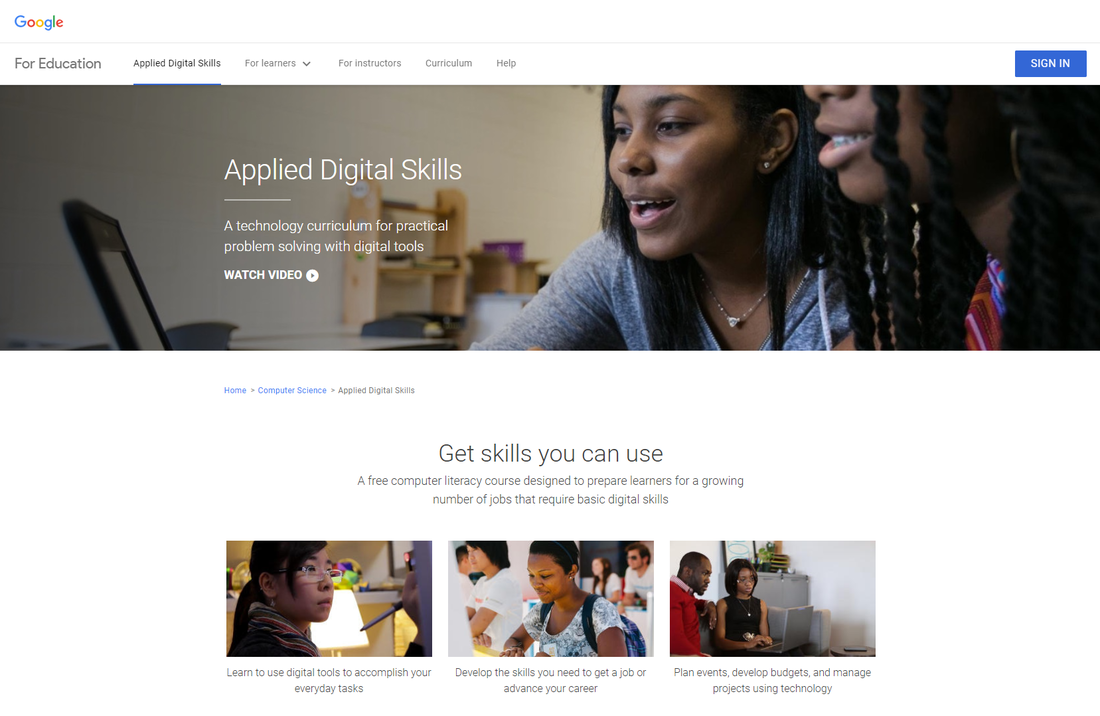
2. Google Applied Digital Skills Curriculum- Google has recently released it's Applied Digital Skills Curriculum which walks through practical life applications that can be accomplished with the GSuite tools. Use this to teach students (or adults) how to research properly, create a budget, stay organized, and much more. Teachers can guide students through the self-paced learning that can be done individually or in groups and the lesson plans and resources can be downloaded to allow modification to meet your specific needs. I think we are finally getting to the answer to all teacher's favorite question: "When am I going to use this in real-life?"
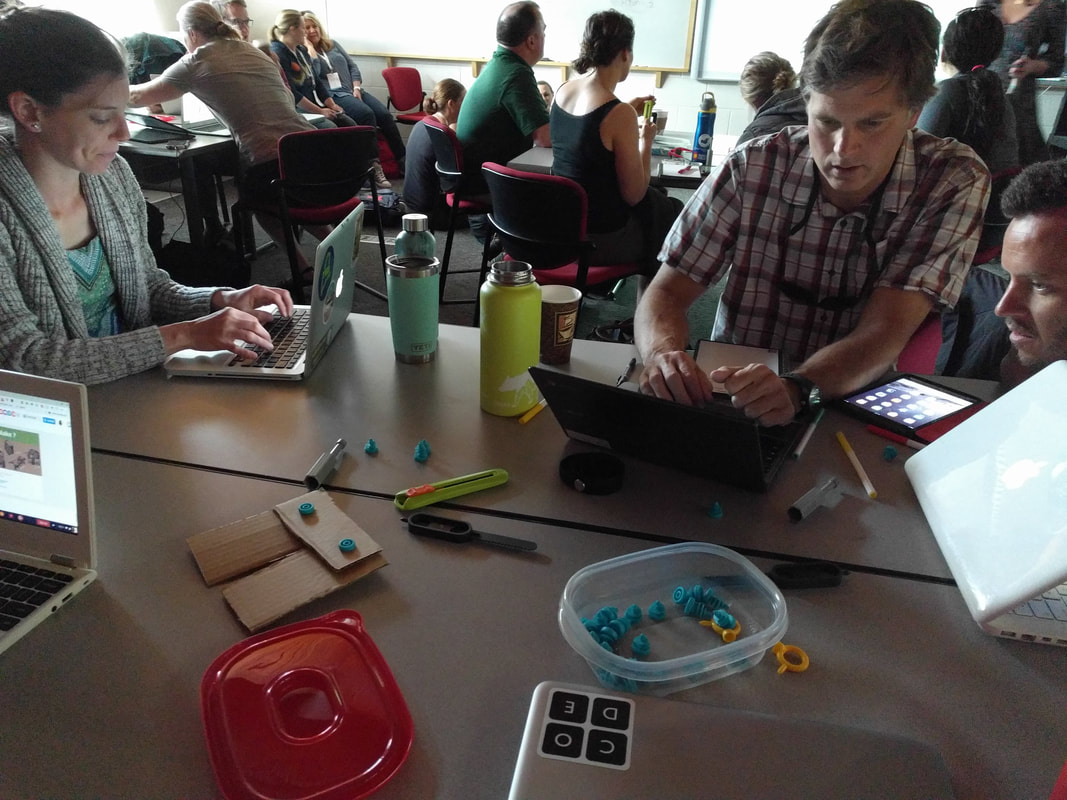
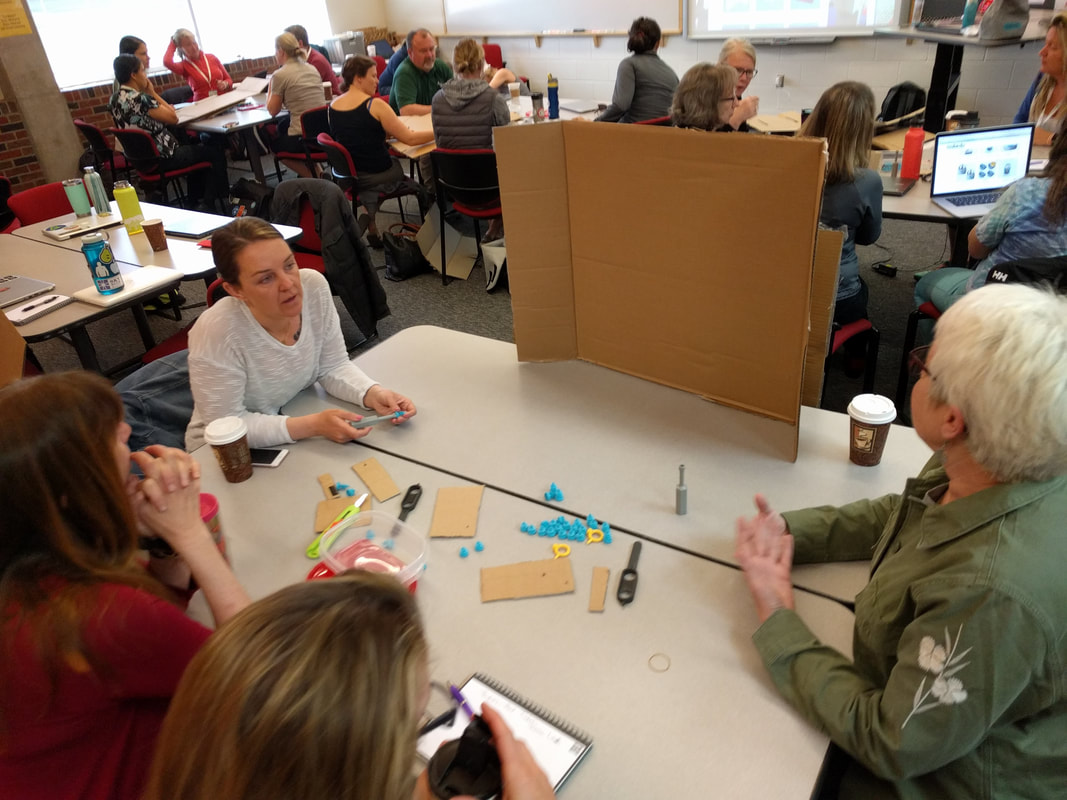
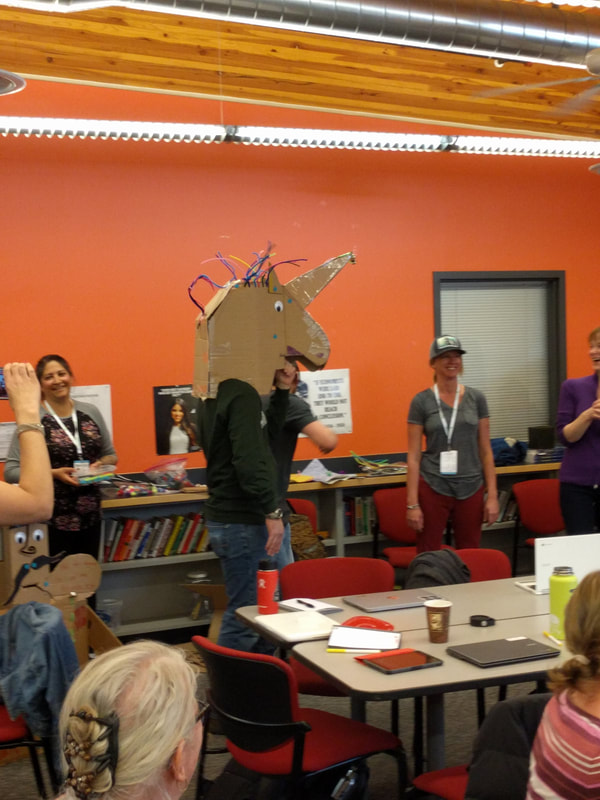
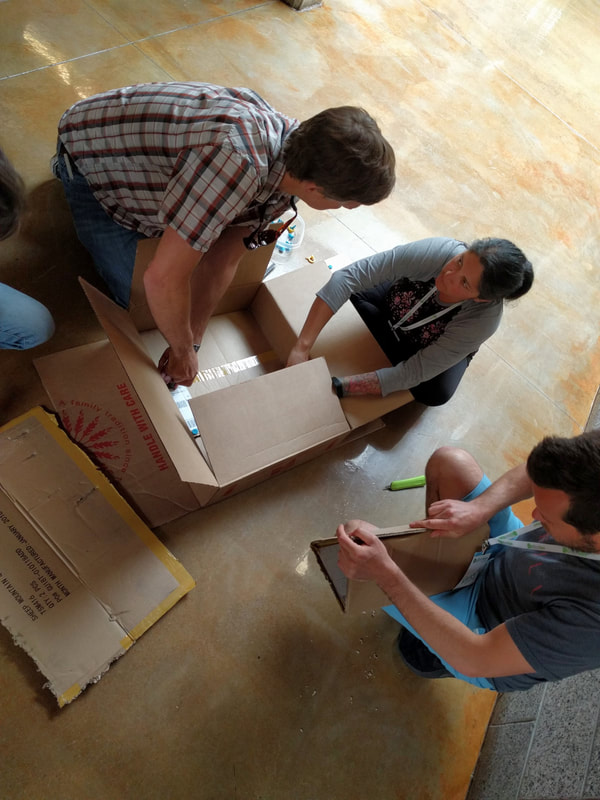
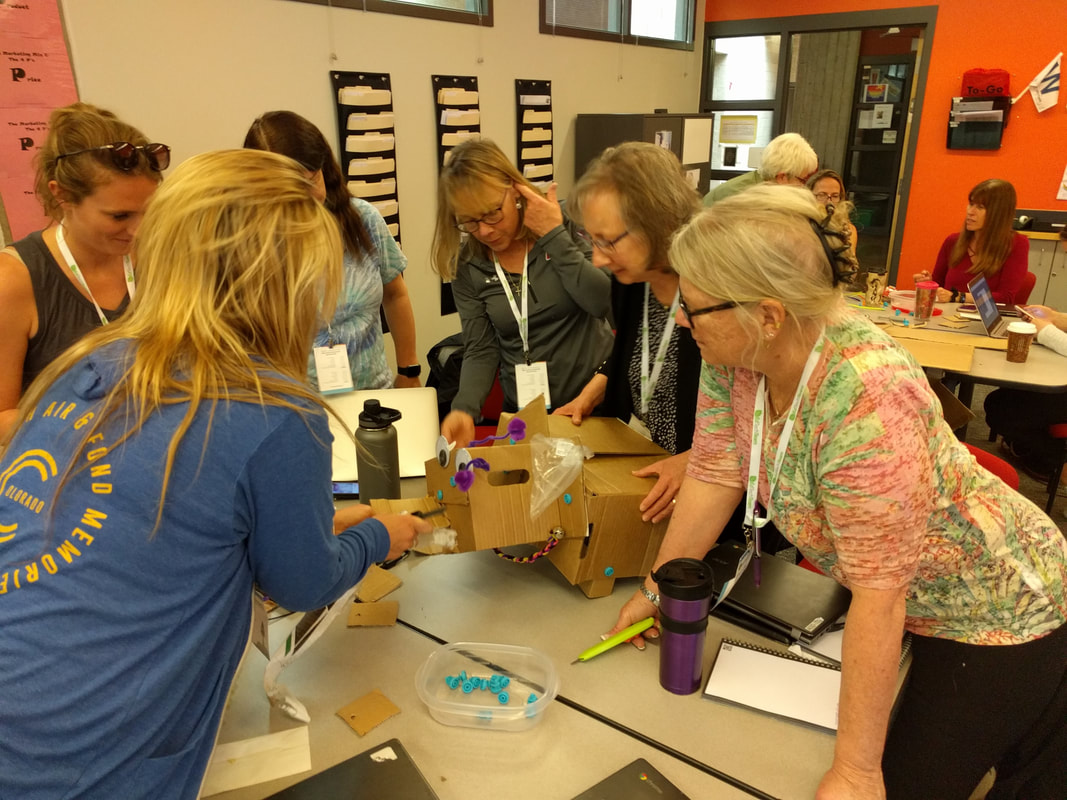
3. Tinker Thinking is important- We were extremely lucky to have very energetic and innovative Jessica Loucks presenting at our summit. I attended her session called Thinkers That Tinker and was motivated to integrate more design thinking into our teachers' lessons and students' learning starting at the most basic of levels. Our first activity was using Makedo kits to design and build a creature out of cardboard! We were given a few requirements and then set off in groups to get creative. In a short amount of time we had all created very different concepts that we presented to each other and participate in a Launch Cycle that can easily be adapted to working with our students. I think the simplicty of design thinking and creativity is often lost on educators as we are pressured to juggle so many things and to step back and slow down is good for us and our students to be creative problem solvers that aren't defined by the barriers around us. Moral of the story: don't be afraid to tinker and let your students tinker!
4. Leadership- In addition to hosting the weekend summit we were also able to have a leadership pre-summit specifically for administration, teacher-leaders, and other school leadership positions. The Leading & Learning session was led by Mark Garrison who did an amazing job of motivating and inspiring us to think about how our students are learning and what ways technology can play a role. We covered several of the models for thinking about and evaluating tech use with teachers (TPACK & SAMR) and students (4Cs, TIM, & T3) and framed our discussion about what good teaching can look like with the assistance of technology as well as how we can coach teachers to use technology effectively in their teaching practice.
Participating in the pre-summit and the full summit made one thing clear to me regarding leadership: we need our leaders to participate in these types of events in order to better understand how technology fits into the educational model and can be leveraged to promote student and teacher success. We had several principals attend the full summit and one summarized his revelation perfectly: "I went in thinking this would be all about the gadgets, and soon realized it was about ways to promote and improve student learning and great teaching!" So refreshing to hear this coming from the leader of a building who will then hopefully pass down that excitement and energy to their own staff when looking to set goals for improvement. Teachers and staff can do a lot by "leading from the middle" when it comes to improving our students educational experience with the aide of technology, but getting our leadership on board is crucial to long-term success!
5. Do you say it GIF or GIF (JIF)?- I am a lover of GIFs. Several years ago I attended a session in an EdTechTeam summit that really showed me the power of these simple graphics and how they can be easily created and used creatively to achieve a lot of different goals in the educational sphere. In hosting our first summit I decided it was time to share my love of the GIF by participating in the Demo Slam. For those of you not familiar with the Demo Slam it is an exciting, fast-paced, and competitive showcase of innovative & fun tech tips to get people motivated to try great things. We use this model in our own district to get people engaged before staff meetings and showcase the amazing things happening in the classroom.
In my attempts to be funny I opened my presentation with the statement that it's pronounced GIF not JIF along with an attempt at a witty jab at those who think otherwise and then proceeded to do a mediocre job of presenting my information. My new best friend and nemesis, Jeff Heil, decided to take it upon himself to impromtively change his original topic and troll me to the point of destruction using this simple video below:
After that short video and a quick tutorial on a very easy way to make GIFs using Google photos I lowered my head in shame and accepted defeat... Until the next day when the entire summit was presented a video message from the amazing Ken Shelton (c/o Tracy Purdy) making his case for the use of phonics and linguistics that result in Graphic Interchange Format (GIF) pronounced with a hard G! I stand with Ken and will forever hold on to my opinion that it's pronounced GIF and not JIF!
There are my 5 big take-aways from the 1st (hopefully not the last) EdTechTeam summit in Aspen, CO. If you attended please feel free to share any of your favorite moments in the comments section.
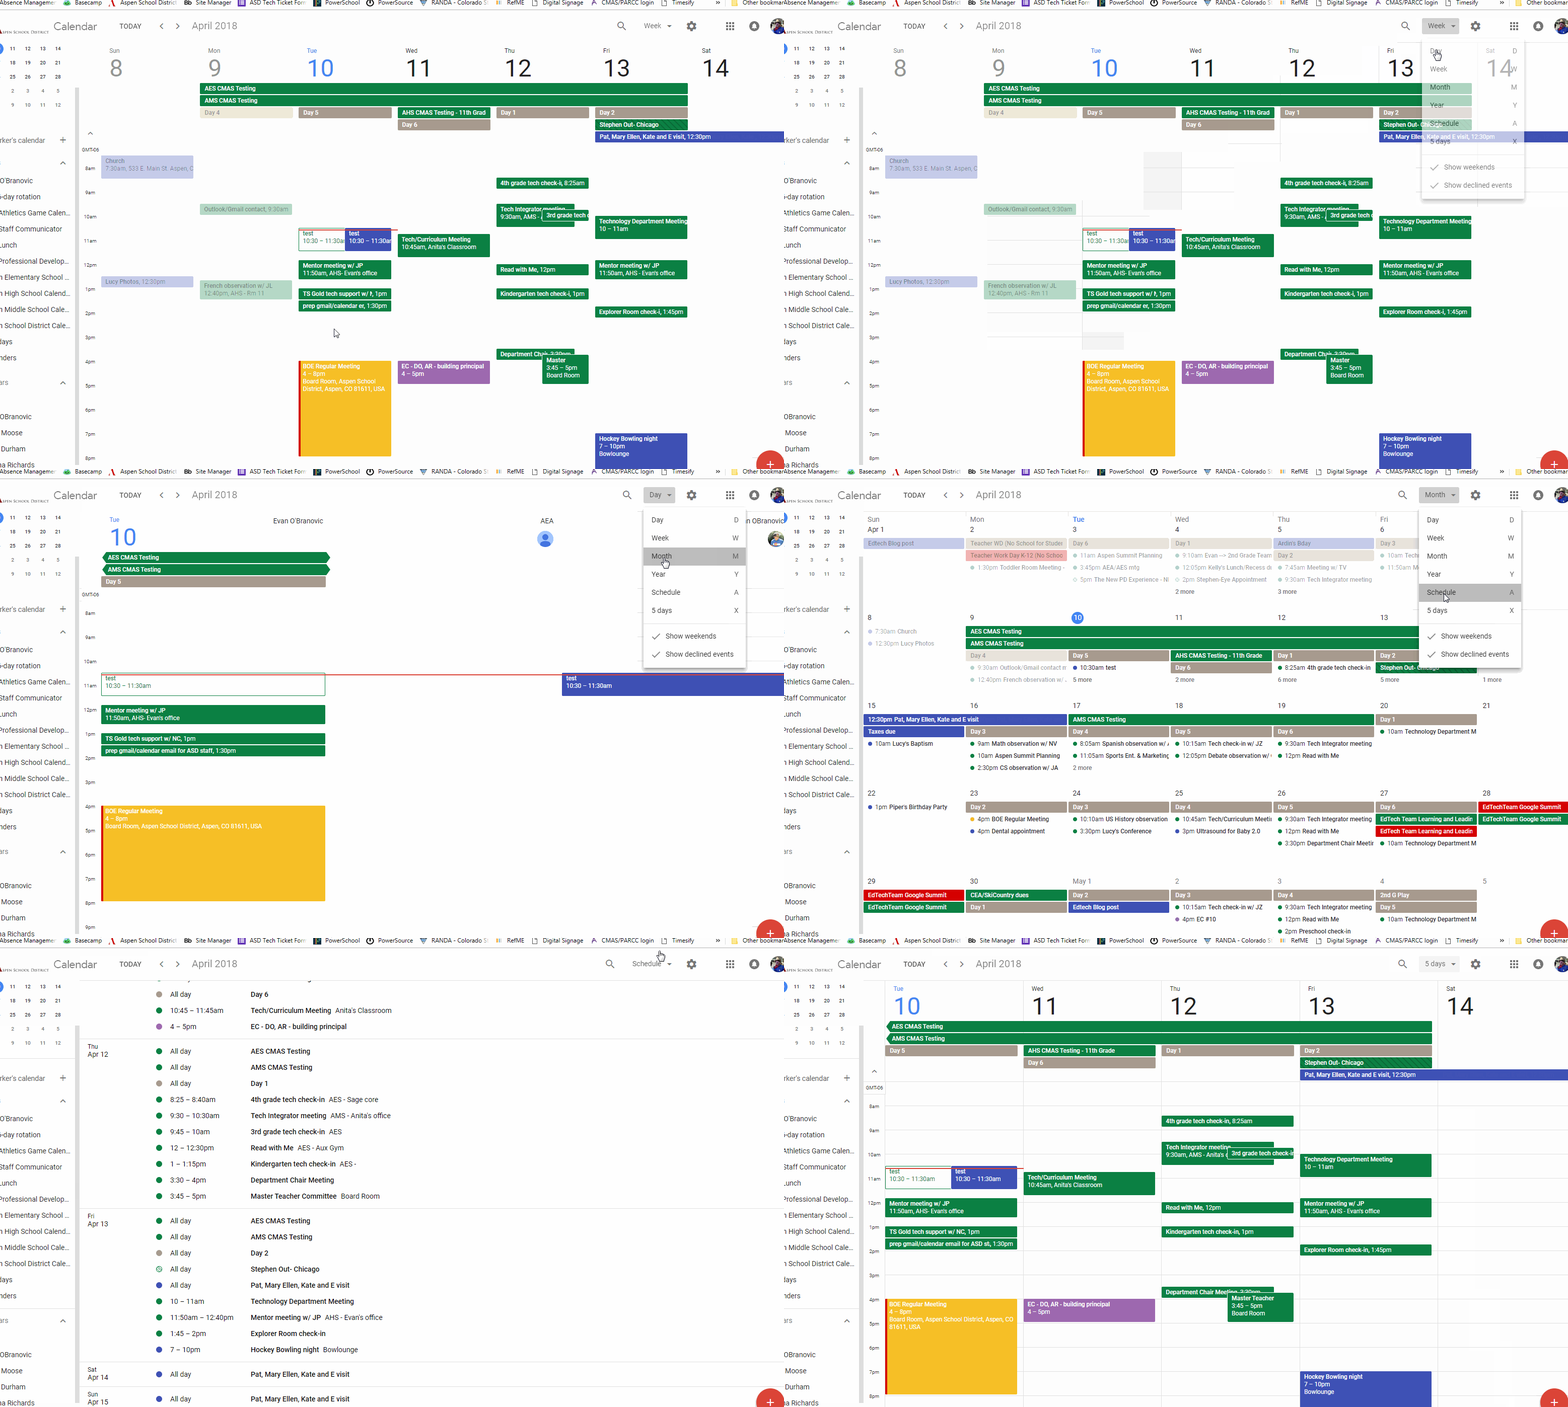
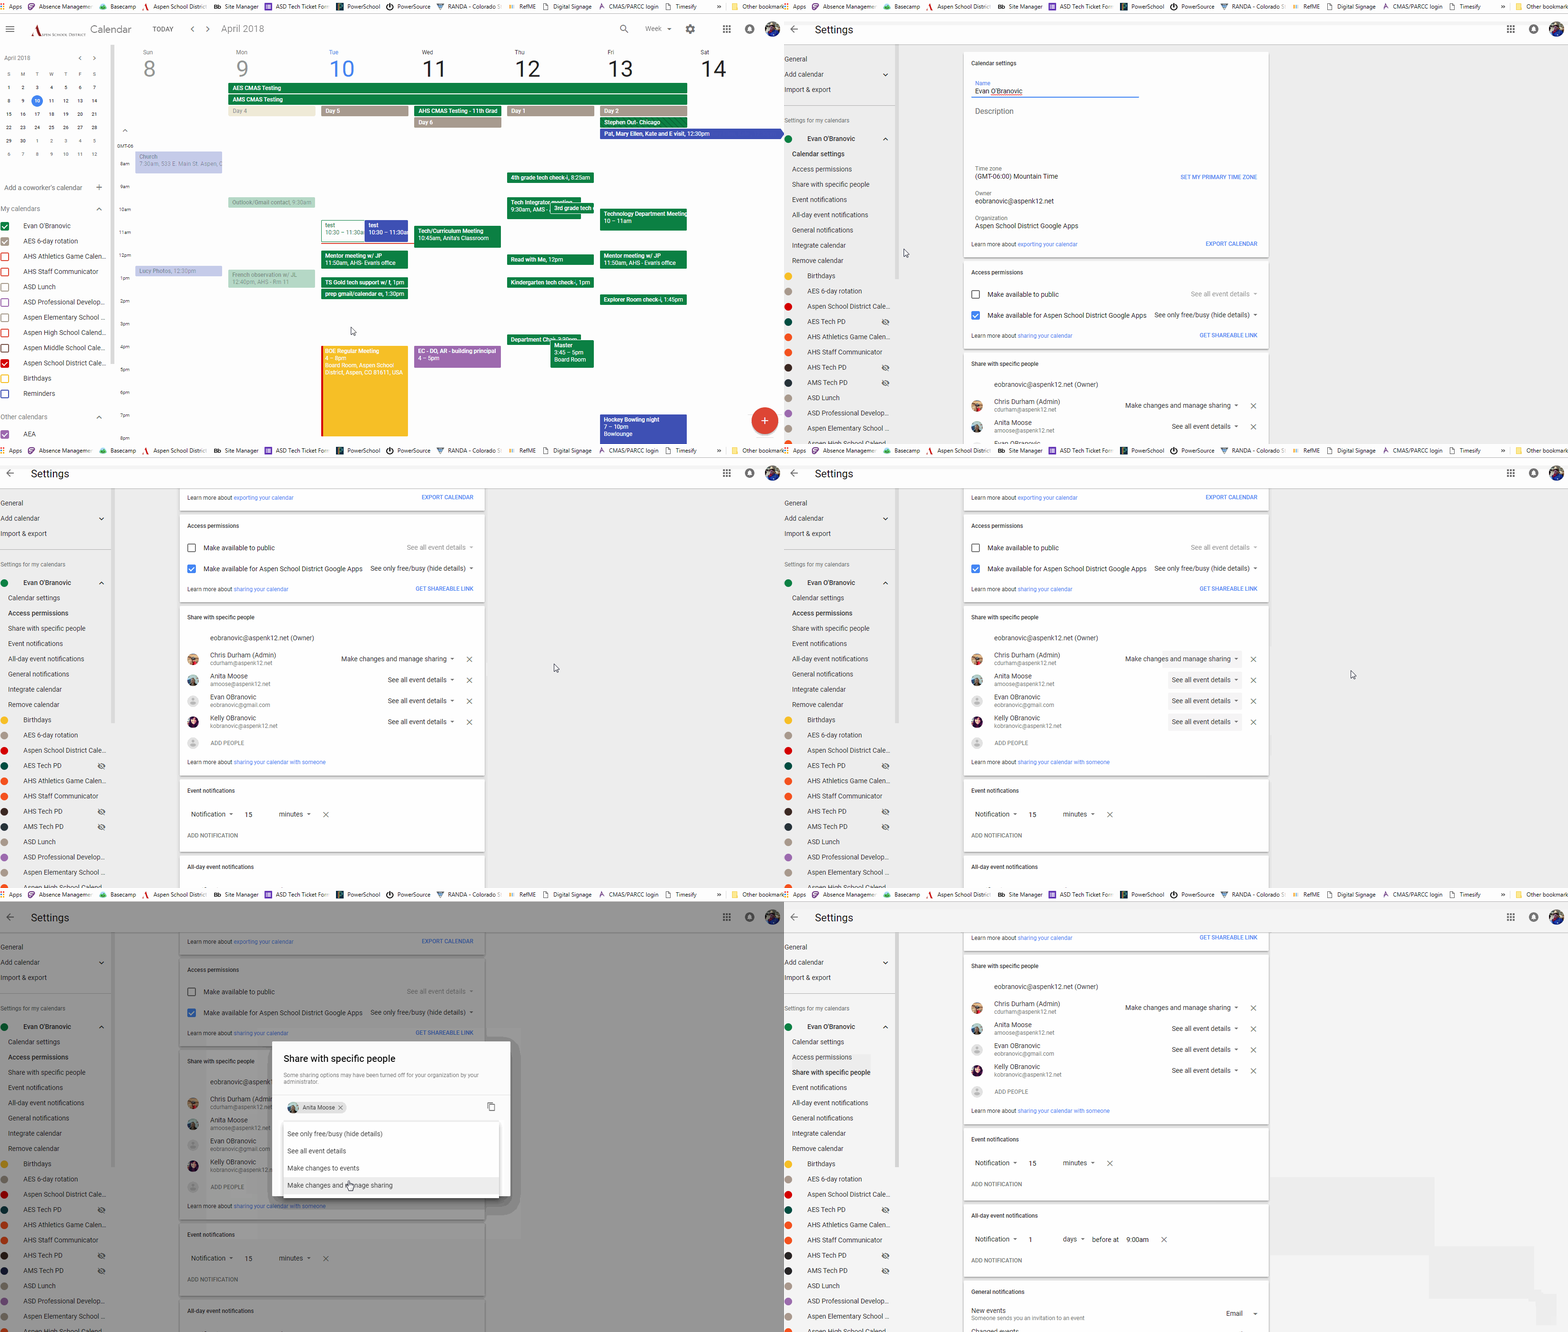
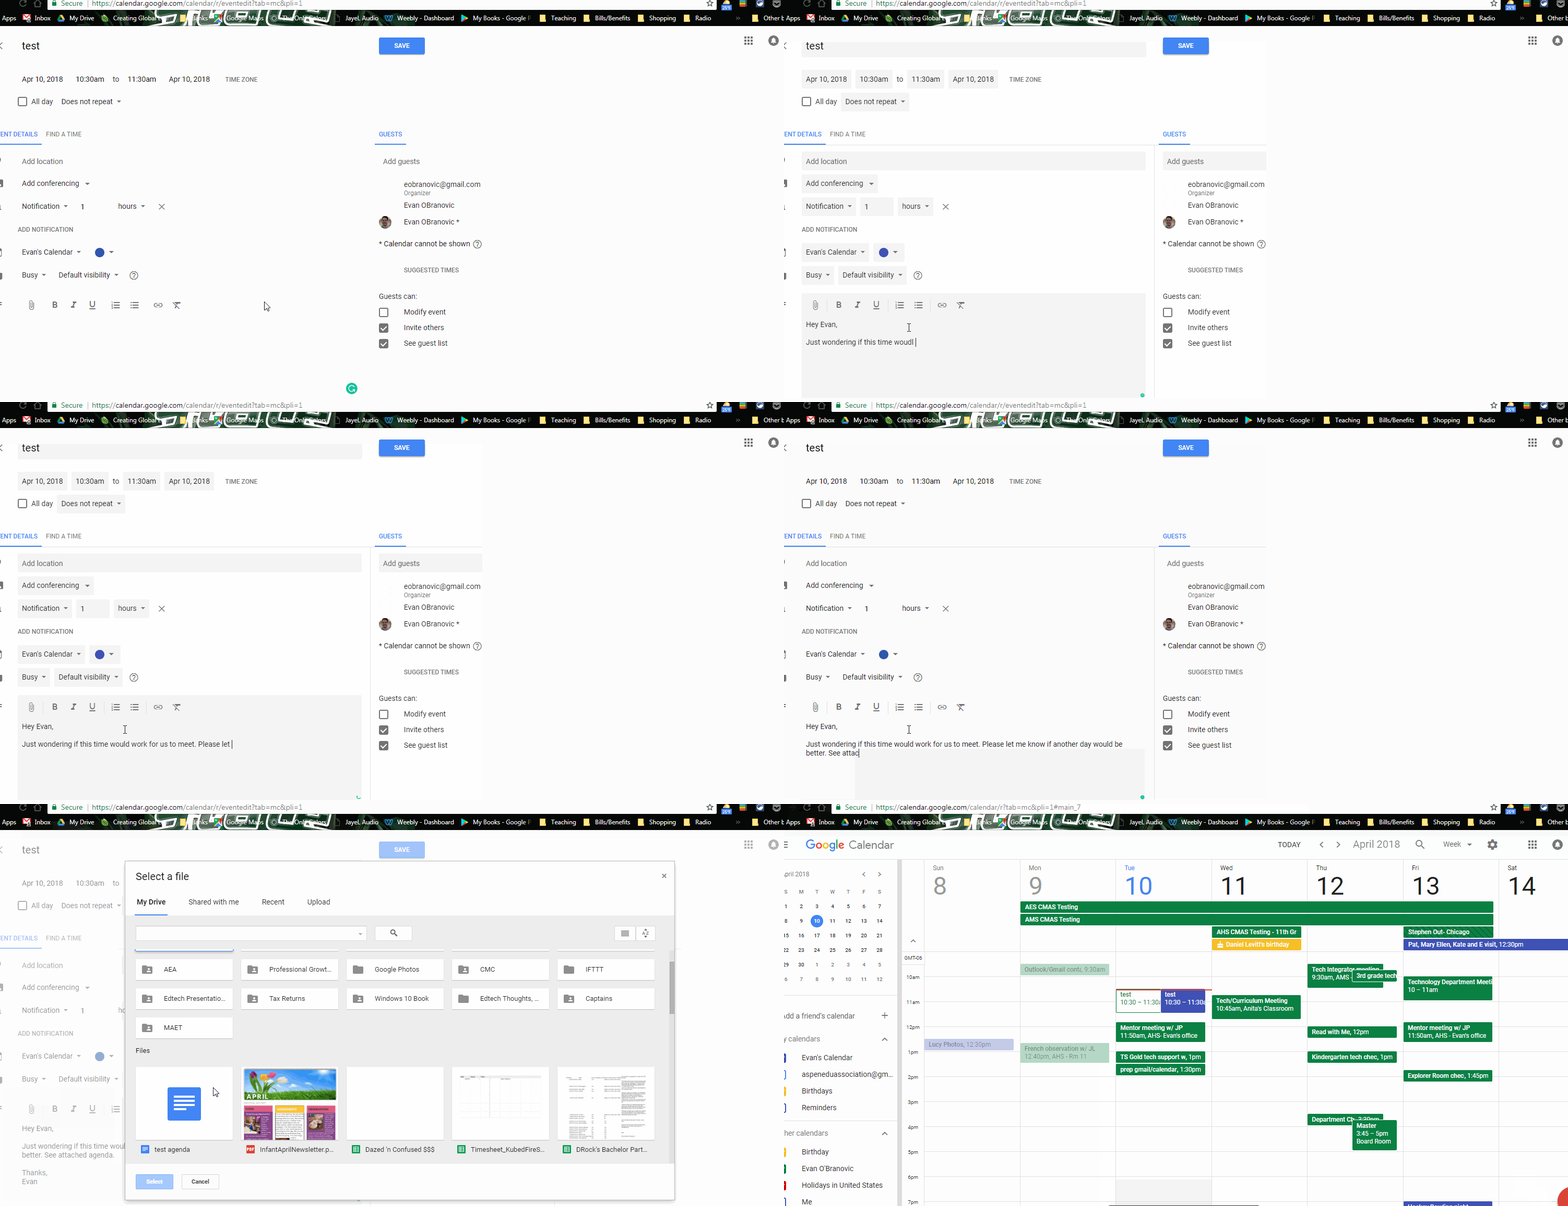
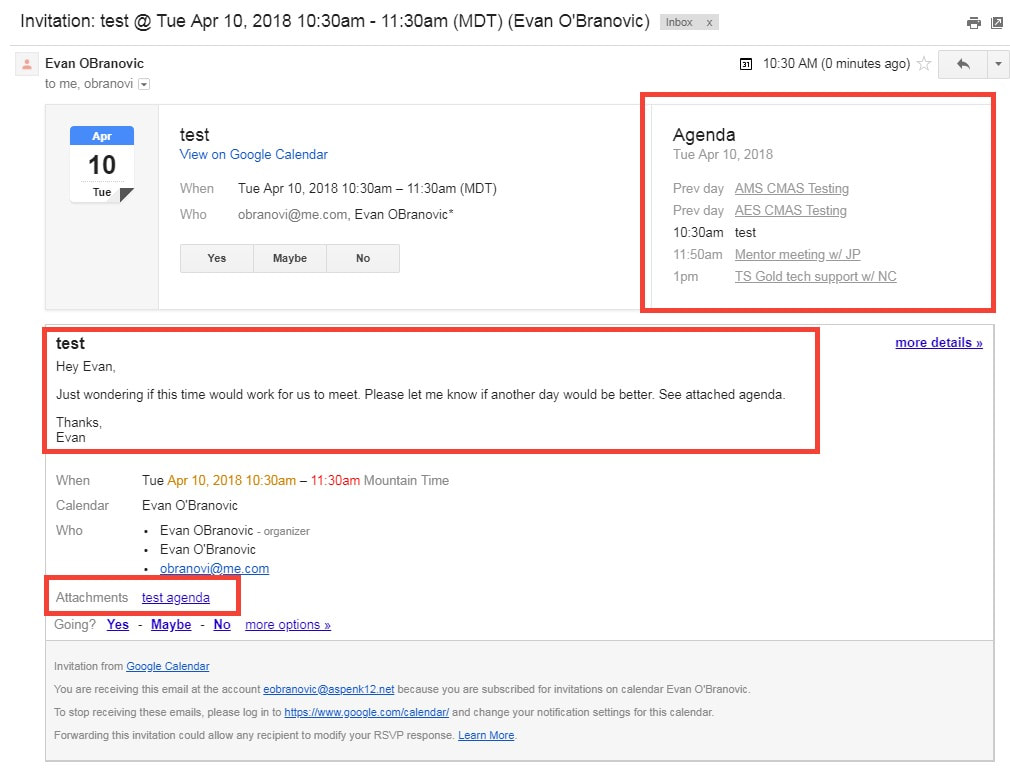
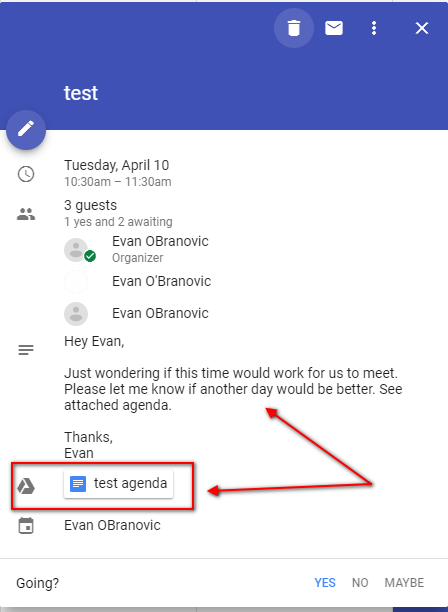
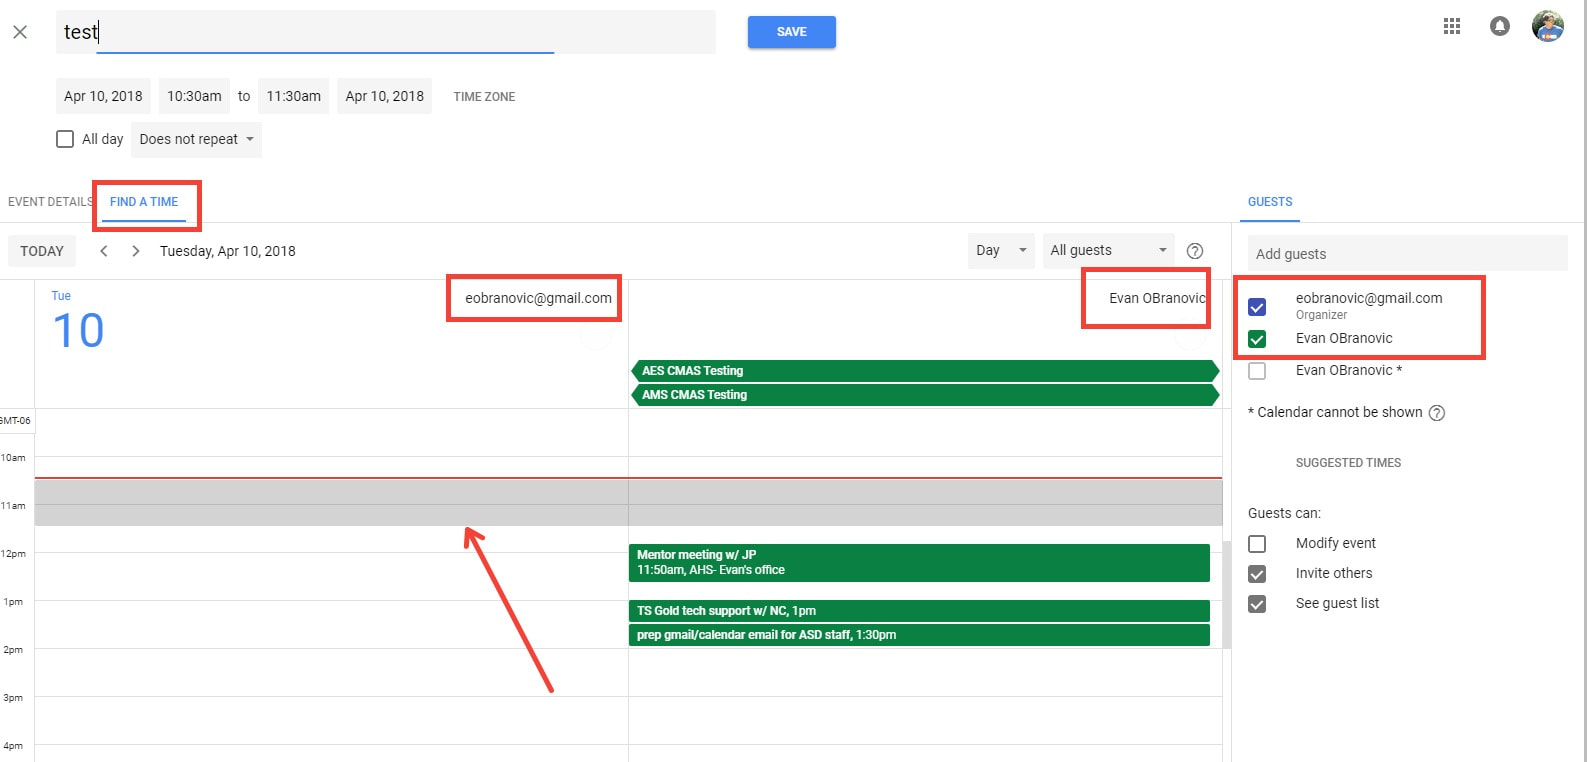
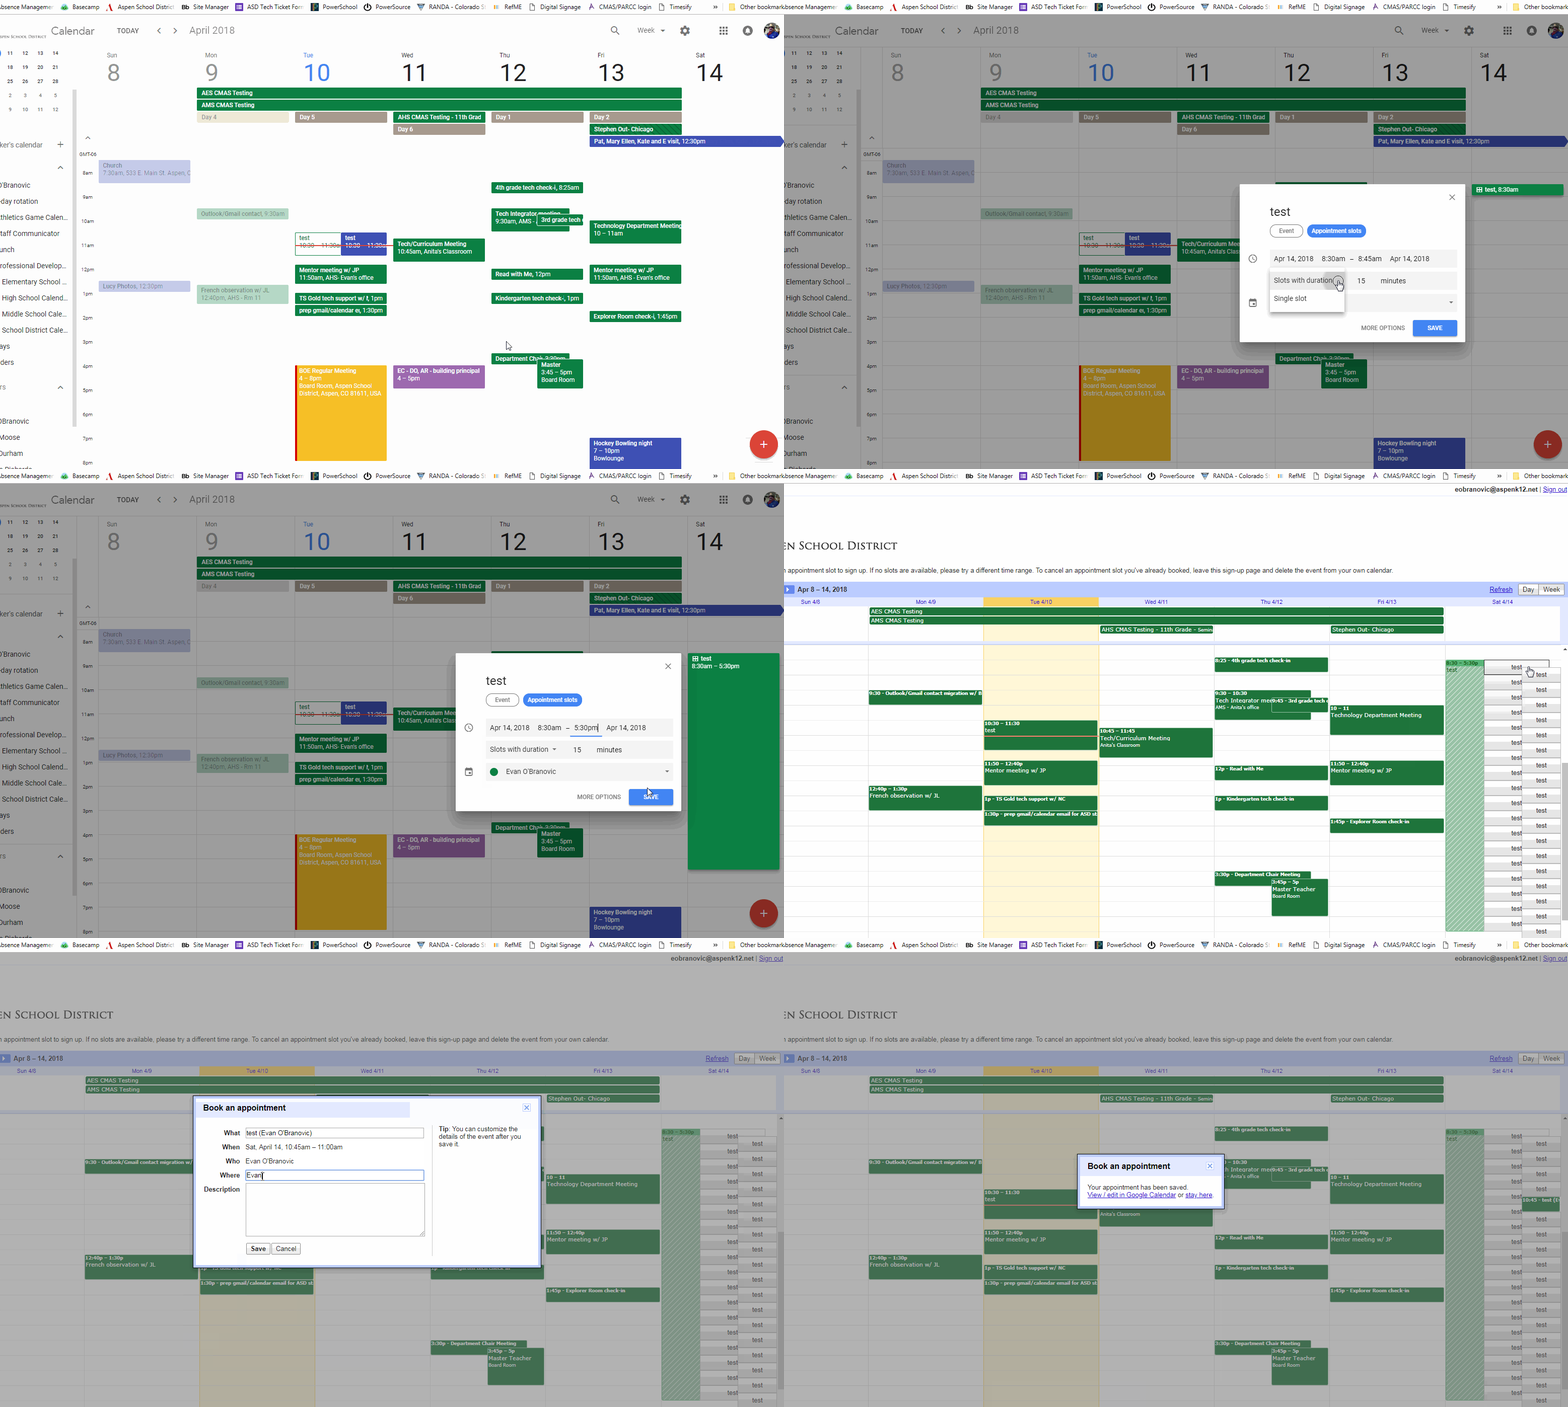
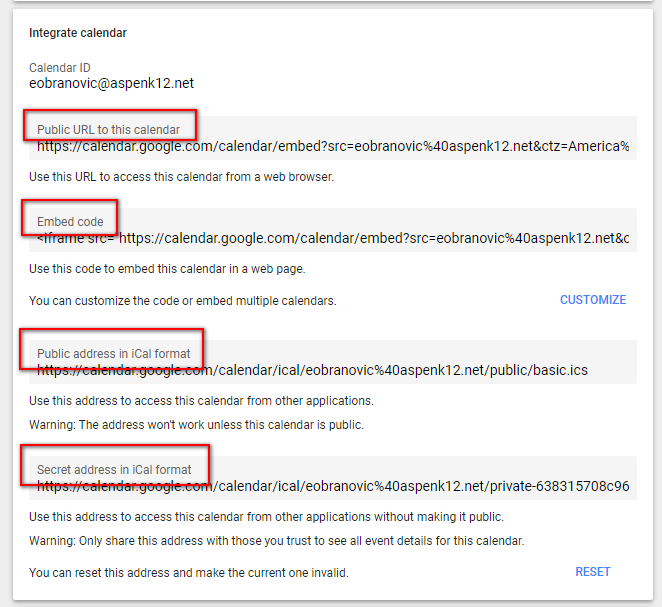
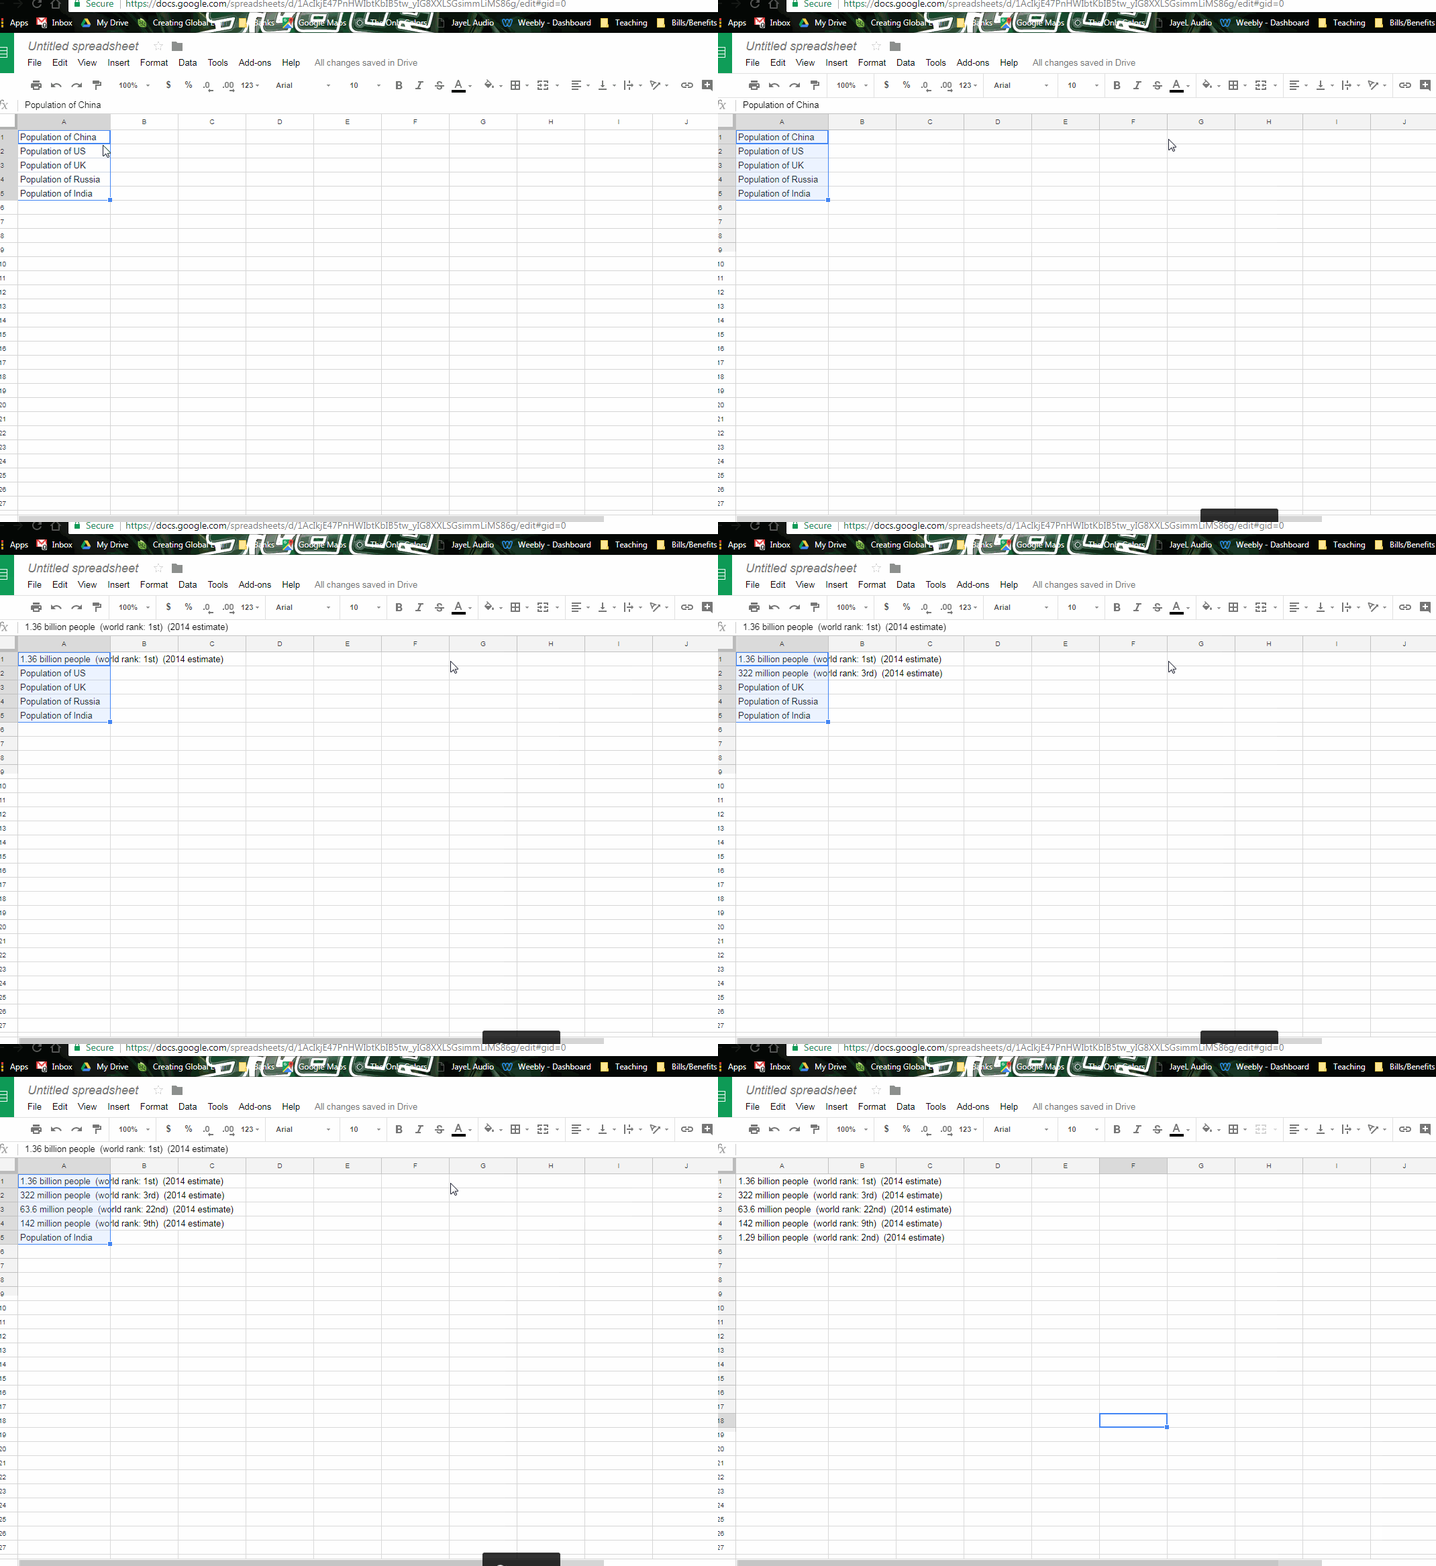
As my school staff move towards a full integration of GSuite for EDU tools to optimize our workflow. We have begun to really take advantage of Google Calendars to keep our schedules organized and accessible to others. Here are some tips and suggestions I have after working with staff in developing best practices: Layering & different views - Google Calendar works on the premise that you can easily meld a lot of different calendars together in order to stay organized. When you have a whole organization using the calendar it allows for easy sharing and access to calendars making coordination with peers simple and effective. Don't forget that you can alter how you are viewing your calendar based on your needs. Schedule view is often forgotten and can really help keep you organized if you have a lot of events. Day, Week, or 5-day view might help keep things organized if you need a clear picture of several calendars all at once. Sharing - Much like Google Docs one of the big advantages of Google Calendar is the ability to easily share it with other Google users and control what exactly they can see. Calendars can be made public or shared individually with a varied level of detail/access depending on what you deem appropriate. Avoid unnecessary emails about your availability by giving some level of access to your calendar/schedule to your cohorts. Invites & Attaching documents - One of the lynch pins of organizing your calendar with others is sending invites. This insures other parties are aware of a meeting or event you have scheduled, inserts it on their calendar, and will let you know who has confirmed or denied their ability to attend. Use the 'Find a Time' tab when creating an invite to easy see invitees availability (if you have access) to avoid back and forth correspondence about best times. When any corresponding documentation (i.e. agendas, supplemental reading, notes, etc...) would be helpful, simply attach it to the calendar invite so you have quick access. This feature is great for standing meetings that you may have a running agenda for, no need to search your Drive for the document! Making appointments - One feature only available for organizations like schools and businesses is the ability to make appointment slots that users can then sign up for and make an event on both calendars as a reminder. When you are in a support role, like myself, it is an easy way to stay organized and again avoid unnecessary emails back and forth to find times that work for everyone. View the Google Help center documentation HERE and watch the quick GIF below walking through the process. Syncing & Embedding - Everyone's using GSuite aren't they? Though a tool like Google Calendar always works best in it's home environment, it's easy to give someone (or larger audience) access to a calendar in a few different ways regardless of their Googleness. Each Google Calendar you create has the ability to be imported into a calendar viewer and grab an embed code to easily display your calendar on any webpage that allows for custom HTML. Spreadsheet import - When you have a lot of events you'd like to put in a calendar all at once, the thought of clicking on each day and entering the details can seem like a massive time suck, and it is. The ability to create a quick import template via Google Sheets is an incredible time-saver that makes populating a calendar quick and easy. Find the instructions from Google HERE and access a template I've created HERE.
There you have my advice for some of the best features and tools of Google Calendars that have really helped my district get the most out of this tool. If you have been a longtime user of Google Calendar none of this should come as a surprise, but getting everyone on your team and organization on board with these features and tools is paramount to getting the most out of Google Calendar and being efficient and organized. Please leave any tips or advice in the comment section that you've found helpful that wasn't mentioned above.
You've often heard my ranting and raving about the great things done for edtech and education from the amazing people at the EdTechTeam. I was accepted to present at their Colorado Summit in Louisville, CO this November and joined 600+ educators for a weekend of fun and learning. It was truly an awesome event and a bit overwhelming with all the participants and presenters to hone in on the best tips, tricks, and practices to take-away and back to my teachers. Here is a list of the amazing things I gained from this incredible two day event:
1. Chromebooks are the answer! - I'm sure this could spark a lengthy debate on which device is the most effective for student learning and there can be a case made for a variety of devices depending on environment, but the more I speak with other educators in a variety of situations the Chromebook continually seems to rise to the top. In my district we have been steadily moving mostly to Chromebooks for students, but still have a mix of devices including iPads, iTouches, Android tablets, Macs and PCs. The Chromebooks are a breeze to manage using the Admin console and the simplified interface of the Chrome OS lets students get just about everything and anything done within the GSuite workflow.
Once you do take the plunge into the world of Chromebooks there are plenty of great tips you and your students can use to maximize your experience. I sat in on a session with Sean Williams (@seani) who walked us through some of the useful shortcuts, apps/add-ons, and extensions. Review his slideshow HERE, but some of my favorite are: Shortcuts - save yourself some time and sanity with these keyboard shortcuts. Ctrl+Shift+T - Open your last closed tab(s) Ctrl+Windows Switcher - screenshot Ctrl+Shift+Windows Switcher - selected area screenshot Ctrl+Shift+? - Pull up a map of all the available keyboard shortcuts and what they do. Extensions - get the most out of your Chrome experience with great extensions to improve you and your students workflow. Extensity - as you continue to add more and more extensions you may notice some issues with performance. Too Long; Didn't Read (TLDR) - this extension has been out for a while, but seemed to take a hiatus and wasn't working for the past year or more for most users. Well it's back, and I urge you to use it with your students to get great short summaries of any website and assist with their reading and summary skills. Add-ons and Apps - when working in a Chrome environment it's always key to find useful apps or add-ons to allow you and your students to do more. Apps are currently being phased out in the Chrome environment so they are essentially websites again. Equatio - allows you to insert complex equations into most GSuite tools. Use voice, handwriting (touchscreen required), or keyboard input. NOW FREE FOR TEACHERS!! Draftback - add-on for Google docs that enhances the existing 'version history' that can be used to see past revisions and revert back to those versions. Great way for you and your students to watch the evolution of the writing process and reflect on practice. Desmos - a powerful graphing, web-based, calculator that can be used individually or as a class with teacher-led activities and instruction. Google Keep - turn your sticky notes digital! Create to do lists, notes, and reminders that can be shared with others, organized, and inserted into Google docs.
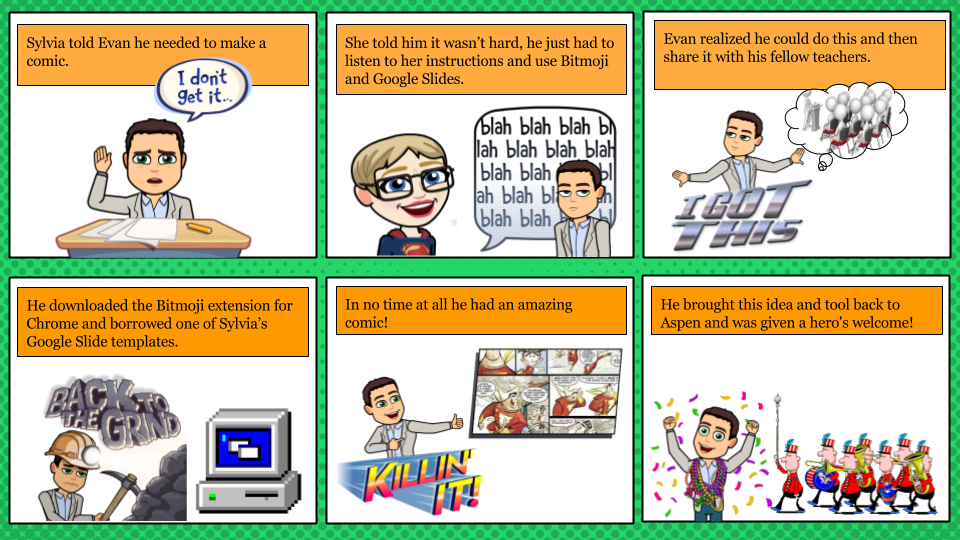
2. Bitmojis and Google Slides - There are a ton of great uses for Google Slides in the classroom and I was blown away by Sylvia Duckworth's (@sylviaduckworth) presentation on tying together the Chrome extension Bitmoji and Google Slides to create fun comics for teachers or students to use. Many of us have already dipped in the Bitmoji world via Snapchat, but utilizing the Chrome extension is a great way to use these fun comics to create meaningful digital literature for both students and teachers to express themselves. Check out Sylvia's presentation HERE and her website (sylviaduckworth.com) for more awesome ideas and how to get started.
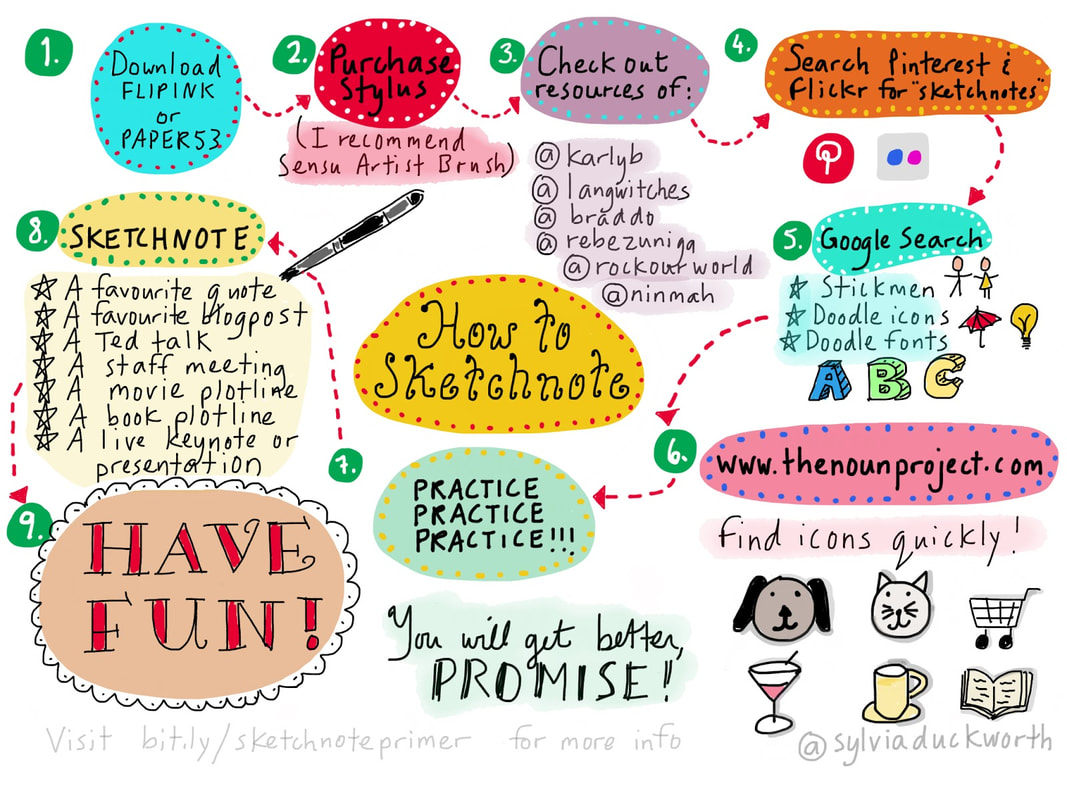
3. Sketchnoting - Another great topic championed by Sylvia Duckworth. She gave several presentations during the summit to help people get started and advance their skills in how sketchnoting can work in the educational environment. As we do move to an more digital environment for students it's important to still provide students with tactile ways to record and remember information. There often seems to be a disconnect if students simply type down their notes and we are getting closer with the tools available to live comfortably in both worlds. I cannot do the topic justice in comparison to Sylvia so please check out her presentation HERE, blogpost HERE, and her website for more information on how to find the best tools and strategies for you.
We were also introduced to Rocketbook which combines the best of both worlds when it comes to taking notes and keeping digital records. Sketchnote, doodle, draw, scribble, etc... and use an app on your phone to send your documents to a variety of locations all at once. Very cool tool I recommend checking out.
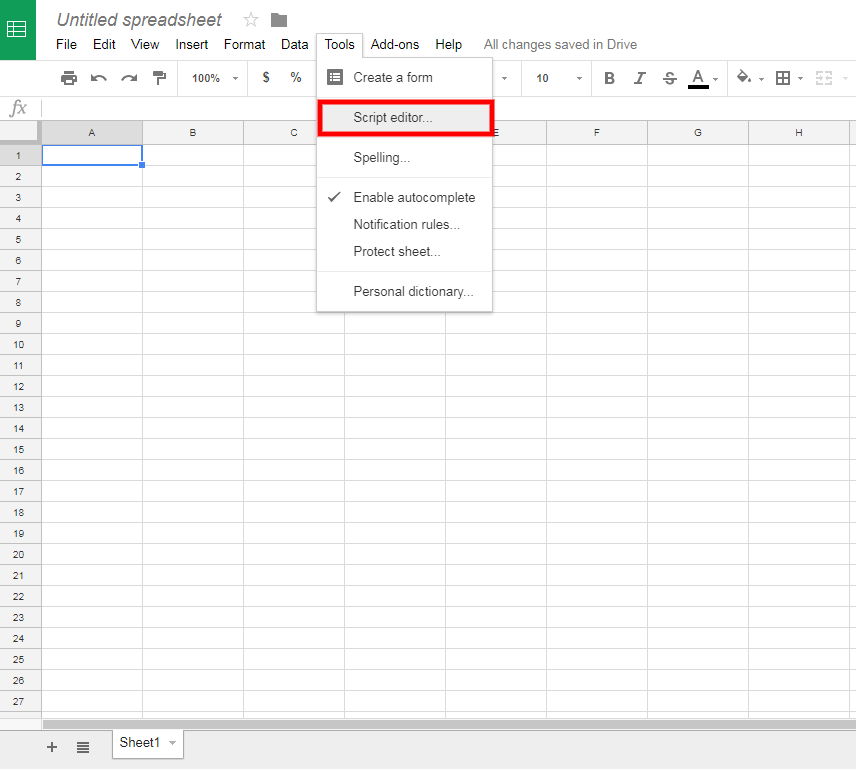
4. The Power of Sheets - We need to start thinking of Google Sheets as much more than a data collection repository. Ben Johnson, Media Specialist at Rocky Mountain HS, showcased some simple but extremely effective add-ons and resources that make Sheets a powerful tool. Taking things to the next level will find you using the script editor to create your own javascript to enhance the function of a Google Sheet. If you're not ready to write your own code then take advantage of those who already have it done such as Flippity.net, Teacher Tech w/ Alice Keeler (@alicekeeler), or Knight Lab for amazing tools ready to go and boost your effectiveness.
My favorite take-away was the WolframAlpha add-on which essentially puts the power of Siri into your Google Sheets. Insert questions into your sheet and use the add-on to quickly grab the answers. This is obviously the most simplistic use of this amazingly powerful add-on so add this to your Sheets and start playing.
So there you have some of my biggest takeaways from the incredible Colorado Summit put on by the EdtechTeam. Alas, I am only one man so there was no doubt a plethora of other great things happening that I couldn't get to throughout the Summit. I've said it in previous posts, but if you are able be sure to make the time to go check out a summit near you. The information, connections, recharging, and excitment gained from this two day event is incredible. Feel free to comment on any of the topics above or any great ideas you've taken away from this or another EdtechTeam Summit.
I've been a big fan of the EdTechTeam and their awesome summits providing meaningful and exciting edtech PD for teachers. They have also branched into online learning and offer a multitude of great courses through EdTechTeam Online. These course focus on GSuite tools for education, Apple Teachers, Paperless classrooms, assistive technology, teacher leaders, and other critical teaching tools and strategies. Courses are anywhere, anytime learning that can be taken for graduate credit. This summer I took their Creating Global Learners with Geo Tools course and was pleasantly surprised at the power of GSuite tools like Google Maps to enhance a teacher's lesson in far more areas than just Geography.
Being an extensive GSuite for EDU user I was amazed at all the new tools and ideas I gained from taking this course. The possibilities of utilizing Google Maps to teach a multitude of subjects and help students gain a global perspective is seemingly endless! One of the things that really stuck out to me was the http://www.geteach.com/ map comparison engine. I see a lot of use of this tool for students to get amazing visuals on data that can be used for a lot of teaching purposes. Another tool that I really saw the benefit of was using My Maps as an alternative presentation tool for teachers and students that helps look outside of their world. The Google Lit Trips is a great place to get started and I plan on sharing that right away. I really hope to promote the use of this with the teachers in my school and get the students engaged in different and broader way than they are used to.
Here are some of the resources I explored in the course that really stuck out:
Google Art Project - Great resource to expose students to digital media resources for history and art. Specifically, the historical figures section provides access to great pictures and primary sources that can be used for students to create their own narratives about a figure and then do some research to compare stories and facts. Google Crisis Map - Interactive Map allows students to layer various types of data about various crisis situations nationally and worldwide. The weather, hazards, emergency preparedness map would be a great basis to teach students how to collect data and analyze patterns from different regions with other corresponding data to make their own hypothesis on why the weather and hazards may be occurring. GeoGuessr - Game that uses Google Street view to give clues about a mystery location in the world. Great way to teach students to use context clues to be able to narrow down a location based on what they can see and what makes sense in a particular region. Into the Wild map - My Map creation of the locations visited by Christopher McCandless from the story Into the Wild. This could be used as an example of how students could use My Maps to create their own maps based on a book they’ve read. Including links and other resources at various locations mapped from their story. Google Street Art - Access to audio tours, online exhibitions, world collection, and artist stories to provide students access to a genre of art that isn’t always easily accessible and can be just as moving as traditional art. Good way to get students interested in art who may not be interested in traditional art.
My final project was to create a lesson using My Maps to help students become better global citizens and understand a larger impact they and others have on our world. I chose to focus on population growth and what it could mean for various places and cultures around the world. Use the button below to access the lesson plan and feel free to use it or modify it for yourself.
My post may have given you some insight to how tools like My Maps can greatly enhance your teaching and students' path to becoming global learners, but there's nothing like the real thing. Go check out the EdTechTeam Online learning place and take advantage of some great courses they have to offer. Feel free to comment below on any ways you've helped your students become global learners or utilized tools like My Maps in your teaching.
I was very excited to have an opportunity to attend and present at the EdTechTeam Summit April 29th-30th in Breckenridge, CO. I always jump at the chance to take advantage of an event so close to Aspen that never disappoints and always provides me with great resources and ideas to take back to my staff. Below you will find some of the strategies and tools that stuck out to me during my two days at this awesome event:
Make Learning Visible! Creating Student Digital Portfolios with the new Google Sites - Everyone seems interested in utilizing digital portfolios as the most effective way to display student work, and most importantly, understanding. The biggest question has become how do we do it? There are plenty of avenues out there and if you are a Google school then I think the new Google Sites has to top your list. The site revamp has really made sites a useful tool and with many of the same sharing and privacy functionality as a Google Doc it becomes very easy for students to use and limit visibility until the time is right. Some updates to the functionality of the teacher-student workflow would be nice (Hey Site Maestro!) but I think the pros far out weigh the cons. Check out the amazing resources and presentation by Pamela Lewis for more great info on getting started.
Map What? Map That! - Google Maps and My Maps are two amazingly powerful tools that can be taken advantage of in many ways in the classroom. Mapping data from a Google Forms survey can give incredible visual context to what is being collected. By coming several of the GSuite tools a fun and interactive scavenger hunt can be created that has students traveling to various locations around the globe watching informational videos on YouTube, answering questions in Google Forms, and retrieving information from Google Slides and Google searches. Check out Leslie Davison's presentation for more details on what activities like this can look like. Zero to Ninja: Sheets and Forms- EdTechTeam's Michael Wacker walked us through the process of becoming Google Sheets and Forms Ninjas by completing a self-paced activity that earned you digital badges along the way based on your completion. So while learning a bit more about Google Sheets and Forms was nice, the real take-away I had was the process of becoming a "Ninja" and earning the digital badges that came with each level of accomplishment. The process was set up through Google Slides which provided the instructions for each activity and then a final submission of which levels you completed via Google Forms gave you the necessary codes to get your badges and keep them in a Google Sheets trophy case. The badging process was facilitated through a great add-on created by Daniel Sharpe that can easily be used for multiple applications. I see so many applications of this process both with students and teachers. Check out Wacker's site with the ability to become a Ninja in all the GSuite apps. There you have three of my big take-aways from yet another amazing two days of PD, learning, connection and excitement at the EdTechTeam Breckenridge summit. Below you will find another summary of my reflection on two things learned and how I hope to apply them in my own practice. Feel free to comment below on any experience you have had with any of these tools/ideas and what works for you and your students/staff.
Many people have been talking about flipping the classroom, but I feel like it has hit a wall when it comes to implementation. Some of the road blocks are obvious: lack of access, lack of training/PD, and unclear learning targets, but what are other reasons are there for people to take advantage of this strategy? I think the unknown is one of the biggest hang-ups people have in looking to implement this in their own teaching and I've put together a presentation with some resources to help get you started.
Some of the highlights from the presentation that I find particularly useful are:
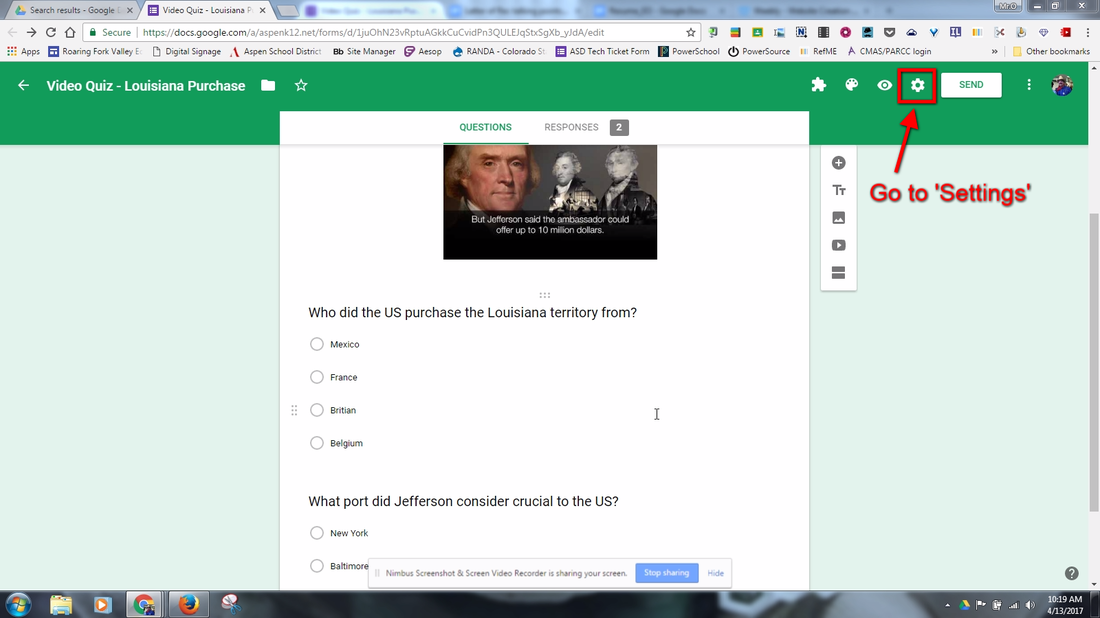
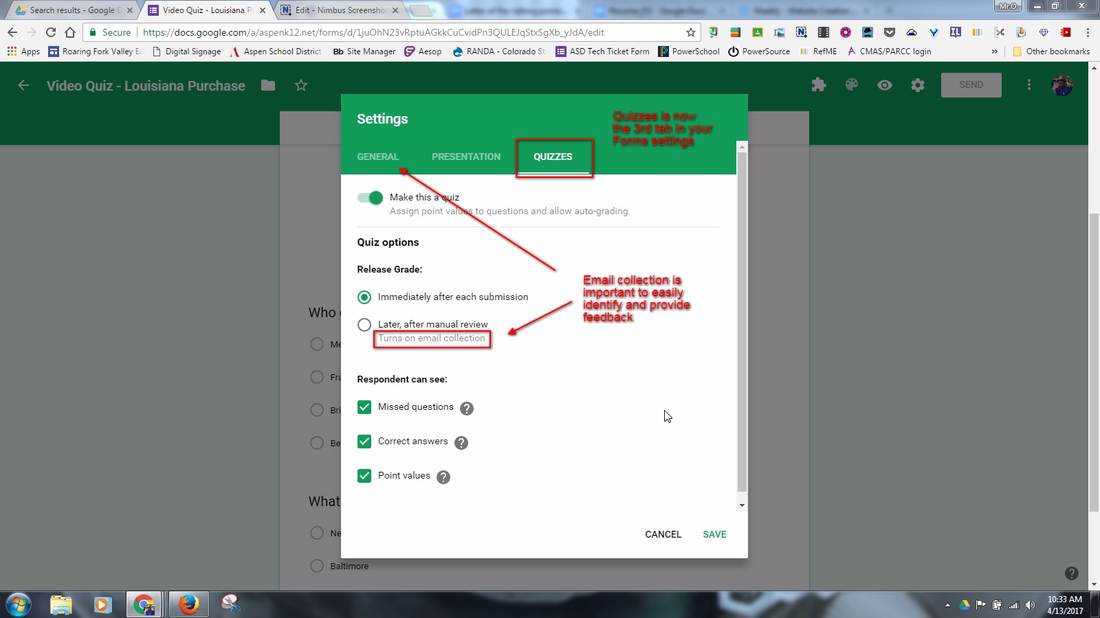
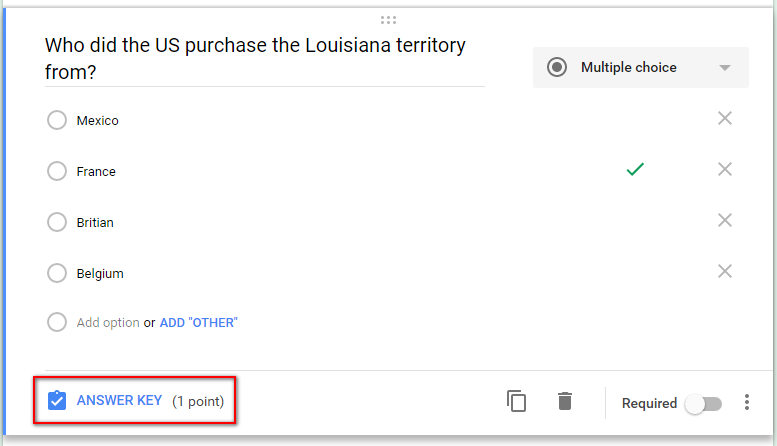
I made sure to mention the ISTE standards and SAMR and TPACK models at the beginning of the presentation to get people thinking about the "why" when it comes to using any of the tools to try and flip content. I think when we have purposeful use of these tools to deliver content to our students in effective and innovative ways we can really see the benefits of flipping the classroom and how it can impact the work we accomplish with our students. My biggest piece of advice is to start small and focus on one area you really see potential in and branch out from there. If you have any great examples or experiences flipping your own classroom feel free to comment below. Feel free to refer and use the presentation for your own teaching and have fun flipping out! There have been some significant and simple changes since my last post about Google Forms and I thought it was time to get the word out for all you avid Forms users out there.
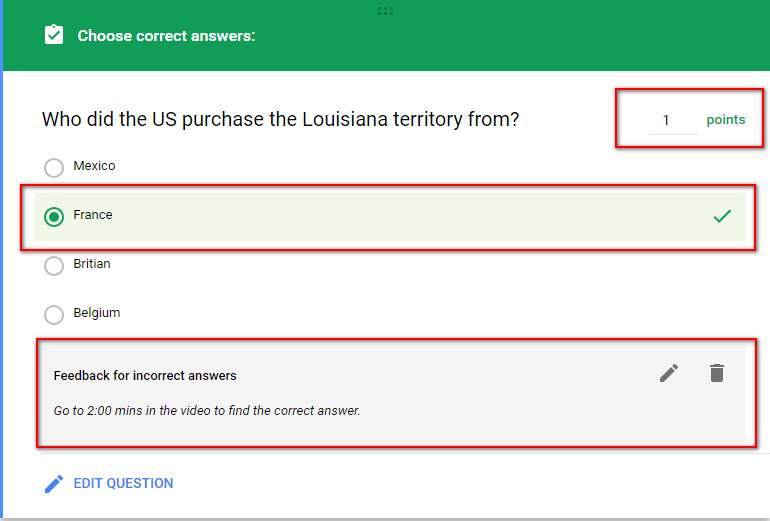
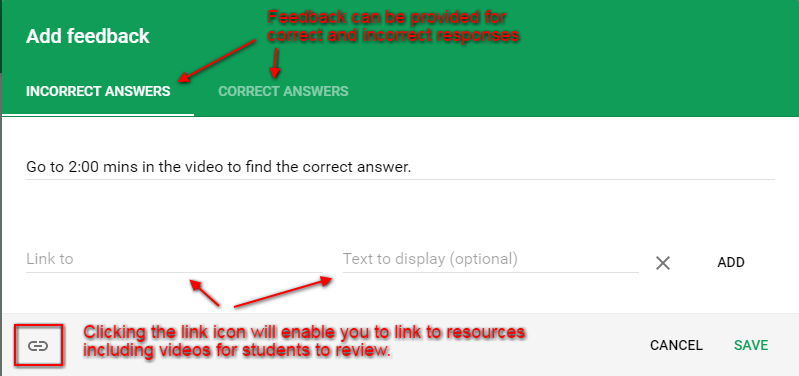
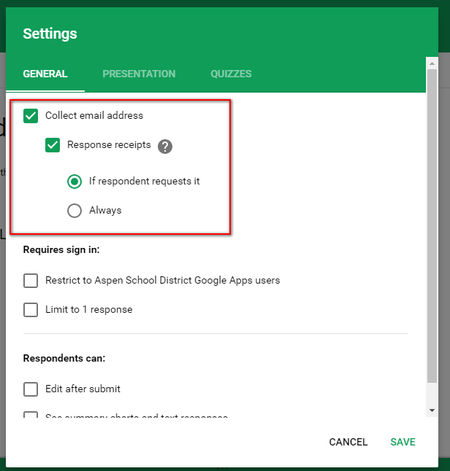
So there you have some new and some not so new features as well as a few tips on how to maximize your Google Forms experience. If you have had any experience or other ways to utilize these please share in the comments below.
|
About EvanDirector of Technology for Traverse City Area Public Schools. Level 2 Google Certified Educator. Former Tech Integration Specialist and 4th grade teacher at Aspen School District and Spartan for life! Go Green! Categories
All
Archives
February 2019
|








 RSS Feed