|
I was very excited to have an opportunity to attend and present at the EdTechTeam Summit April 29th-30th in Breckenridge, CO. I always jump at the chance to take advantage of an event so close to Aspen that never disappoints and always provides me with great resources and ideas to take back to my staff. Below you will find some of the strategies and tools that stuck out to me during my two days at this awesome event:

Make Learning Visible! Creating Student Digital Portfolios with the new Google Sites - Everyone seems interested in utilizing digital portfolios as the most effective way to display student work, and most importantly, understanding. The biggest question has become how do we do it? There are plenty of avenues out there and if you are a Google school then I think the new Google Sites has to top your list. The site revamp has really made sites a useful tool and with many of the same sharing and privacy functionality as a Google Doc it becomes very easy for students to use and limit visibility until the time is right. Some updates to the functionality of the teacher-student workflow would be nice (Hey Site Maestro!) but I think the pros far out weigh the cons. Check out the amazing resources and presentation by Pamela Lewis for more great info on getting started.
Map What? Map That! - Google Maps and My Maps are two amazingly powerful tools that can be taken advantage of in many ways in the classroom. Mapping data from a Google Forms survey can give incredible visual context to what is being collected. By coming several of the GSuite tools a fun and interactive scavenger hunt can be created that has students traveling to various locations around the globe watching informational videos on YouTube, answering questions in Google Forms, and retrieving information from Google Slides and Google searches. Check out Leslie Davison's presentation for more details on what activities like this can look like. Zero to Ninja: Sheets and Forms- EdTechTeam's Michael Wacker walked us through the process of becoming Google Sheets and Forms Ninjas by completing a self-paced activity that earned you digital badges along the way based on your completion. So while learning a bit more about Google Sheets and Forms was nice, the real take-away I had was the process of becoming a "Ninja" and earning the digital badges that came with each level of accomplishment. The process was set up through Google Slides which provided the instructions for each activity and then a final submission of which levels you completed via Google Forms gave you the necessary codes to get your badges and keep them in a Google Sheets trophy case. The badging process was facilitated through a great add-on created by Daniel Sharpe that can easily be used for multiple applications. I see so many applications of this process both with students and teachers. Check out Wacker's site with the ability to become a Ninja in all the GSuite apps. There you have three of my big take-aways from yet another amazing two days of PD, learning, connection and excitement at the EdTechTeam Breckenridge summit. Below you will find another summary of my reflection on two things learned and how I hope to apply them in my own practice. Feel free to comment below on any experience you have had with any of these tools/ideas and what works for you and your students/staff.
0 Comments
Many people have been talking about flipping the classroom, but I feel like it has hit a wall when it comes to implementation. Some of the road blocks are obvious: lack of access, lack of training/PD, and unclear learning targets, but what are other reasons are there for people to take advantage of this strategy? I think the unknown is one of the biggest hang-ups people have in looking to implement this in their own teaching and I've put together a presentation with some resources to help get you started.
Some of the highlights from the presentation that I find particularly useful are:
I made sure to mention the ISTE standards and SAMR and TPACK models at the beginning of the presentation to get people thinking about the "why" when it comes to using any of the tools to try and flip content. I think when we have purposeful use of these tools to deliver content to our students in effective and innovative ways we can really see the benefits of flipping the classroom and how it can impact the work we accomplish with our students. My biggest piece of advice is to start small and focus on one area you really see potential in and branch out from there. If you have any great examples or experiences flipping your own classroom feel free to comment below. Feel free to refer and use the presentation for your own teaching and have fun flipping out!
When making a push to integrate technology into our classrooms the ASD tech team wanted to find a way to reach our educators in a deeper way then simply showing them "cool" tools that can make their teaching easier and their students more engaged (though those are good things too!). We found ourselves looking at our own philosophy on how we view technology in education and had hoped that the teachers would find our department's foundational pieces as enlightening and helpful as we did.
It came down to two models for viewing technology and its integration in to the classroom. SAMR (Substitution, Augmentation, Modification, and Redefinition) and TPACK (Technology, Pedagogy, and Content Knowledge) are fairly well known and are used by many teachers and schools to evaluate or reflection on how they are using technology, but I feel they are often set aside when a teacher keeps coming back to using various technology to support their teaching and a student's learning. Our tech team felt that if we could provide a interactive refresher for staff to look at these two models and define them in their own terms, then maybe we could spark the idea of how to effectively integrate technology in their classrooms and use us as a resource to do it. SAMR - There are lots of resources out there to look at what exactly SAMR means and how it applies to educational technology. I really like the video explanation by Common Sense Media found here. Created by Dr. Ruben Puentedura, this model frames how technology can be used in education and what the evolution looks like as more tools and increased skill levels are applied. I like the analogy that this model is like a pool: depending on what you are trying to accomplish a simple substitution or augmentation might be as far as you need to take it, but getting into the deep end of modification and redefinition is where the most authentic learning will take place and really transform what you are doing. 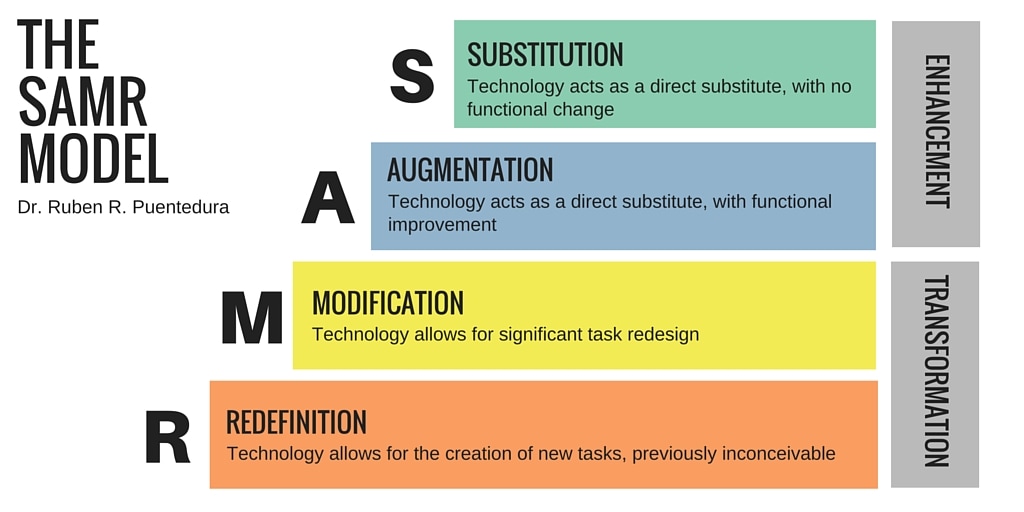
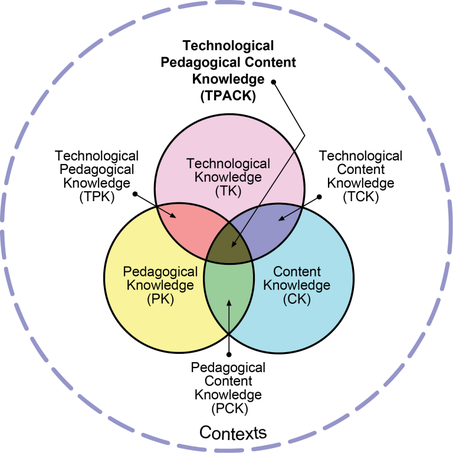
TPACK - I have a special place in my heart for the TPACK model as I am a graduate of the MAET program at Michigan State (Go Green!). Again, I really like the video introduction and explanation done by Common Sense Media found here. Created by Punya Mishra and Matthew J. Koehler at Michigan State University the TPACK model looks at three major areas in education and teaching: It looks at Content Knowledge, Pedagogical Knowledge, and Technological Knowledge and frames it in a Venn diagram to help visualize the intersection of these important areas and how they work together and can build on one another to create excellent teaching practice and in turn, student learning
http://tpack.org
So in order to expose our staff to these two models and how they applied to technology integration we created the slideshow below and had teachers spend time in small groups learning and jigsawing ideas of what these concepts mean to them and how they can apply it to their own teaching. We did the presentation three separate times in each of our buildings and were amazed at how engaged and thoughtful the staff was at working through this process. Shortly after each presentation my fellow integrator (Anita Moose) and I were constantly approached to help teachers with ideas or next steps for using these concepts to better integrate technology into their lessons. Feel free to make copies, modify, and use with your own staff to teach these crucial concepts of technology integration. Comment below on any experiences you have had with these two models and any success or struggles with implementing them.
The more you work with Google Apps for Education, the more quick hacks and tricks you find to make them work best for you. As much as we all love GAFE, no tool can do it all, and you need to be adaptable in order get things done that help you and your students succeed. If you're like me, you been shown, and discovered, some quick tips and tricks for many of the GAFE components. I thought I'd start a list (that will inevitably grow) of some of the ones I've found most useful: 1. Force copy - Unless you are handing something out through Google Classroom you've probably run into the trouble of making sure other people are making a copy of your work and not editing your original or have trouble with the process of copying. Use force copy to shorten the process and ensure the recipient has a editable copy of your document all to themselves. All you need to do is replace the end of the link from your edit screen with the word 'copy' and copy that link to anywhere easily accessible to your desired audience.
I have used the force copy link to share out templates with students and to allow professional development participants easy access to documents they can customize or take notes on. You can use the force copy trick for just about every GAFE tool (Docs, Sheets, Forms, and Drawings) So stop worrying about outsiders ruining your documents and start spreading the love! 2. Tables in Google Docs - You are probably familiar with the ability to insert tables in a Google Doc, but have you redesigned the purpose of this ability? When first implementing Google Docs many teachers jumped at the chance to create digital worksheets, but quickly had issues with where the content created by students should go to make the activities easy to view and provide feedback for. By creating a simple 1x1 table underneath a question you require a written response for, you now have a text box that will grow with any amount of content and keep answers organized on the page.  No need to stop at a 1x1 table. Inserting a mute-cell table enables you have students respond to more complex questions and help continue developing critical thinking questions and answers. 3. Page size in Google Slides - Adjusting the page size in Google Slides is a quick and easy way to adapt the standard presentation format into something different and engaging for the students. A simple change to 8.5in x 11in will create a great magazine template that can be easily shared and worked on by an entire class.  One of our AHS English teachers used this formatting trick to create a wonderful literary magazine (Nepsamerg 2016) that her students were able to quickly and easily edit and publish. The formatting made basic graphic design easy for all students and enabled each one to put a personal touch on the final product. 4. Google Slides backgrounds in Google Drawings - If you have really taken on the use of Google Slides as a presentation and student-work tool in your classroom then you need to take advantage of your ability to customize the backgrounds using Google Drawings. Change the page size to match your slide and create a slide background that cannot be manipulated or erased by another user (unless they change the background as a whole...). This is a great way to make assignments using Google Slides that can be shared out via Google Classroom.
Make sure once you have created an image you want to use as a Slides background that you download it as an image file type (preferably a .jpg or .png) or Slides won't recognize it as a viable option. 5. Pre-filled Google Forms - Are you using Google Forms to collect all types of information from staff and students? In the case when you want to collect some individual information, but also have pieces that will be the same for anyone submitting you can utilize pre-filled forms to get what you need and keep a consistency for certain questions. Our district has found this extremely useful when creating registrations for in-district courses for staff. The pre-filled Google form creates a great roster that can then be shared with HR.  This is used in my district to have staff create registrations for in-district course offerings that require rosters for HR. Course Instructors can then easily collect information from interested staff members while keeping some of the important information for HR consistent. 6. Photo editing in Google Drawing - Photo editing can be complicated, but if you're in need of basic and simple changes insert you picture into Google Drawings for a quick way to resize, crop, fade, brighten, contrast, or recolor.  This skill set is very similar to creation of Google Slides backgrounds mentioned in trick #4. One thing to remember is to make sure to download the file as a photo (.jpg, .png, or .svg) in order to have it be recognized by other programs as an image. 7. Limiting Sharing Options - When you want to share a document with your colleagues or the world you may be hesitant to put it out there for anyone to take share with others or create their own copies and use your work without giving you credit. Recently added are two options to limit others abilities to share you documents. When you go to 'advanced options' options you can now select to "Prevent editors from changing access and adding new people" and "Disable options to download, print, and copy for commenters and viewers".  These options are great for sharing sensitive information that you would only like a specific group to see or safely sharing others work with a larger audience without the worry of work being taken without permission. There you have a few ways to get the most out of your GAFE tools. The more we use GAFE the more ways we find to make sure they work best for our needs. I have no doubt that I'll be updating this post with more tips and tricks as time goes on, but if you have any that work for you, feel free to leave them in the comments below.
GIFs like the one above can explain muti-step process for students to review. The search engine Giphy can be used to find already created GIFs
No matter your pronunciation there's no doubt you've seen one of the thousands of GIFs (i.e. a lossless format for image files that supports both animated and static images."a GIF image") floating around on the internet. Many of the GIFs revolve around funny video clips and memes that you can watch over and over again, but with the ease of creating your own they can easily be used in an educational capacity. After attending a presentation give by Ben Wilkoff last year at a GAFE Summit run by the Edtech Team I was introduced to the innovative ways you can use a GIF to help your students or fellow staff members.
The best GIF maker I've used is the free download LICEcap which allows you to record anything on your screen with an adjustable window interface. MakeGIF is a Chrome App & Extension that allows you record short sections of YouTube videos or compile a stack of pictures to make a GIF. The TechSmith Snag-it extension is another tool that can be used to create GIFs from short videos/screencasts. So what can you do with a GIF? One of the most useful applications I have experienced is to create step-by-step instructions on any type of process that could benefit from repeated visual instruction. With the roll out of a new website at our school my staff appreciated a collection of simple tutorials that are time consuming than instructional videos (see below). By embedding GIFs in a Google Presentation staff or students can flip back and forth between steps and figure out the process at their own pace. Classroom teachers can use them to record processes like multi-step equations. No matter what the topic, using GIFs as a teaching tool has real potential. Comment below if you have ever used them before or any ideas you have for using them in the future.
By publishing a Google Slides presentation I can set the show to play on repeat and customize the amount of time spent on each slide. By using the tool bar at the bottom you can control the pace and go back to review steps.
This is the second GAFE summit I've been able to attend and I'm always amazed at the innovate and new ways educators can use Google Apps for Education (GAFE) to accomplish so many things in the classroom and promote student learning. Below you will find my thoughts and take-aways from the sessions I attended including a quick reference guide Google Presentation.
Fueling Future-Ready Students with 20time The opening keynote was an eye opening look at utilizing 20time in the classroom. Kevin Brookhouser spoke to his own experience in the classroom giving his students 20% of their time to work on a project that means something to them. He found he was able to create powerful learning that was engaging to the students. I loved his emphasis on completion of student projects rather than perfection and that students need to feel comfortable sharing and exploring "bad" ideas in order to develop good ones. Paperless Projects: Google Slides as Project templates This was an eye-opening look at how Google Slides can be used to provide templates for student projects and easily handed out and collected with Google Classroom. The speaker notes section for each slide can be used to record instructions for the project. Slides can also be graded with a custom rubric using Doctopus and Goobric. If you want a background template on a slide for students to base their work on you can easily change the background of a slide (individually or for all slides) using any image or a Google Drawing. Slides provides for a great way to provide guidance for various types of student projects that can be fun and dynamic. Check out Nate Paul's presentation for a more detailed overview on how you can utlilize Slides in a multitude of ways. Dynamic Google Drawings Google Drawings is an often underused GAFE tool that has many applications for teachers and students. The drawings you or students create can become interactive posters by adding links to videos, websites, images, sound clips, and other Google apps. It's also a quick and easy device for basic photo editing or modification. Creating backgrounds and templates for Google Slides was my biggest take-away for the uses of Drawing. It allows you to customize any type of graphic organizer (chart, graph, venn diagram, etc...) that your students can work off of without fear of accidentally altering or deleting crucial pieces. Preparing a Staff for Major Change There are lots of changes happening in education and in order for one to be successful all the stakeholders have to involved. Rushton Hurley did a great job talking through changes he has helped educational organizations make, focusing on adopting and utilizing educational technology. The one concept that really stuck with me was his feeling that all parties involved in some type of change need to truly be able to explain, justify, and understand both sides of the proposed change in order to effectively move forward in any type of decision. I think this often gets lost in making a decision that stakeholders are firmly on only one side of the fence which results in a change that isn't fully supported and facing an uphill battle. Check out Rushton's website, http://www.nextvista.org/ for great free resources, videos, and contests that you can do with your students. Google Sites 1.0 Google sites has not been my favorite platform for building websites, but it has begun to grow on me as I have seen what others are able to accomplish with it. Michael Wacker showed me how to set the custom footer on your Google Site in order to create links and information that are specific to the visitors coming to your site. Another nifty trick is using Google Drawing to create your very own Favicon for your website (that mini icon on the browser tab). Google Drawing can also be used to create a custom header for your website, which if you have ever tried inserting a photo into a header section of any website without formatting its size you can understand the frustration of trying to move and resize a photo within a header. The integration of other GAFE tools with Google Sites has slowly started to bring me around to the idea of utilizing Sites as a web-building tool. Demo Slam Demo slams are one of my favorite events at the GAFE summit because of their instant gratification in learning and using new, cool tools. Four demos really stood out to me this year: 1. The ability to insert Google Slides into Google Maps to make a really engaging and unique presentation. 2. The add-on "SaveAsDoc" which allows you to take information in a spreadsheet (typically collected in a Form) and quickly save it as a Google Doc which makes it much easier to read and process. 3. The Chrome extension "Black Menu" is an amazing all-in-one menu to access everything Google from your browser and even work within the extension so you don't lose your current tab. 4. The biggest take-away is an amazing extension and web teaching device called DocentEDU (you may need to load unsafe scripts if you're using Chrome). This fantastic tool allows you to adapt any website of your choosing into an interactive lesson for students. I had an opportunity to chat with one of the co-creators, Karin Hogan, after the summit and was incredibly impressed with this device and how useful it is in the education. Assessment in the Digital Age Assessment is always something educators are looking to improve upon and the GAFE tools are making constant improvements to how we can assess all the time. Using Google Forms is a great way to complete formative and summative assessments. It's now easier than ever to add elements like pictures and YouTube videos for students to reference as they complete the form. On the response end you can use conditional formatting to quickly check for right and wrong answers as students complete your quiz and if you haven't checked out the Autocrat add-on to send automated responses and feedback forms then your missing out on a great time-saver and feedback device. As useful as Google Forms are for creating assessments and gathering data there are several other options out there that make assessment fun and dynamic for students: Quizizz, Socrative, and Kahoot are all great game-based assessment tools you should also spend time looking into. How to Survive a Zombie Apocalypse w/ Google This was a unique way at looking how encouraging students to solve a large complex problem and use GAFE tools in order to put a plan for a solution together. James Sanders is always looking to make educational technology dynamic and innovative to encourage students to learn. The problem you have students solve doesn't have to revolve around surviving zombies, but there are many scenarios you could create that would engage your students and require them to use a variety of cross-curricular skills and tools in a fun and engaging way. Check out James' website, classroominthefuture.com, to learn more about all the great projects he's working on. 30+ Forgotten buckets of Googlicious Awesomeness There are so many tricks and tips for using Google and web that go un-utilized. Michael Wacker went through a laundry list of items that are both fun and useful. Many people don't know that by right-clicking on the Omnibox (a.k.a address bar) you can customize the search engines that are used when making a quick search. Most people are aware of Google translate, but enabling the microphone access can be a great way for students to practice their speech and self-assess if they are pronouncing words correctly. Peanut Gallery films and Google Story Builder are quick and effective ways to digitally express stories and ideas. Wacker is continously updating this list so be sure to check him out from time to time to find the next great Googlicious item. Build you own Android apps (and learn to code) The explosion of students learning coding has lead to a whole new way of learning to problem solve. Kevin Brookhouser demonstrated how anyone can use the free software on MIT App Inventor and create simple to very complex applications for an Android device. Check out that website as well as code.org to find tons of free resources to teach and learn coding. |
About EvanDirector of Technology for Traverse City Area Public Schools. Level 2 Google Certified Educator. Former Tech Integration Specialist and 4th grade teacher at Aspen School District and Spartan for life! Go Green! 
Categories
All
Archives
February 2019
|

 RSS Feed