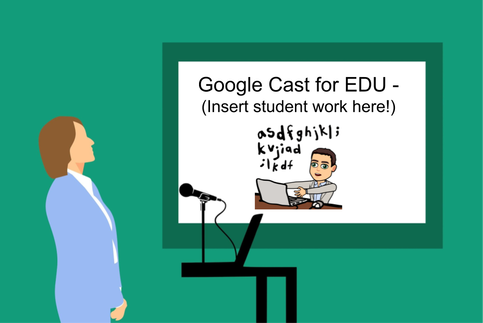
 With Google Cast for EDU student sharing has just taken on a whole new level! This amazing extension for the Chrome Web Browser allows a teacher to easily give students access to share what they are working on quickly and in real-time. The Google Cast for EDU extension is quick to install and very easy to setup for teachers, enabling them to turn their device into a display for an entire classes' devices when it comes time to share with the group. At the admin level we have limited the ability for students to install this extension in the admin console since teachers are the primary users for displaying content being shared by students. With Chrome now having Cast built directly into the settings it's very easy for students and teachers to access the tool in order to share their screen. Within a few clicks you can access a preset teacher device and quickly begin sharing your screen to present. Refer to the screenshots below for visuals on how to get started, but don't miss this opportunity to take advantage of a great tool to seamlessly share student work! **For all my techies out there, all of our testing has shown that devices don't have to be on the same network in order to cast to one another. This has been extremely important since we have student and teacher devices on separate networks** 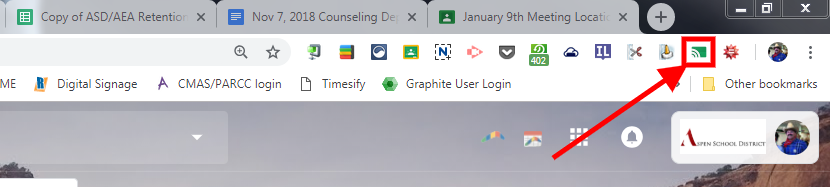 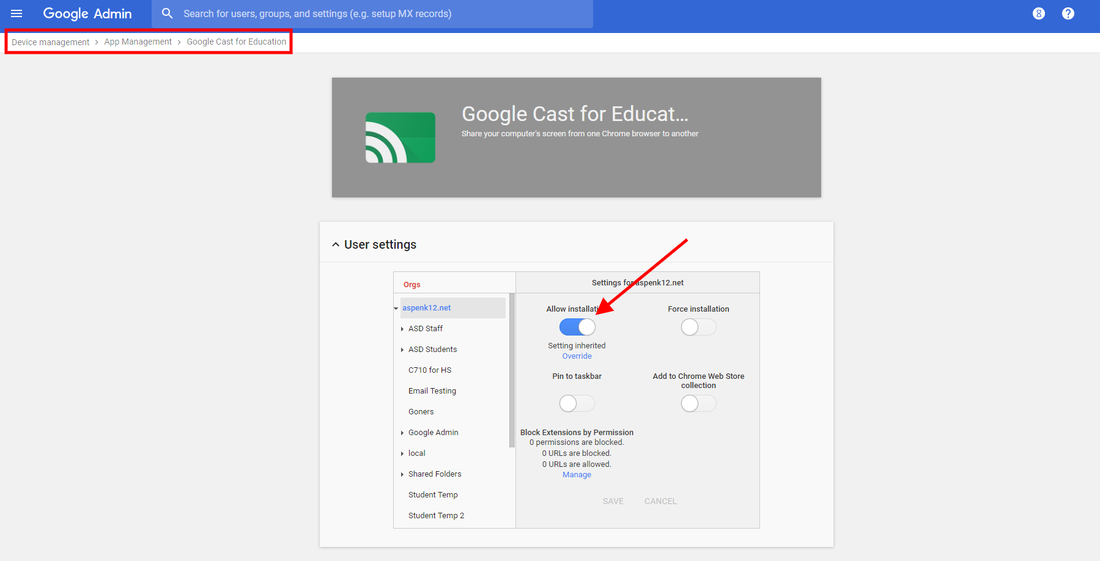 Within the Device Managment section of the Admin console we allow installation of extensions like Google Cast for EDU for specific OUs to prevent misuse. 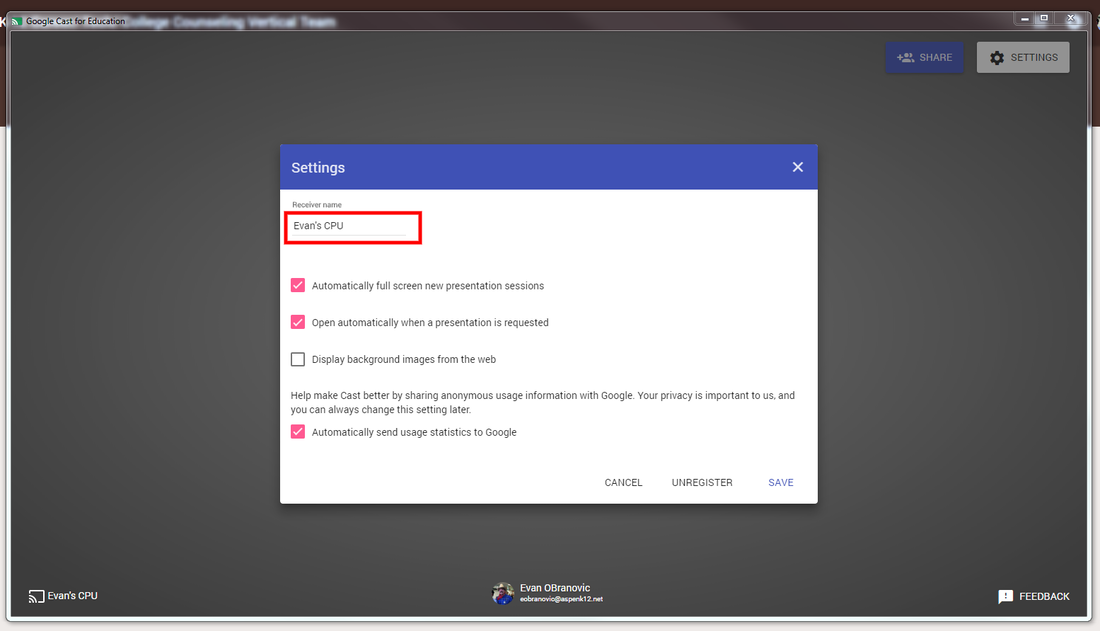 Once you launch Google Cast for EDU make sure to name your device something unique and recognizable so students can quickly find and connect. 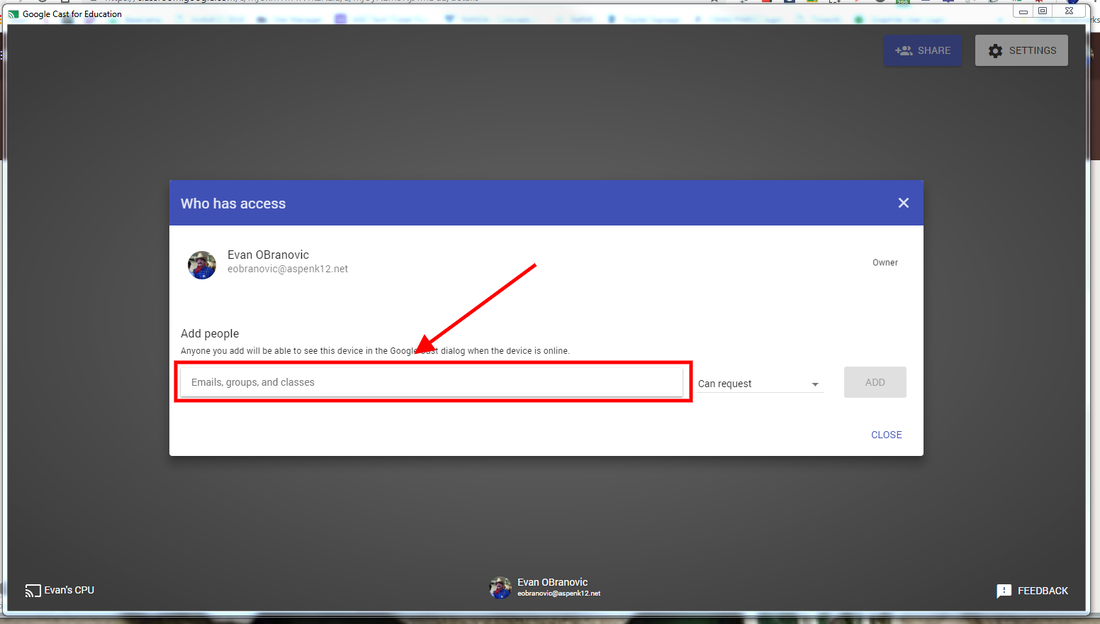 Add individuals or groups by email address and/or Google Classroom to only connect with the students you want to be able to cast to your device. 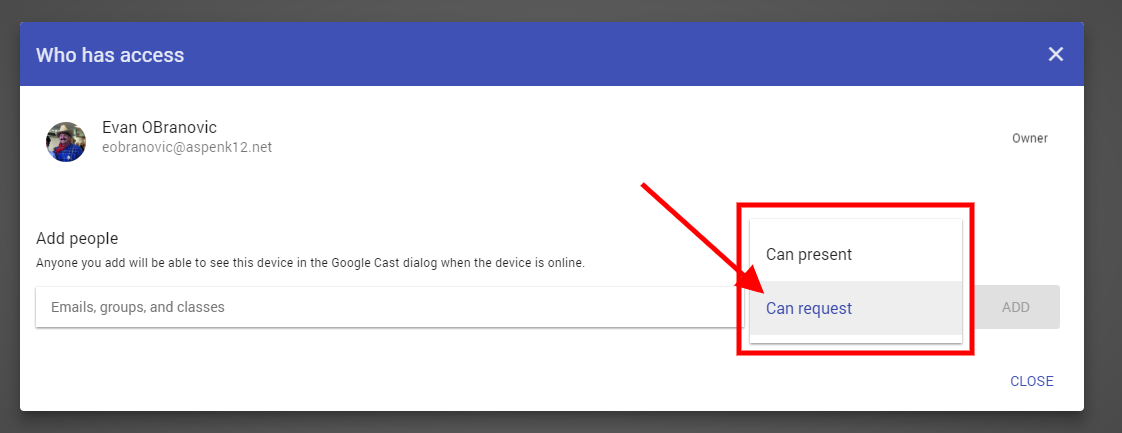 I would suggest always selecting 'Can request' as an option for casters so you have to approve a session each time.  Once you have your settings dialed in, students will be able to find your device from the 'Cast' menu in the 'Settings' and begin to cast their screen to your device.
0 Comments
 If you are reading this blog there's a good chance you found me via Twitter. There are a lot of opinions about Twitter especially since the election of our President who is not shy about his use of this platform for pretty much anything that comes across his mind. Politics aside, I do believe Twitter has a special place for educators in allowing us to connect, share, and grow in ways never before imagined. Twitter started with the ability to add 140 characters and has recently doubled to 280. Though many people see drawbacks to the character limit, I feel it really makes us value the words we are posting and think critically about what's the most important info to include to get your message across. Tip: use a url shortner like the Google URL shortner or tinyurl, when posting links to save on character space. 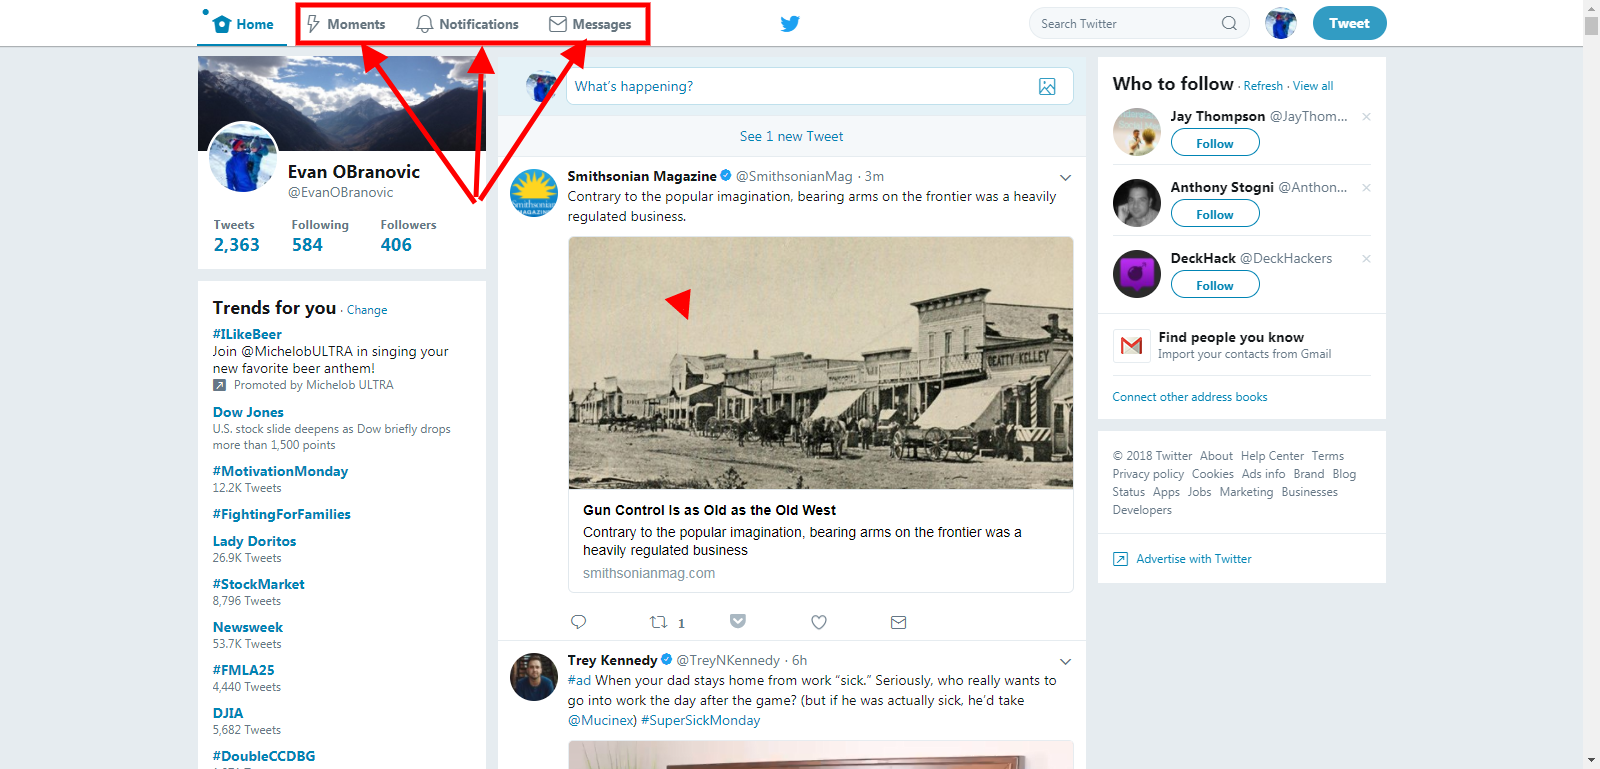 The web interface of Twitter allows you to get organized and start connecting with others. Once you have an account the Twitter web interface has several options you can use to get the most out of the platform: #Hashtags (formerly the pound sign) are Twitter's version of keyword searching (many platforms have adopted this as well). You can search these in the search box on the upper right hand corner of your screen. Adding #Hashtags to your own tweets allows you to put an organizational system in place to group relevant tweets together with yours and other users. Using #Hashtags to follow and participate in Twitter chats is one of the most valuable uses I have found for Twitter. Whether rapid-fire or slow-chats I have always made some great connections and walked away with amazing ideas or tools. Some of my favorite #hashtags to keep up with and participate in are: #edtech #edchat #EdTechChat #ETCoaches #GlobalEdChat #PLN #TeacherPD #GSuiteEDU Here's a link to a great article listing 100 educational hashtags organized by topic.  Search for keywords or topics in the search box to filter tweets. Lists are collections of twitter users you can curate yourself or become part of. Another great tool to sift through the massive amounts of information and focus on a specific group. You can see lists created by other users and follow those as well to let great users find other great users for you. 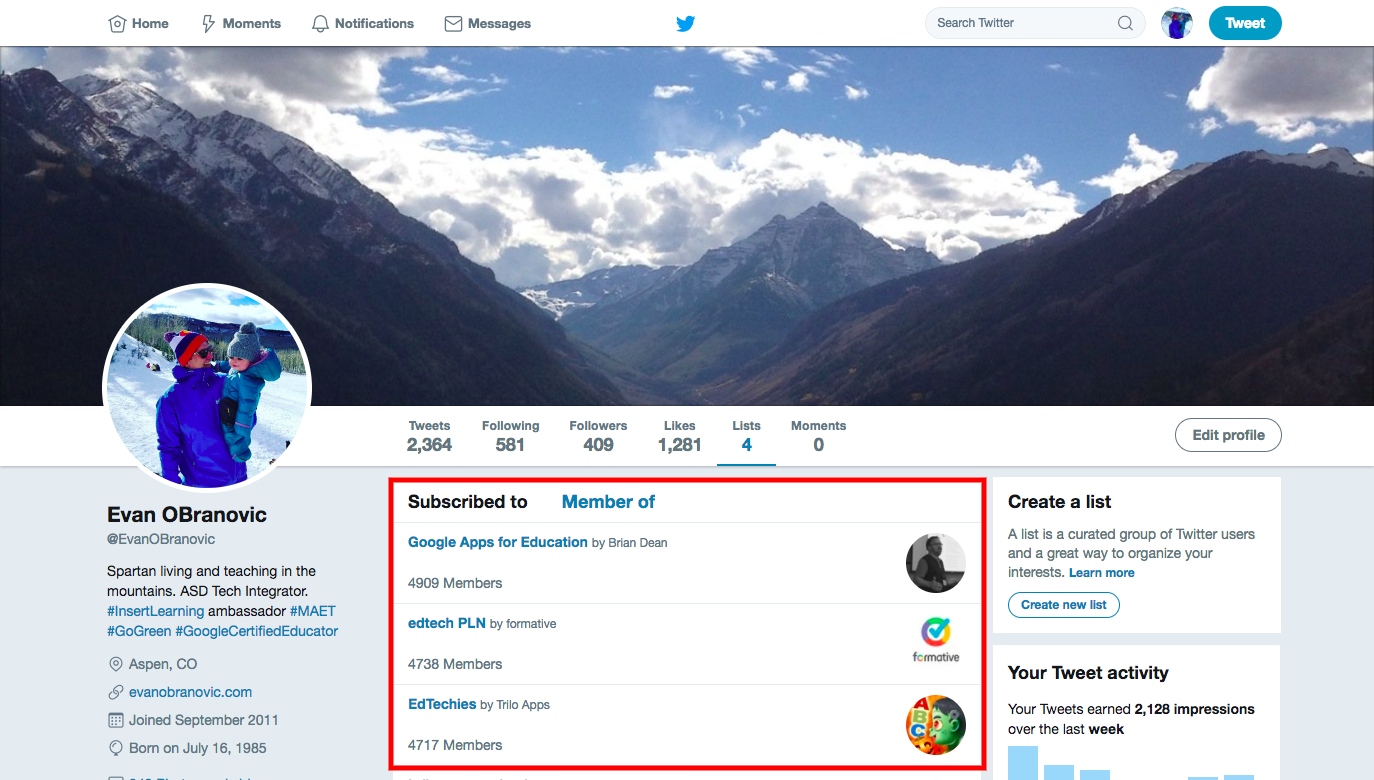 You many find yourself added to lists as you become more active on Twitter and it will benefit you to create or subscribe to lists of users you find helpful. Moments are curated events that collect related tweets and put them together. You can even create your own moments from tweets you want to collect and stream together to tell a story about a particular event. Flipping over to the moments tab can be very useful and informative when looking to gather information on a particular subject or event. It is important to remember that Moments are not comprehensive collections of information so take them for what they are worth. 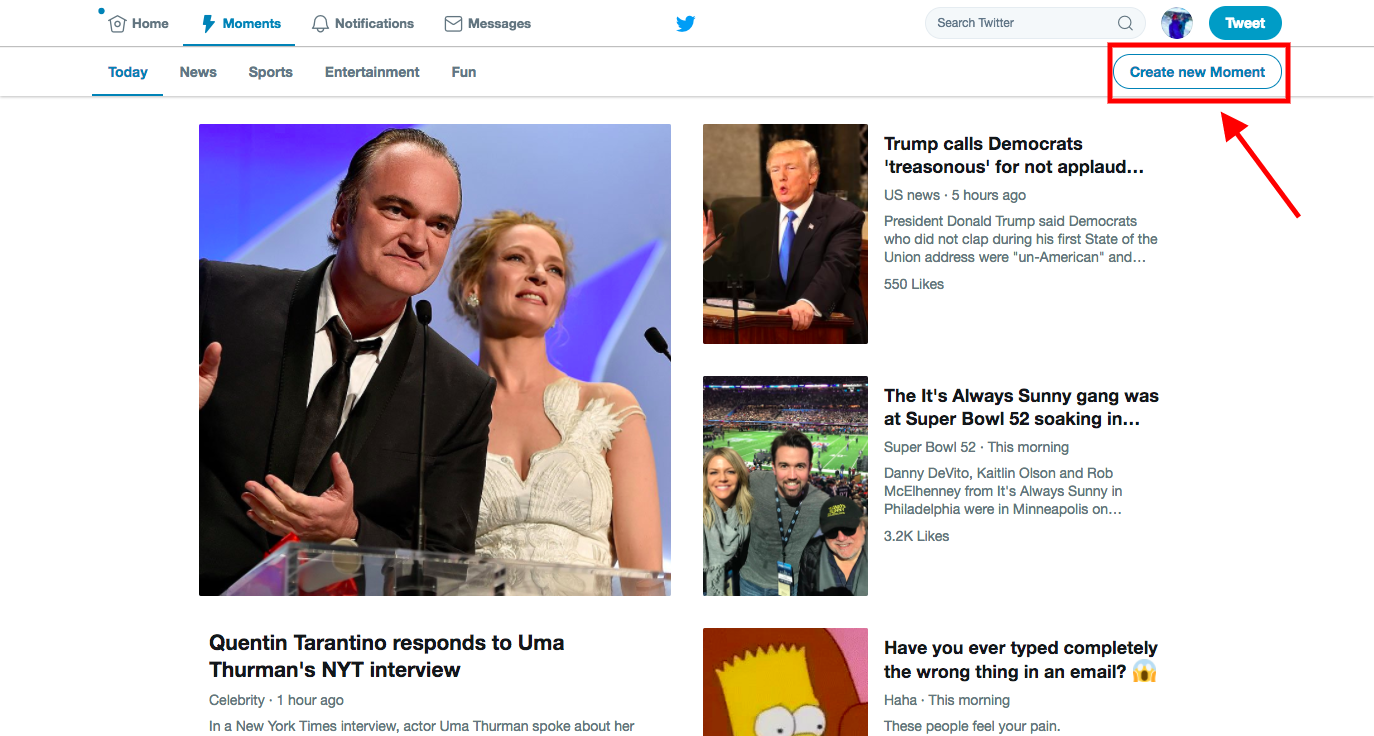 Twitter will curate moments for you that can prove helpful in finding lots of information on subjects of interest to you. 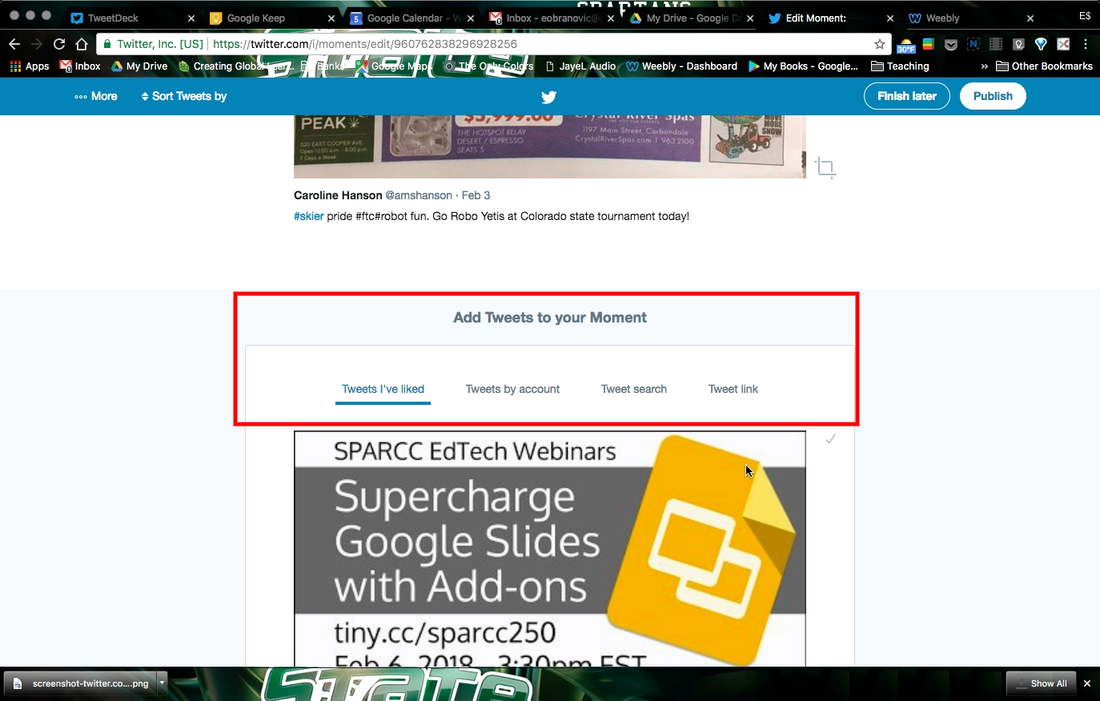 You may find it helpful to create your own moment to gather tweets related around a topic you're passionate about. Following other Twitter users is where you can get the most out of your experience. There are a lot of people on Twitter and who you follow will affect how your feed looks. Though it may be tempting to follow everything and everyone you may have had interest in you will quickly find that great things posted by those users can get lost in the shuffle. Be thoughtful about who you are following, but as a courtesy always considering following fellow educators who follow you. Some of my favorite tweeters are: @alicekeeler @ericcurts @sylviaduckworth @gcouros @heza @WickedEdTech @PaulSolarz @nvCloudlab @EdTechCoaches @iste @GoogleForEdu @mcleod @ISTEglobalPLN @MrSchoenbart @InsertLearning @CommonSenseEd @CommonSense @rmbyrne Tip: when you do find someone or something worth following you can set mobile notifications to be alerted every time they tweet. No need to sift through your feed to find the gold. 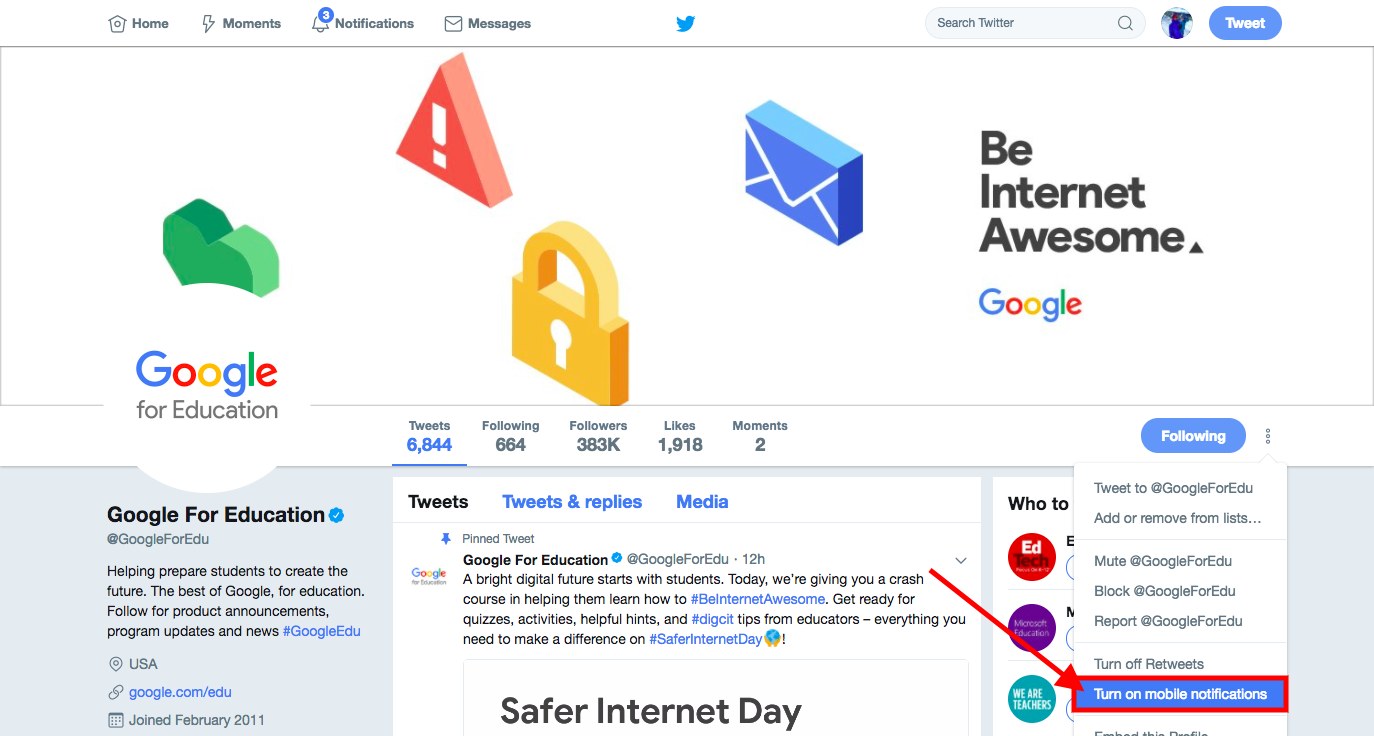 As you begin to follow more and more users your feed will continue to grow. It's a good idea to turn on notifications to those you feel are always putting out relevant and important content so they don't get lost in the shuffle. When you've fully bought in to the Twitter life it might be time to up your game and use an app like TweetDeck to take full advantage of everything Twitter has to offer. TweetDeck and other apps like it, allow you to really organize your feed and create columns/sections to follow specific #hashtags, people, or content. It can be really useful when you begin to use Twitter as a professional development tool and participate in Twitter chats. I love TweetDeck and currently use it as a "Chrome app" that launches automatically when I open Chrome. Best Twitter desktop apps (older article, but all the tools are still relevant) Best Twitter mobile apps (articles rates app by categories) 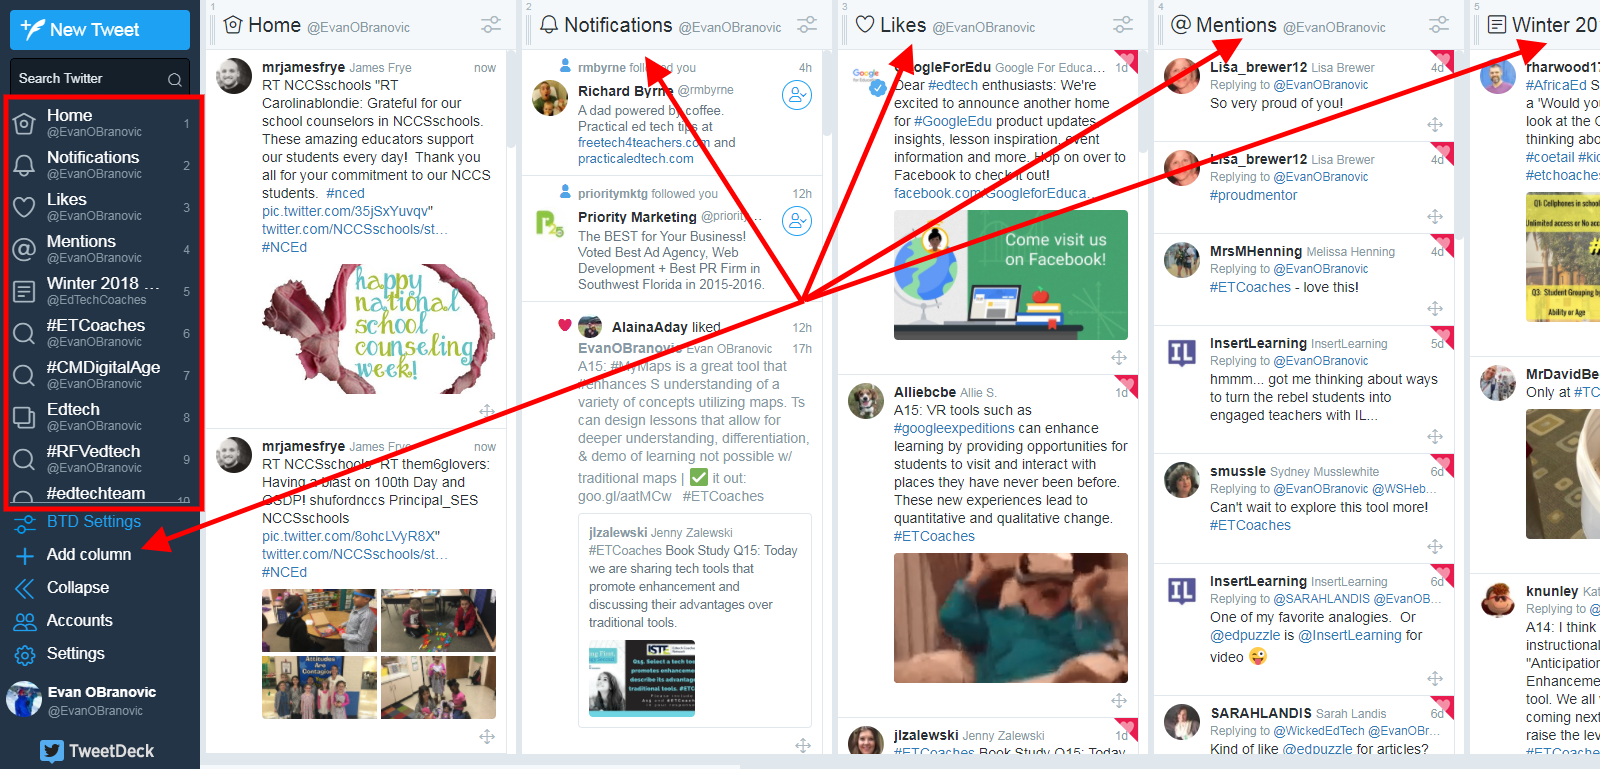 Columns can be created to keep track of specific users, hashtags, curated lists, or content searches to really organize and enhance your experience. 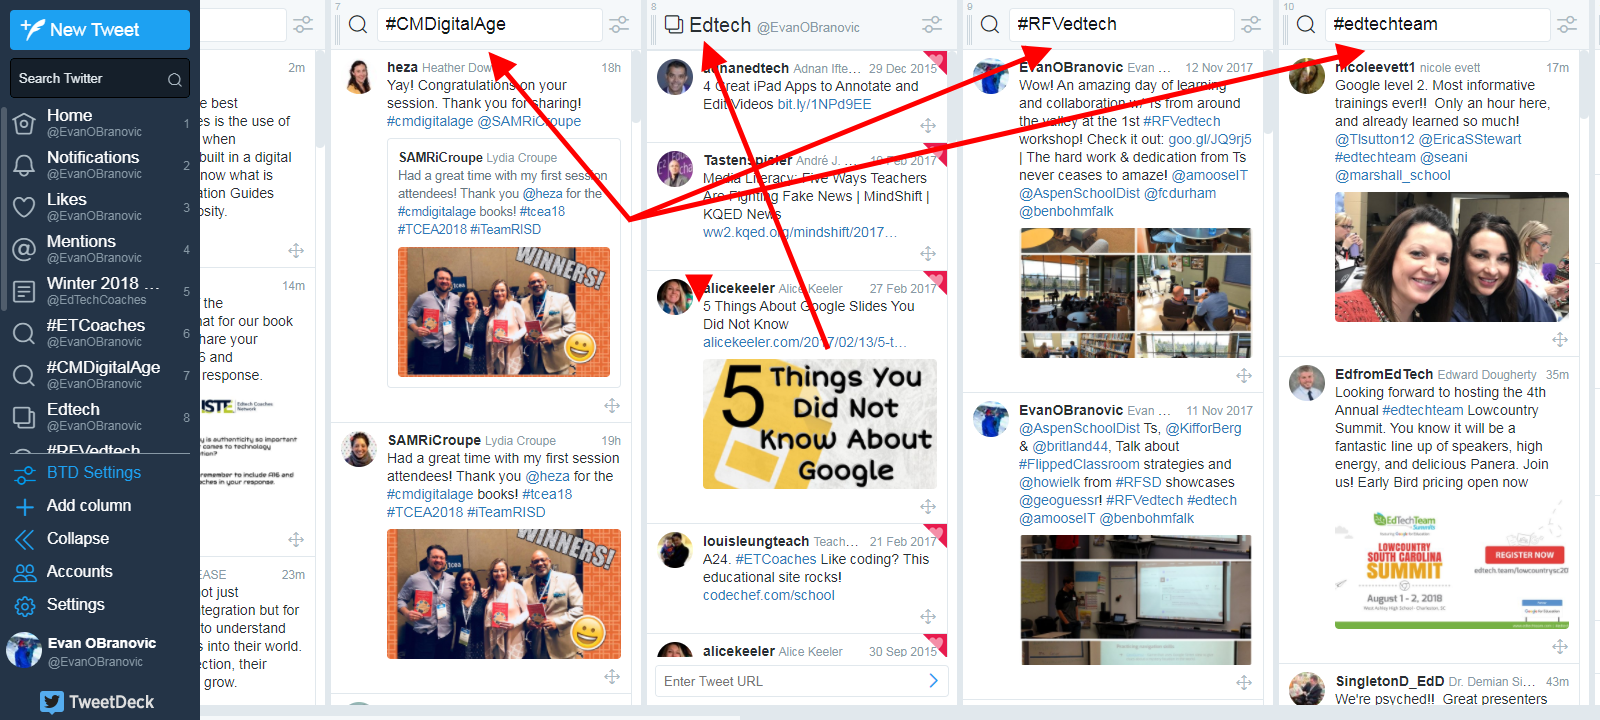 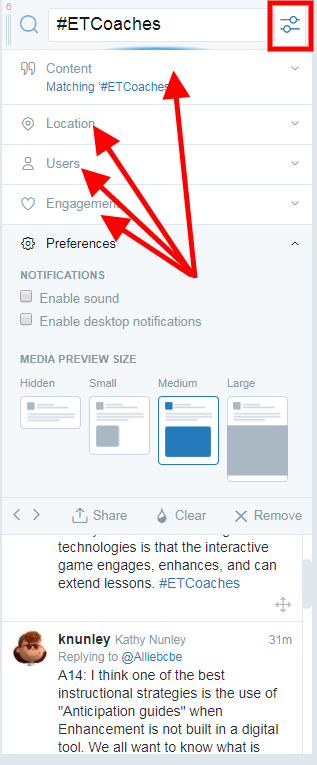 Each column can be further customized to really mine down into the tweets you want to see and how to best view them. So if you're already using Twitter as an educator hopefully you found some useful tips in this post to really get the most out of your experience and if you're not on Twitter, what are you waiting for!?! Anytime I talk to folks who are hesitant I always encourage them to get on and not focus on sending out any information, but simply following those who are already sending out great information. You can still gain a lot from Twitter by "lurking in the shadows" and you may find that as you begin to interact and connect you have created a PLN that was not remotely possible in the past. Feel free to share this post with those who haven't made the Twitter plunge yet and let me know of any great tips or tools you have experience with that make Twitter work for you!
How did you celebrate Computer Science Education Week? In the third consecutive month with a tech week to celebrate (October - Digital Citizenship Week, November - Media Literacy Week, and December - Computer Science Education Week) my fellow integrator, Anita Moose (@amooseIT), and I were pretty fried after organizing the first two and not sure how to get back up and excited for this huge event. Anita proved to be key to getting us motivated and excited by rallying the troops and reaching out to our middle school coding classes. She then matched them with elementary classes K-4th grade to share their knowledge of basic coding with some fun unplugged and digital activities. In addition to having students teach students, we held lunch sessions in the middle and high school with Ozobots, Osmo, and hour of code activities on the Chromebooks.
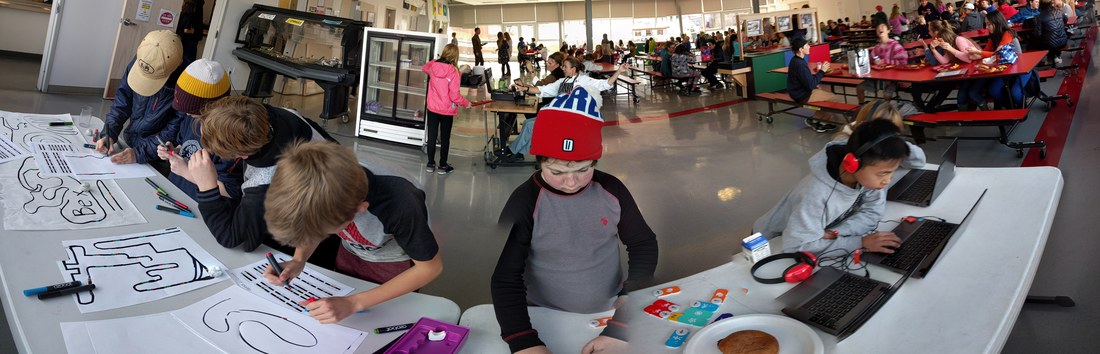
Panorama shot of AMS students playing with Ozobots, Osmo, and Hour of Code Chromebook activities during lunch.
Our most concentrated effort was having coding and CS centers on rotation in the elementary school library with the help of our amazing librarian, Lisa May Howard (@aeslib) and AES G/T teacher, Julie WIlle (@jpwille). Using Bee-Bots, Pro-Bots, Ozobots, and code.org activities, every single student in the elementary got exposure to a variety of coding and CS concepts throughout the week with time to play, explore, and problem-solve.
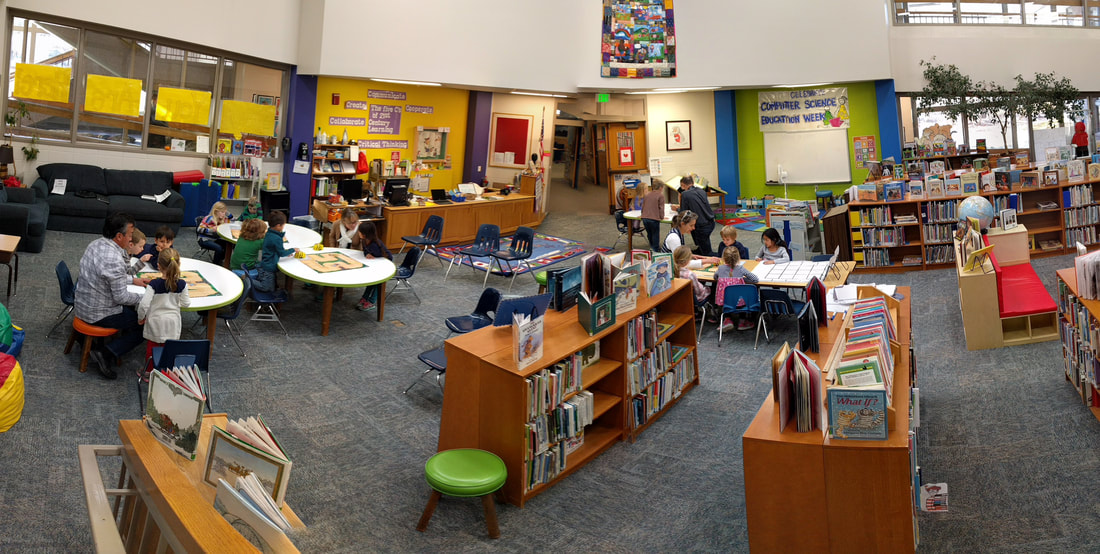
Panorama shot of students working at various coding/CS centers in the AES Library.
The three buttons below will give you access to each of the resource documents Anita and I put together for teachers to use during and after CS Education week. We included videos, unplugged resources, and online activities.
Though we are getting more traction at including coding and CS (Computer Science) in students' everyday curriculum, it was still important to provide a specific focus on these topics to create excitement for pursuing these topics from the students and teachers. The underlying goal of each of the weeks was to encourage teachers to keep using the concepts throughout the year for a more comprehensive understanding and use. That's why we created resource documents for each topic (Digital Citizenship, Media Literacy, and Computer Science), to provide consistent access for teachers and allow them to go back at their convenience and use when applicable. The hope is that these weeks will soon be showcases of the great work already being done throughout the year. Please share any great resources you've used for this week or successes you've had.
I've been a big fan of the EdTechTeam and their awesome summits providing meaningful and exciting edtech PD for teachers. They have also branched into online learning and offer a multitude of great courses through EdTechTeam Online. These course focus on GSuite tools for education, Apple Teachers, Paperless classrooms, assistive technology, teacher leaders, and other critical teaching tools and strategies. Courses are anywhere, anytime learning that can be taken for graduate credit. This summer I took their Creating Global Learners with Geo Tools course and was pleasantly surprised at the power of GSuite tools like Google Maps to enhance a teacher's lesson in far more areas than just Geography.
Being an extensive GSuite for EDU user I was amazed at all the new tools and ideas I gained from taking this course. The possibilities of utilizing Google Maps to teach a multitude of subjects and help students gain a global perspective is seemingly endless! One of the things that really stuck out to me was the http://www.geteach.com/ map comparison engine. I see a lot of use of this tool for students to get amazing visuals on data that can be used for a lot of teaching purposes. Another tool that I really saw the benefit of was using My Maps as an alternative presentation tool for teachers and students that helps look outside of their world. The Google Lit Trips is a great place to get started and I plan on sharing that right away. I really hope to promote the use of this with the teachers in my school and get the students engaged in different and broader way than they are used to.
Here are some of the resources I explored in the course that really stuck out:
Google Art Project - Great resource to expose students to digital media resources for history and art. Specifically, the historical figures section provides access to great pictures and primary sources that can be used for students to create their own narratives about a figure and then do some research to compare stories and facts. Google Crisis Map - Interactive Map allows students to layer various types of data about various crisis situations nationally and worldwide. The weather, hazards, emergency preparedness map would be a great basis to teach students how to collect data and analyze patterns from different regions with other corresponding data to make their own hypothesis on why the weather and hazards may be occurring. GeoGuessr - Game that uses Google Street view to give clues about a mystery location in the world. Great way to teach students to use context clues to be able to narrow down a location based on what they can see and what makes sense in a particular region. Into the Wild map - My Map creation of the locations visited by Christopher McCandless from the story Into the Wild. This could be used as an example of how students could use My Maps to create their own maps based on a book they’ve read. Including links and other resources at various locations mapped from their story. Google Street Art - Access to audio tours, online exhibitions, world collection, and artist stories to provide students access to a genre of art that isn’t always easily accessible and can be just as moving as traditional art. Good way to get students interested in art who may not be interested in traditional art.
My final project was to create a lesson using My Maps to help students become better global citizens and understand a larger impact they and others have on our world. I chose to focus on population growth and what it could mean for various places and cultures around the world. Use the button below to access the lesson plan and feel free to use it or modify it for yourself.
My post may have given you some insight to how tools like My Maps can greatly enhance your teaching and students' path to becoming global learners, but there's nothing like the real thing. Go check out the EdTechTeam Online learning place and take advantage of some great courses they have to offer. Feel free to comment below on any ways you've helped your students become global learners or utilized tools like My Maps in your teaching.
Many people have been talking about flipping the classroom, but I feel like it has hit a wall when it comes to implementation. Some of the road blocks are obvious: lack of access, lack of training/PD, and unclear learning targets, but what are other reasons are there for people to take advantage of this strategy? I think the unknown is one of the biggest hang-ups people have in looking to implement this in their own teaching and I've put together a presentation with some resources to help get you started.
Some of the highlights from the presentation that I find particularly useful are:
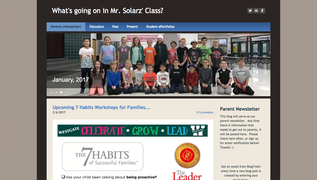
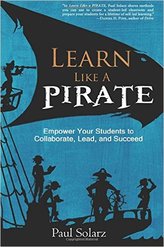
I made sure to mention the ISTE standards and SAMR and TPACK models at the beginning of the presentation to get people thinking about the "why" when it comes to using any of the tools to try and flip content. I think when we have purposeful use of these tools to deliver content to our students in effective and innovative ways we can really see the benefits of flipping the classroom and how it can impact the work we accomplish with our students. My biggest piece of advice is to start small and focus on one area you really see potential in and branch out from there. If you have any great examples or experiences flipping your own classroom feel free to comment below. Feel free to refer and use the presentation for your own teaching and have fun flipping out!  There's a lot of learning happening in today's classroom and in turn lots of discussion of how we can best showcase that learning for the students' and teachers' reflection on their practices. The buzz word has become digital portfolios! There are many reasons a digital portfolio is a useful way to showcase what is happening in the classroom and no one reason is the best. You have many teachers wanting to focus less on grades and more on conceptional learning and what better way to still have evidence of how your students' are accomplishing this then by having each individual create a collection of their best work to showcase to parents, teachers, students, and the public alike! Project-based learning is another great concept in education that has been gaining momentum and by using a digital portfolio you can easily collect and display all the great work that was happening throughout the project as well as the end result. A great example of what project-based and more specifically, student-led, classrooms and digital portfolios can look like lives in Paul Solarz' classroom and website. Check out his book Learn like a Pirate to learn more about his awesome strategies and all the great work he is doing with his students.
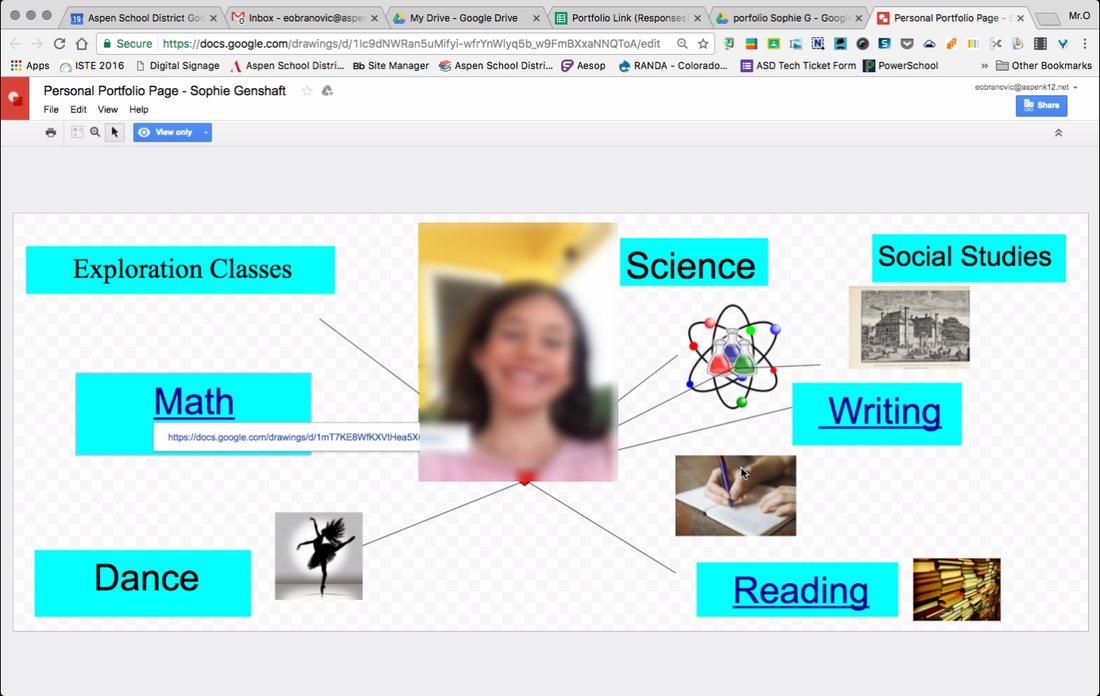
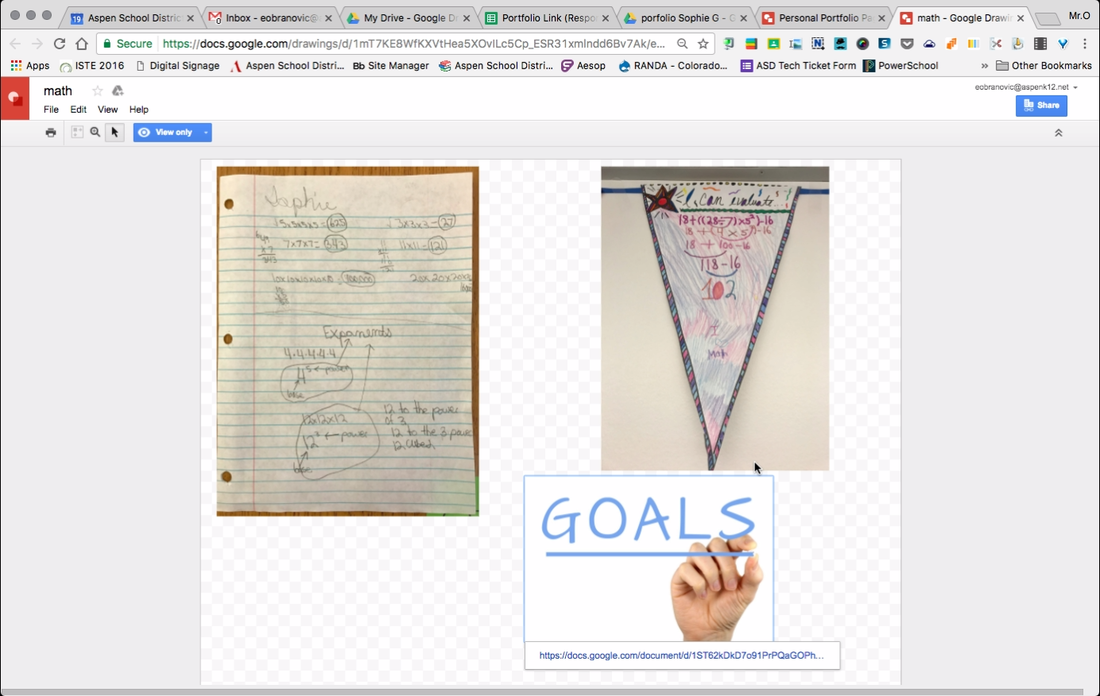
Post-secondary education prep has become so crucial in our education system whether that is college or another trade. Using digital portfolios to help students create effective resumes for college or other institutions. These and many other reasons are great justification for the use and practice of digital portfolios. The question then becomes which tool or medium is the best way to create digital portfolios for students. These suggestions below are not a fully comprehensive list, but should give you some ideas on how you could get started or modify your own version: Thinglink- This website allows for easy creation of interactive pages that students can link various resources or digital media to in order to create of collection of work that can be easily shared with others. Google Drawing- If you are using Gsuite then you can mimic a tool like 'Thinglink' with Google Drawing. Students can place text or images on a Google drawing page that can then be linked to other student work. An awesome AMS 6th grade teacher, Mark M., has instituted this method with his own class with great results.
Google Drive- Another simple way to collect student work. Create a folder in a student's Google drive that can have sub folders for various subjects. Students can then simply drop in work they would like to be part of the portfolio and keep a collection going throughout their time in school. Though the collection is easy some downfalls are effective ways to display the information once collected, ability for students to reflect, and the easy of saving items that aren't savable file types, like a link to a web resource. Google Sites- Gsuite users should definitely take advantage of the easy and beautiful new Google Sites as an option to create great looking digital portfolios. Websites are great ways to collect a body of work, provide reflection, and showcase it to the public and in the case of Google sites, the sharing permissions can be locked down for younger students who aren't quite ready to be fully out into the internet. Weebly/Wix- Much like Google sites, Weebly and Wix offer easy to use platforms to create beautiful looking websites that can be used as digital portfolios. They both have very simple interfaces that allow for quick editing that doesn't require a lot of website building experience. Students can collect all types of work and post on the website One of the AHS Business teachers, Sheri S., has her students create websites to help build their 'brand' and use as a piece of an application or resume. 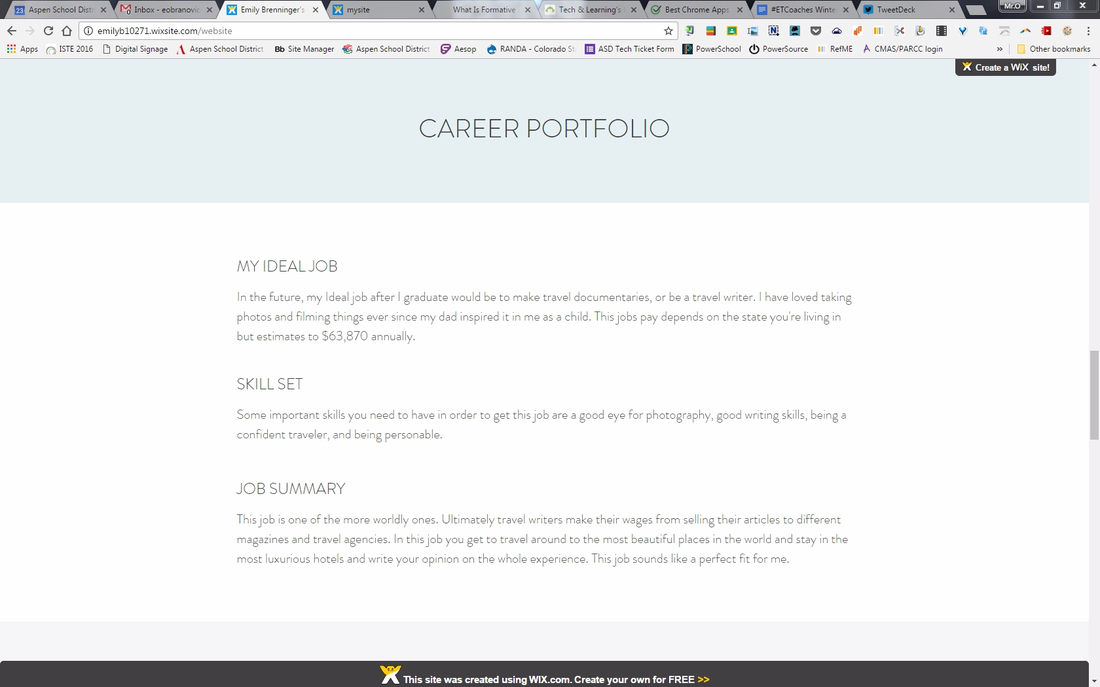 This student's Wix page contains a career portfolio and work showcase. Click on image to view her portfolio in full. 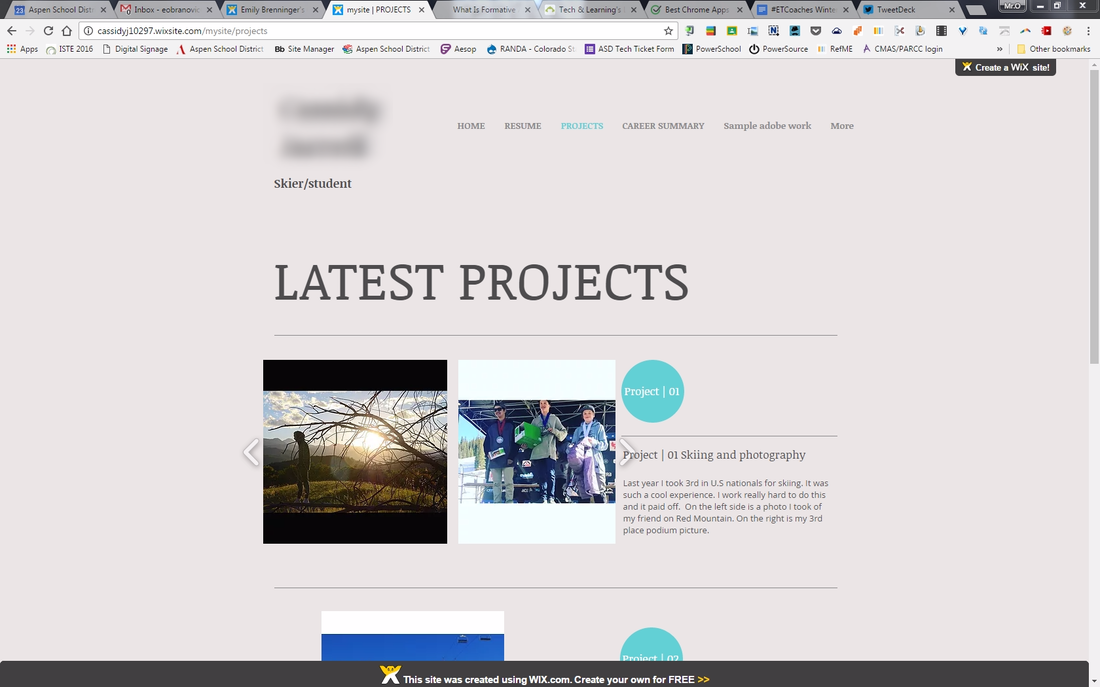 Another one of Sheri's students hopes to take his skiing to the next level so he designed his webpage to focus on his skiing accomplishments. Adobe Express- This is a great suite to make a lot of different web-based projects and the ability to make a digital portfolio is definitely one of those options. Accounts are free to create and gives you the ability to make videos, pages, and posts. Be sure to check it out for portfolio options or just a great tool to create digital media. Blogs- There are so many tools out there that can help you blog. Google sites, Wix, Weebly (which you are currently reading), and many others all have options to add a blog section and there are specific tools that pare down a full website to a simple blog interface like Blogger or Wordpress (also a robust website creator). A blog works well for a digital portfolio because it allows a place to collect work, provide reflection, receive feedback, and share with the world. As I mentioned earlier this is a short list and in no way the full quiver of tools and programs you could utilize to create a digital portfolio, but they are a great place to start! Please comment below any tools not mentioned that you have had experience with creating digital portfolios or just your thoughts on digital portfolios and their benefit in education.
We are living in a digital world where just about any information is available at our fingertips. This has increasingly made a boxed curriculum more irrelevant as finding information that is current and valuable to students online can be as simple as a Google search.
DocentEDU is an amazing tool that enables any teacher to easily create a lesson using the most updated content they find on the web and share it with their students. This extension or add-on makes the development of your content accessible from anywhere and available on most web browsers. The DocentEDU layer works with most webpages, online pdfs, and published Google docs. The process is pretty simple: Sign up for an account, add the extension or add-on to your web browser, and find relevant web content you would like to incorporate into a digital lesson for your students. I personally prefer to utilize this tool with Google Chrome as an extension which works really well as one more tool in my favorite extensions list. 
With a free account you can create up to 5 "Docents" to share with a class. For the low price of $40/year or $8/month you can have unlimited Docents and be able to refer back to any of your created content to reuse again with future students. I recommend getting set-up with the free account and playing around before making the decision to purchase. If you and your colleagues find this tool useful, you can work with your school's tech and/or curriculum department to look at a volume purchase for a large group of teachers who can then share content with one another.
DocentEDU is fully integrated with Google to make all you GAFEers out there one step closer to implementation. Google Classroom can be used to create your classes with existing rosters and assign Docents to your students through the Stream. 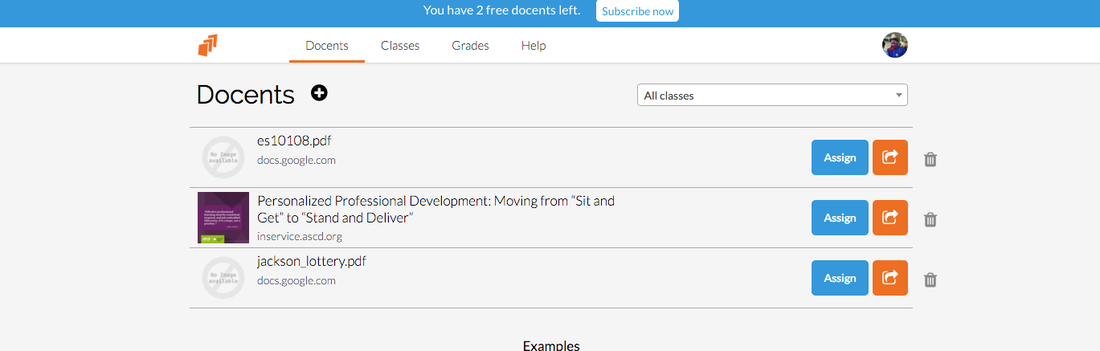

Sticky Note: This is DocentEDU's do all tool. It works as a simple sticky note within a document or accepts embed code for YouTube videos, Google Slides, images etc... in order to allow you to add more information to an existing webpage for your students to review.
Question: Just like it sounds add a short answer or multiple choice question that your students can answer and the results will get stored in the DocentEDU database for you to go back to your teacher dashboard and review and grade/provide feedback.
Discussion: Create a thread where you and your students can discuss topics based on content in your lesson. Provides a safe place to host an online discussion within the realm of your classroom.
I got a chance to speak with Karin Hogen, the co-founder of DocentEDU, in my early stages of discovery and DocentEDU's early stages of release. She walked my fellow integrator and I through her creation and development of DocentEDU, how it can be used, and what her hopes were for the tool in the future. It's great to see a teacher look to create such an innovative solution to an up and coming problem of trying to give students the most updated information when teaching them concepts across subject matter.
If you try and teach using new web content and current events then you need to check out DocentEDU as a easy and innovative way to deliver lessons to your students.
Check out this video from DocentEDU on how easy it is to create questions.
One of the biggest buzzwords flying around the education world is "Flipping" the classroom. When you Flip the Classroom you attempt to enable students to learn concepts at home (or anywhere) and come to class prepared to take the next steps in the learning process. This strategy is a great way to cover a lot a content in a limited amount of classtime or re-enforce concepts to individuals or the whole group. You can also differentiate for small groups or individuals. Edpuzzle is a free service you can sign up for (In addition to email you can use a Google or Edmodo account to register) and create classes/groups that can then be assigned videos from a large list of video databases. (Youtube, National Geographic, Kahn Academy, Vimeo, etc...)  Once you have picked a video with content that meets your students needs you can trim the video in order to focus on specific ideas or content. You can only trim from both ends of a video so be careful of what you are removing. 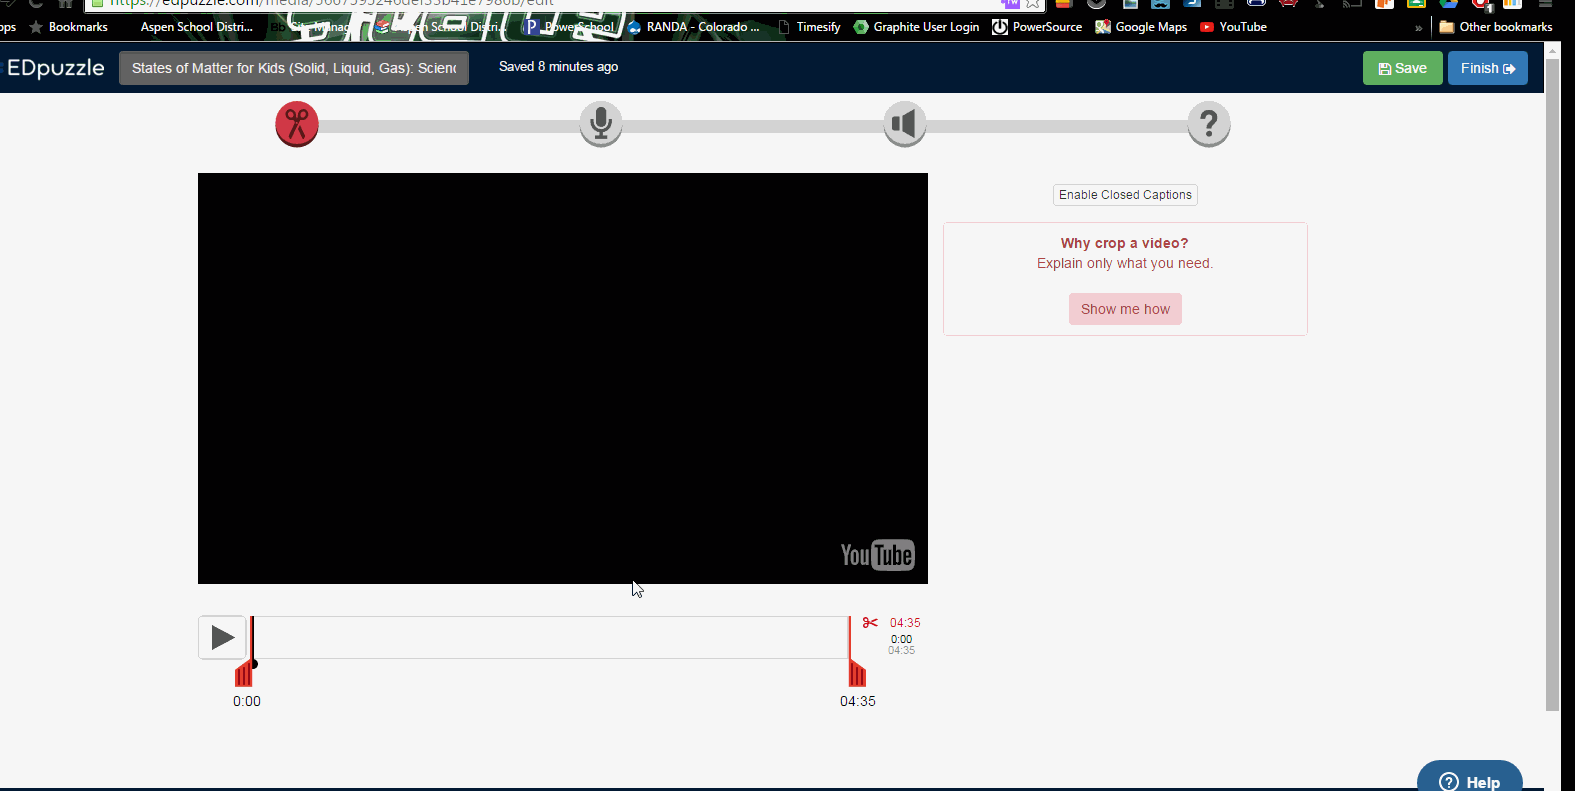 If you prefer to customize your video's audio you can record your own narration over the video content. If you start your own narration you do have to record over the entire clip so make sure you aren't removing any original sounds or narration you want to include. 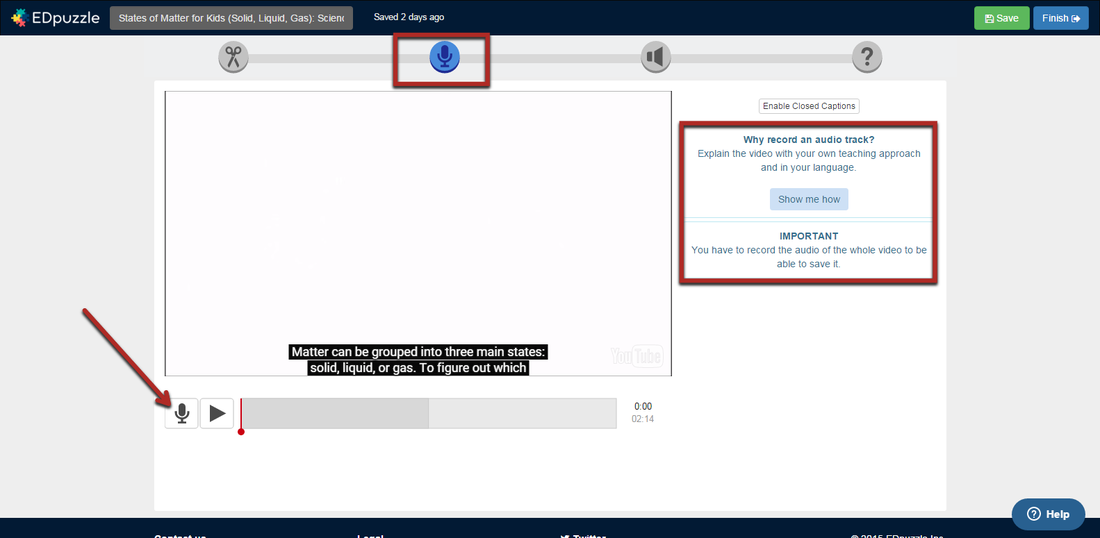 Throughout the video you can add audio notes for your students to listen to as they watch the video. They can be added at specific points in the video to allow you to highlight ideas or concepts in the video. 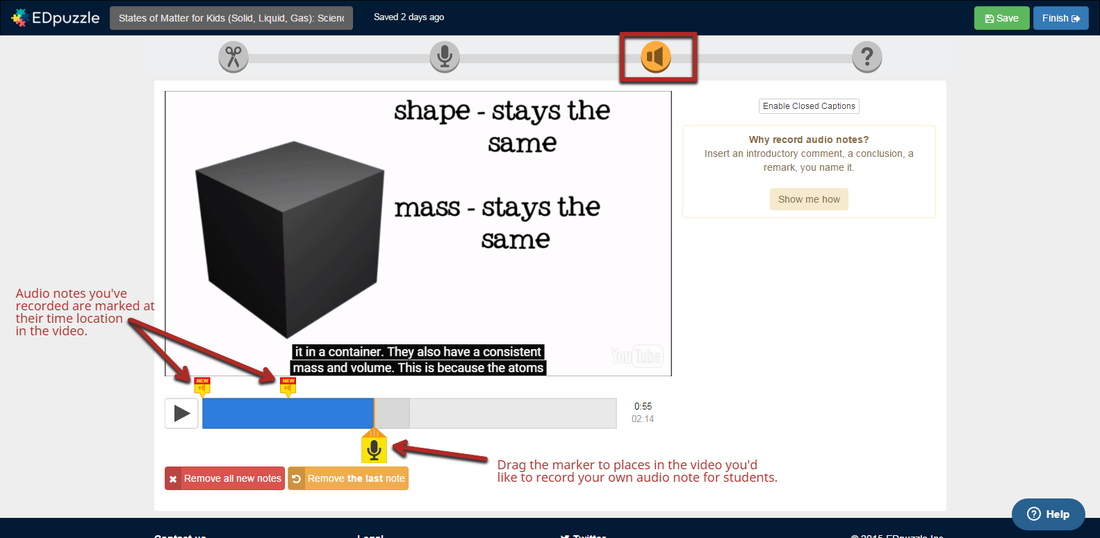 One of the coolest features is the ability to add questions throughout the video at specific points to assess if students are understanding the content they are watching. You have three options: Open-ended, Multiple Choice, and comment. Answers are collected and can be graded and sent back to students. 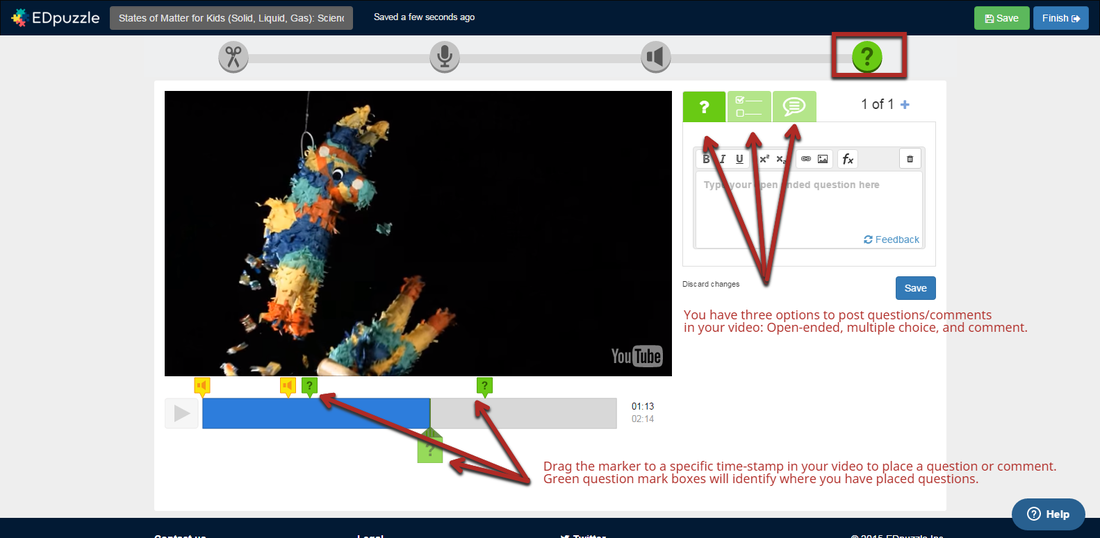 Finally, you can assign your video to one or more classes/groups and enable or disable your two 'Superpowers' which can prevent students from skipping around in your assigned video and set a due date. 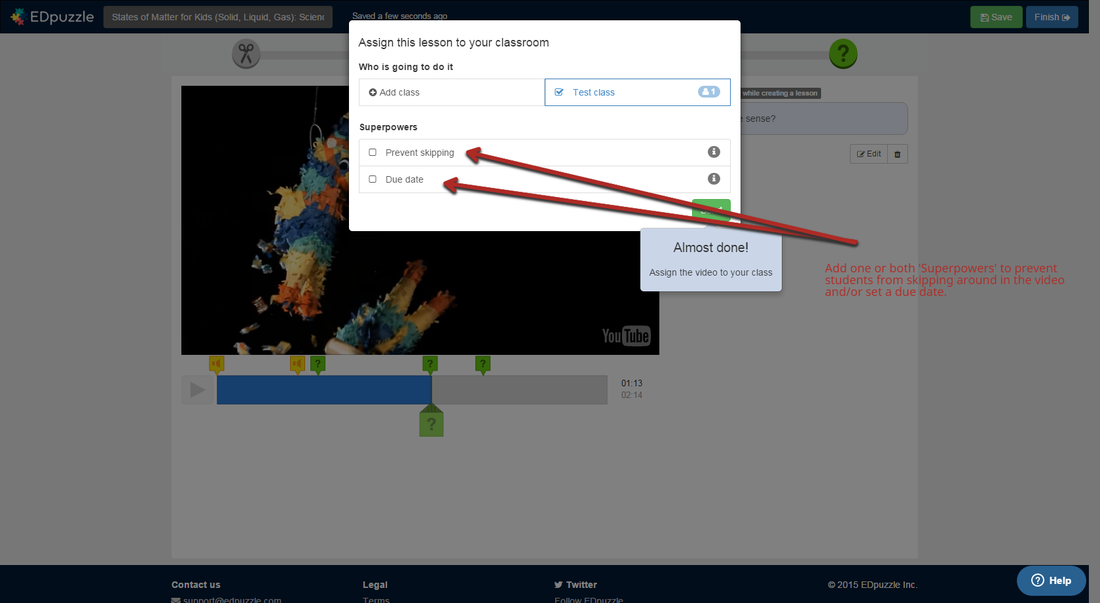
No teacher has enough time in the school day to teach everything, so make sure you're taking advantage of great free tools out there like Edpuzzle to easily flip the classroom and customize learning for students in a variety of ways that can best meet their needs. Comment below any great ways you've used Edpuzzle or any other useful flipping tool.
 If you're like me then you always come up with a bright idea right when it's needed most and wish you had the foresight to put something in place ahead of time. If you haven't checked out IFTTT.com yet then you are doing your productivity a disservice. If This Then That is a web tool that allows you create "Recipes" for a multitude of processes including web services, apps, android and iOS notifications, and email. I was introduced to this tool from James Sanders when he was presenting a GAFE session on how to create problem-based learning for students.
Countless numbers of recipes can be created when you sign-up for an account with IFTTT.com and then let the fun begin. On the site they are divided into DO and IF recipes. DO recipes let you create a process you control like quickly adding events into your calendar. IF recipes let you create processes that run in the background like automatically saving Instagram posts into a dropbox folder. The site provides an easy search function as well as galleries and channels containing hundreds of suggested recipes you could spend all day browsing. Once you get the hang of the process you can even start to create your own recipes that are tailored specifically to your exact needs. One recipe that I use all the time is creating an email alert when iOS or Android educational apps go on sale or become free. One thing I think all educators are looking for is great, FREE tools to help them and their students. It's so convenient to have a daily digest sent right to my inbox and then be able to vet the app and share it out with other educators. Recipes can be made to retrieve photos or information on NASA activities, you can collect and read current event headlines from NPR, even keep track of the U.S House and Senate voting record. This list goes on and on and they are adding new ones all the time. Do yourself a favor, create an IFTTT account and start finding amazing recipes to make your personal and professional life more automated, organized, and productive. |
About EvanDirector of Technology for Traverse City Area Public Schools. Level 2 Google Certified Educator. Former Tech Integration Specialist and 4th grade teacher at Aspen School District and Spartan for life! Go Green! 
Categories
All
Archives
February 2019
|

 RSS Feed